Portable Professional Fume Extractor

This project focuses on developing an open source professional-level portable fume extractor around an existing early 2000s server fan. I began development about 6 months ago when I was debating which fume extractor to get for my personal electronics lab. I was a bit hesitant with the affordable ones on the market as they all looked like cheap PC fans in a fancy enclosure with simple spray carbon mesh filters. I happened to pick up a large centrifugal fan in ewaste a few years back when I was in college. It killed me to see it get thrown out and I kept it for future reuse. Well, that fan turned out to be the perfect platform to make a portable fume extractor.
The goal of this product is two fold: to make high filtration solder fume extractors financially accessible to anyone and to remind both common folk and designers that ewaste should be treated as a second-hand parts bin, not as ready-for-landfill.
I am very committed to bring this project to completion as it directly impacts a field that I hold dear: health and safety. It is still commonplace to hear technicians and engineers brush off solder fume extraction as a petty problem and say things like "I don't mind the smell" or "I've been doing it for years and I'm still kicking." This needs to change. A personal goal of this project is to put higher quality filtration in the hands of more people. Through the reuse of ewaste, I can make this happen.
Large high performance centrifugal fans are not cheap by any stretch and this project would be impossible to keep affordable if I specced out a new fan. Without the lavish implementation of the IBM vortex cooling system, this project would not have been possible. This is a hats off to the IBM engineers who specced out top-tier centrifugal fans to cool early 2000s POWER chips.
Unlike inexpensive fume extractors, this fume extractor doesn't use any run-of-the-mill PC fan. It's based on a 110w ~500CFM backwards-curved blade centrifugal fan with loads of static pressure and retails for ~$201 on Digikey and $225 on RS. Here is a datasheet directly from ebm papst. This fan is no slouch and is easily comparable with fans used in the commonplace Hakko and Pace units. Depending on the model, this unit even exceeds the specs of some professional fume extraction units. How else does this differ from other DIY solutions? For one, the filter. This unit uses legitimate off-the-shelf dedicated HEPA and activated carbon based filtering material. The filter is user serviceable and can be refreshed with filtering material that can be purchased from big-box stores and large retailers.

What also sets this extractor apart is the fact that this unit runs off drill batteries. I am designing adapters for the Dewalt, Milwakee, and Makita system, and will expand compatibility based on demand. I aim to replicate the performance of professional extractors like the Hakko fa-430, Pace Evac 200 and various alternatives with this fume extractor. As with any health related product, research and testing are a major challenge. I want to make sure I am sourcing the correct and appropriate filtration material for the end user to maximize extraction efficacy. I believe I have the right basis for the design, and the material I have selected looks to be promising and near identical to the professional filtration materials, but it would be ideal to have tested and or simulated proof.
Since this product is so heavily dependent on ewaste (I am even reusing a dell laptop power port cable) I am open sourcing the entire thing. I'm still working on the PCB design revisions, so those won't be posted until later on. The financials for each unit have not been solidified, as I am still in the process of acquiring new old stock and ewaste fans and I don't want the pricing on these to skyrocket before I acquire enough supply, but I expect to reach a price point of 1/4 to 1/5 the price of professional solutions. The highlight for this project, for me, is the fact that I am using ewaste recyclers that inventory old computer parts, as primary source suppliers. I can't get over that.
Early Mockups and Research
With the beginning of any new project, it is easy to get carried away in the lime-lite of a new idea and sail off into the sunset of potential possibilities. I like to take a grounded approach and start off with physical mockups to see if my idea is actually possible in 3D space. I placed the fan around my lab bench and got a good feel of the size, weight and volume of it. Is it too big? Is it too heavy to move? Is it cumbersome? The physical use and interaction between a user and a product are sometimes the most important aspect of the product, not just its intended purpose. Yes, cardboard boxes work great for props!
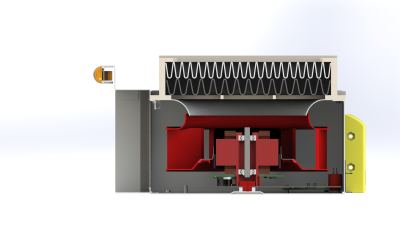
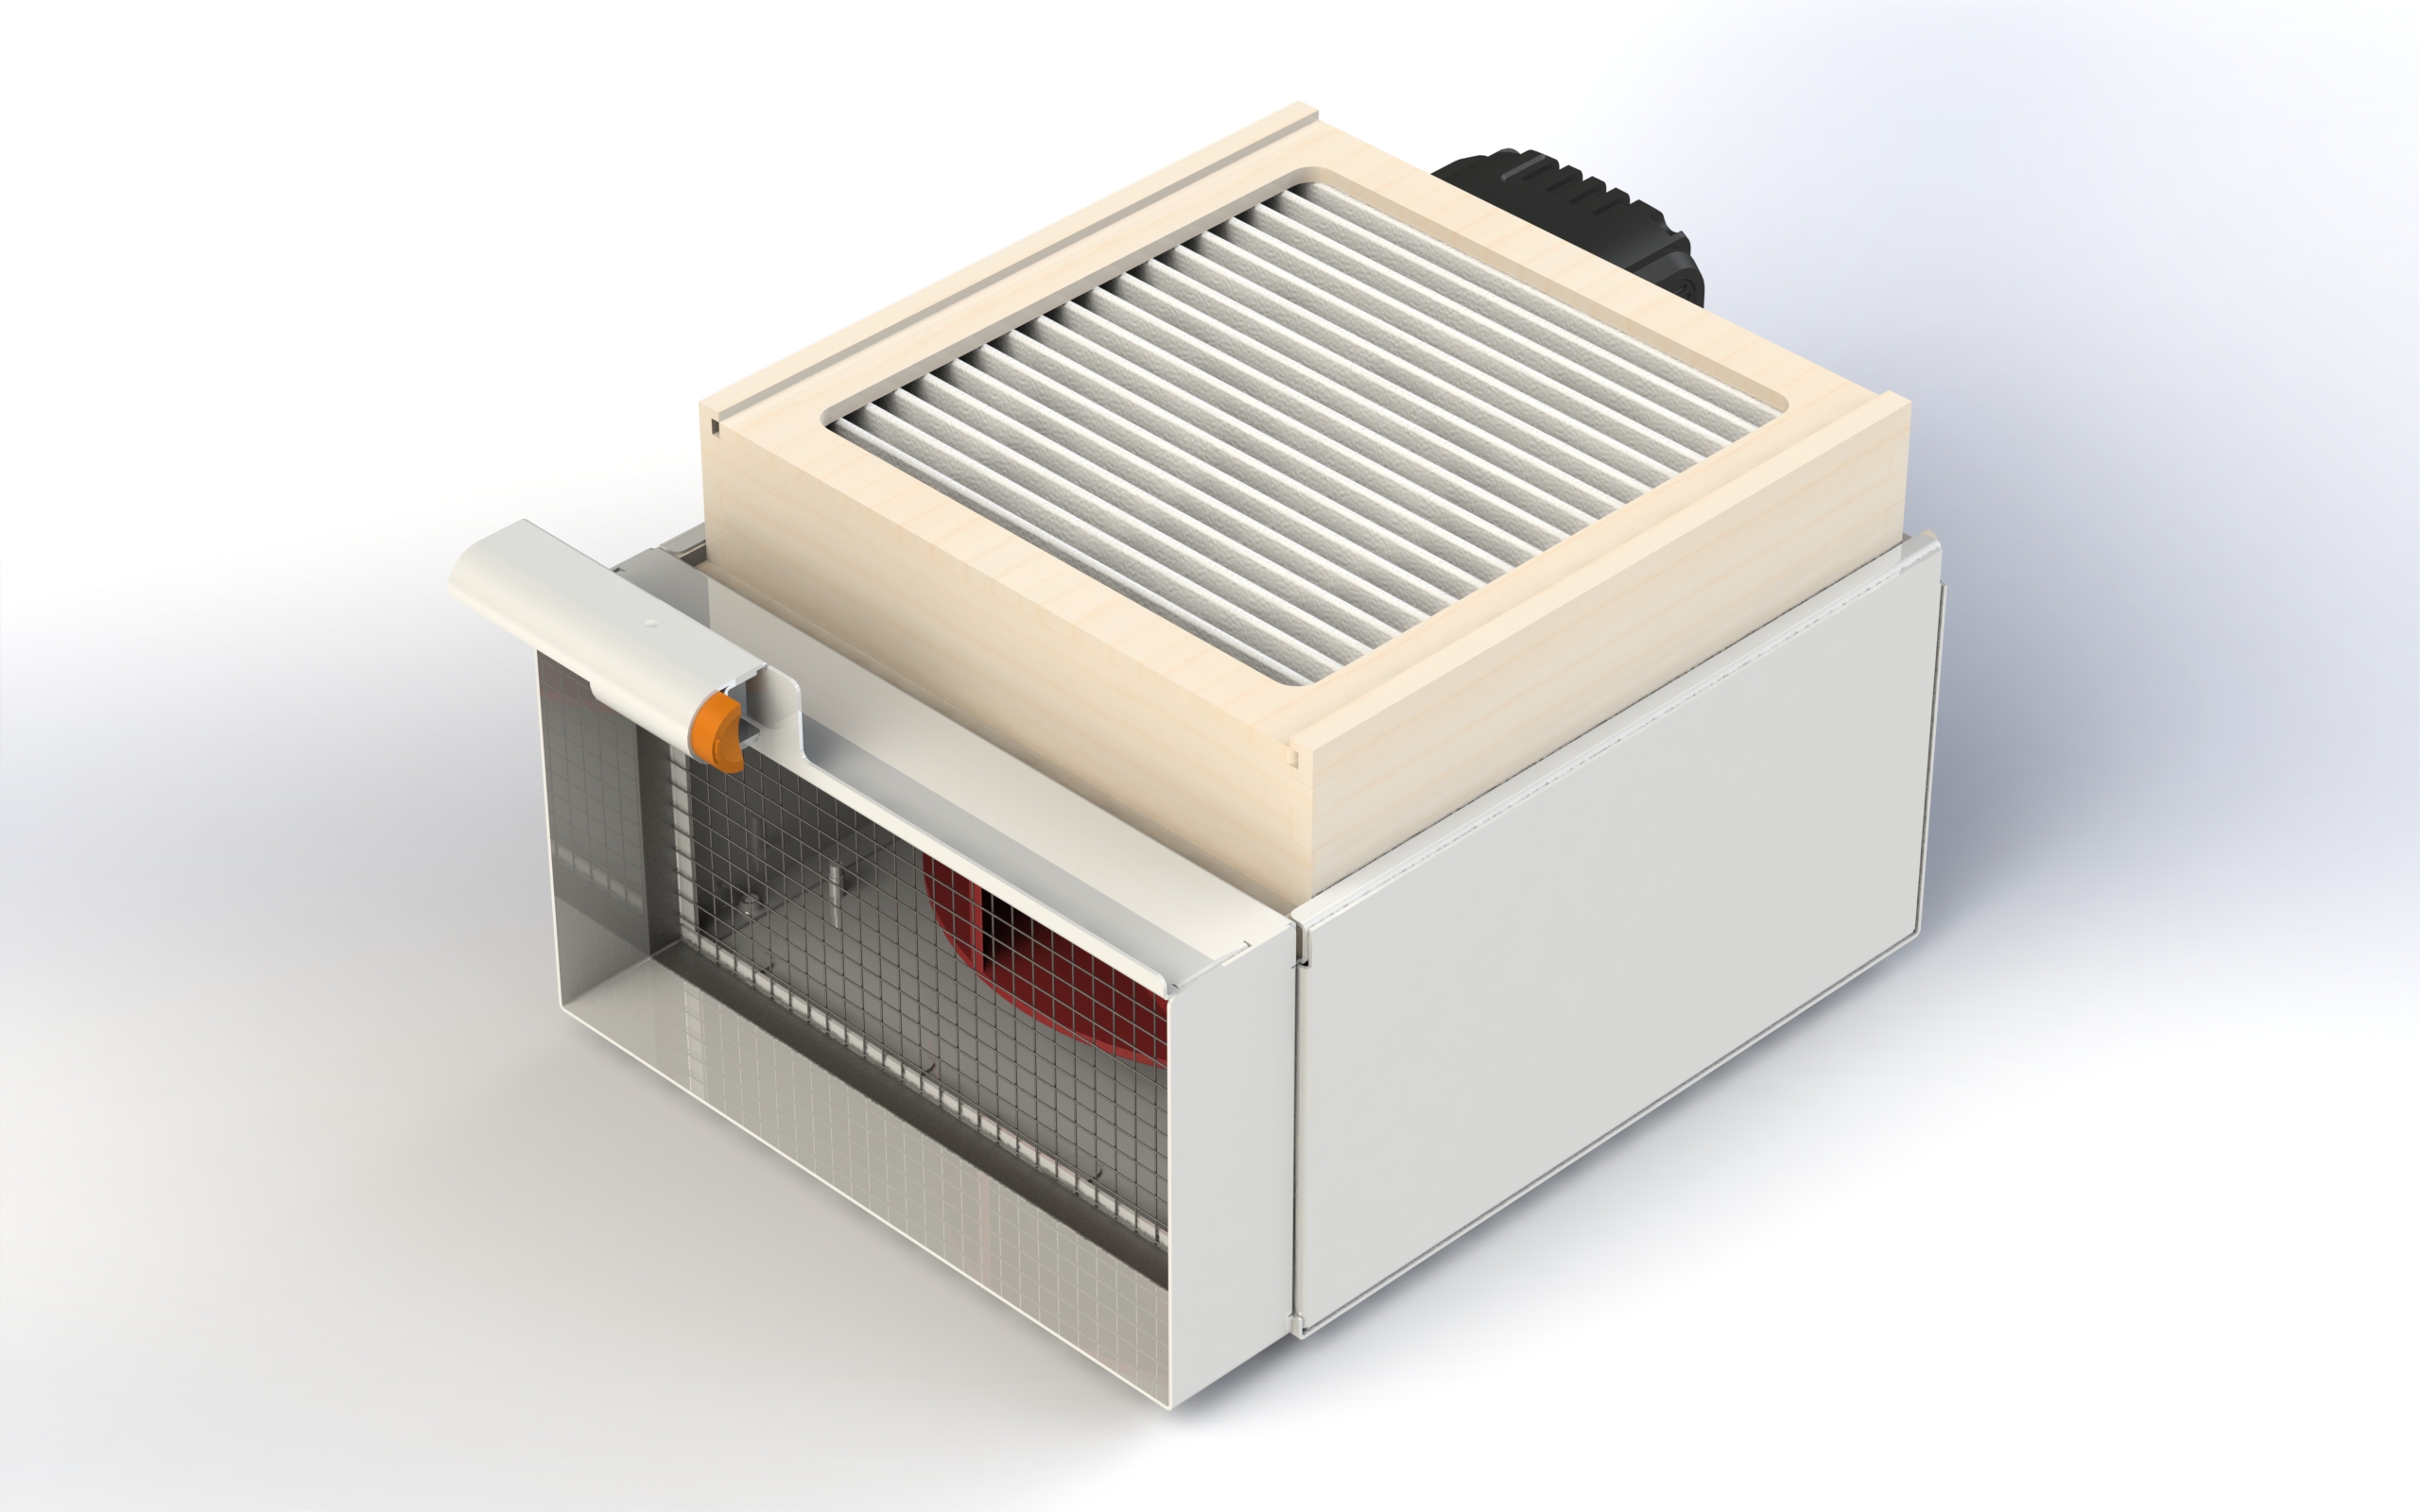
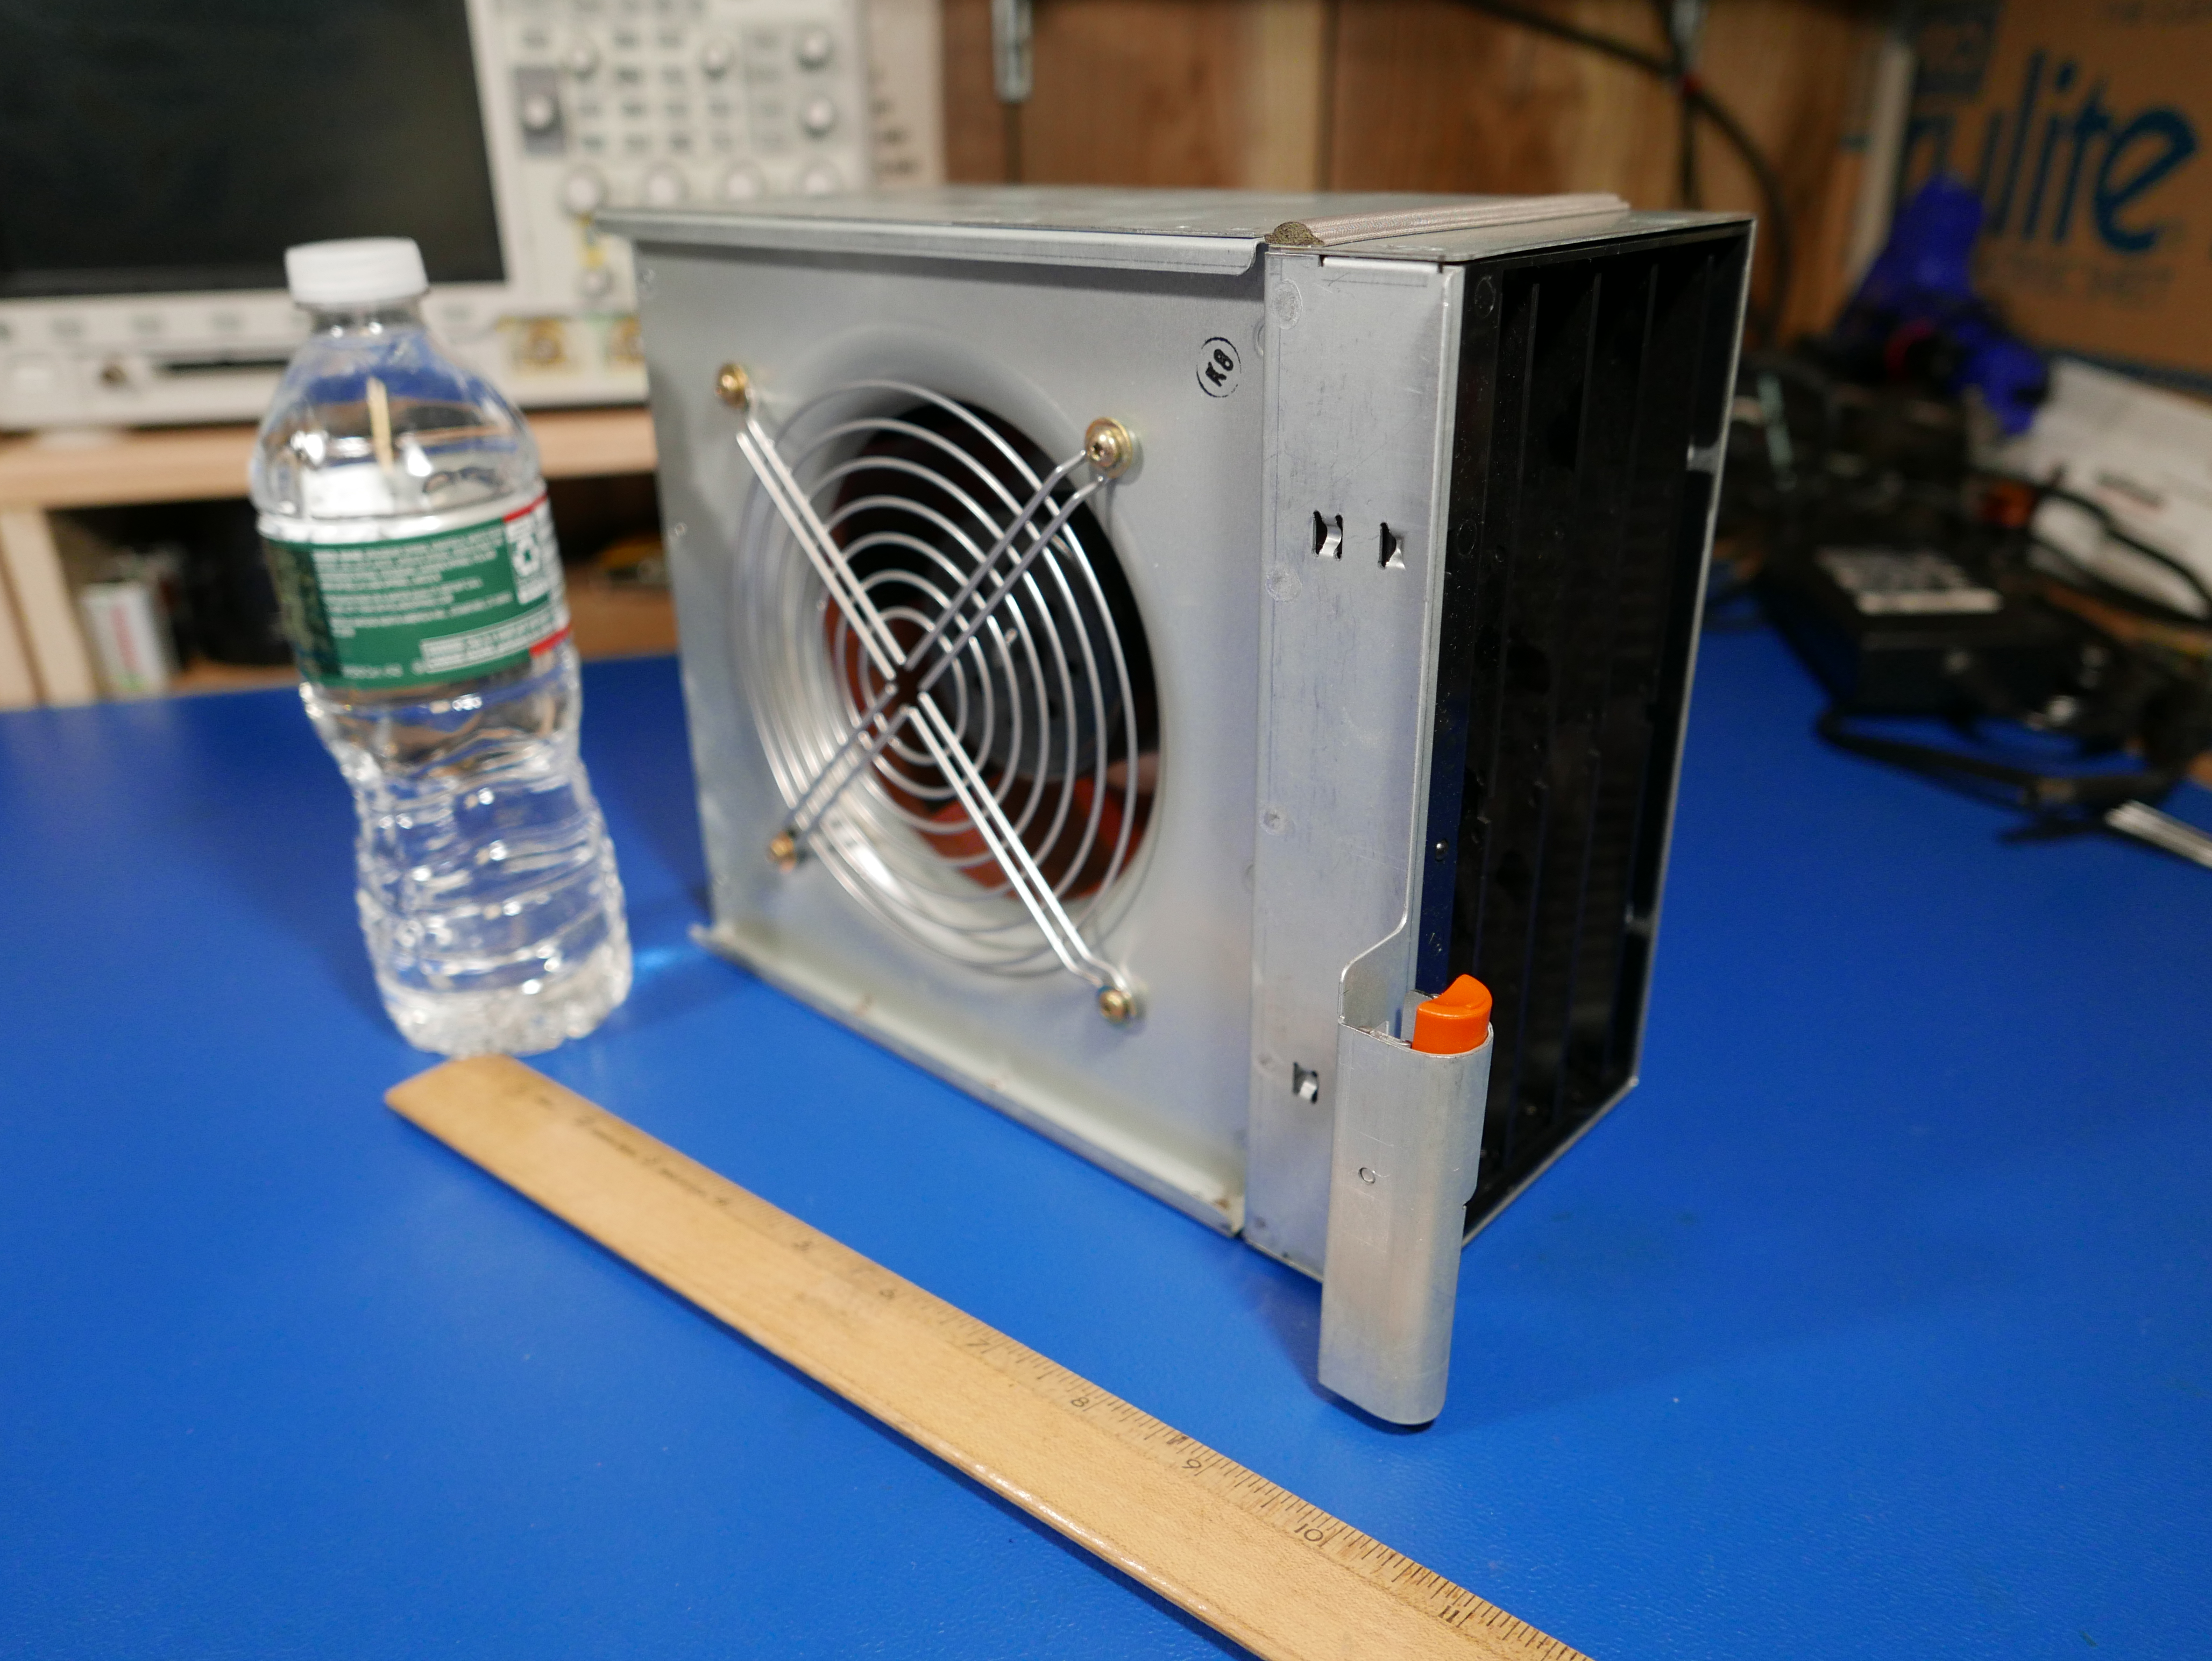
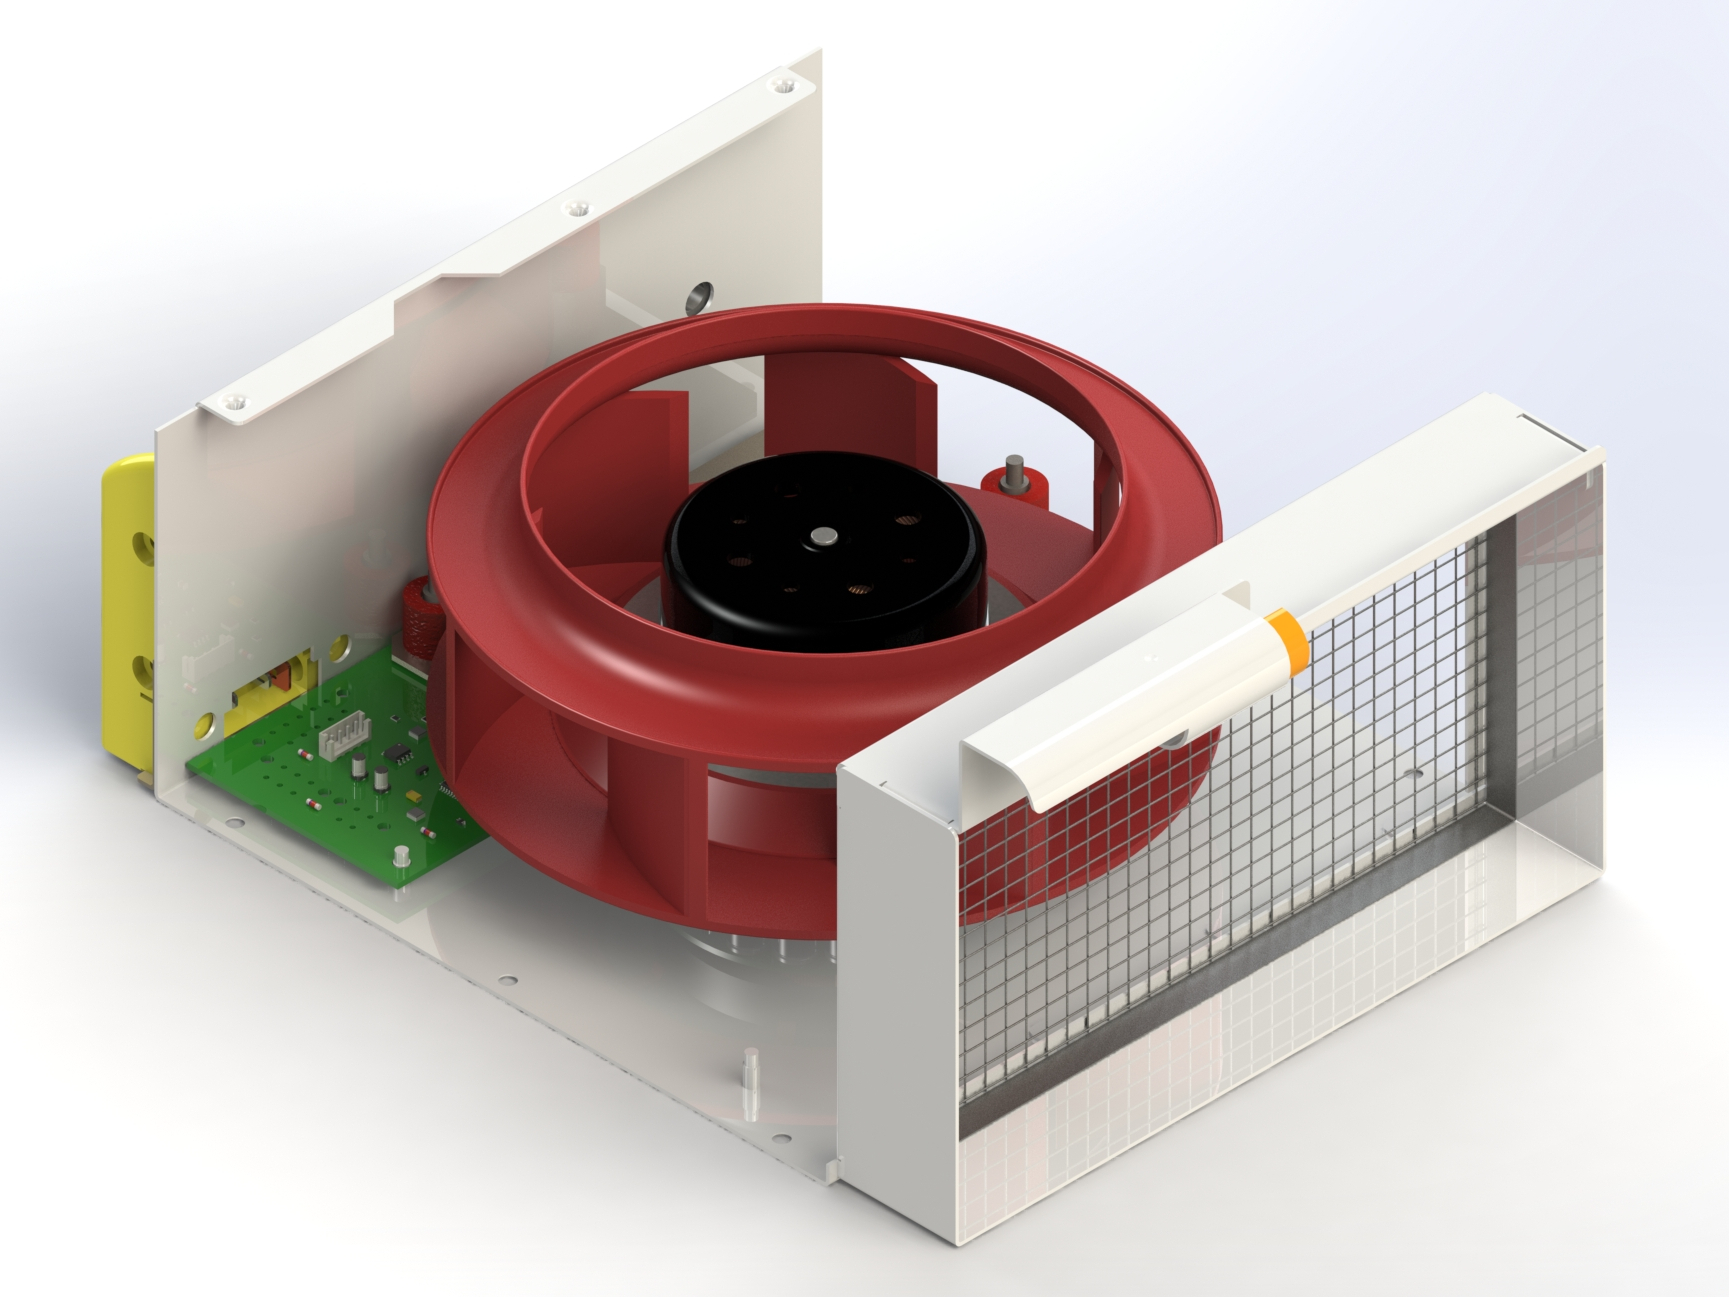
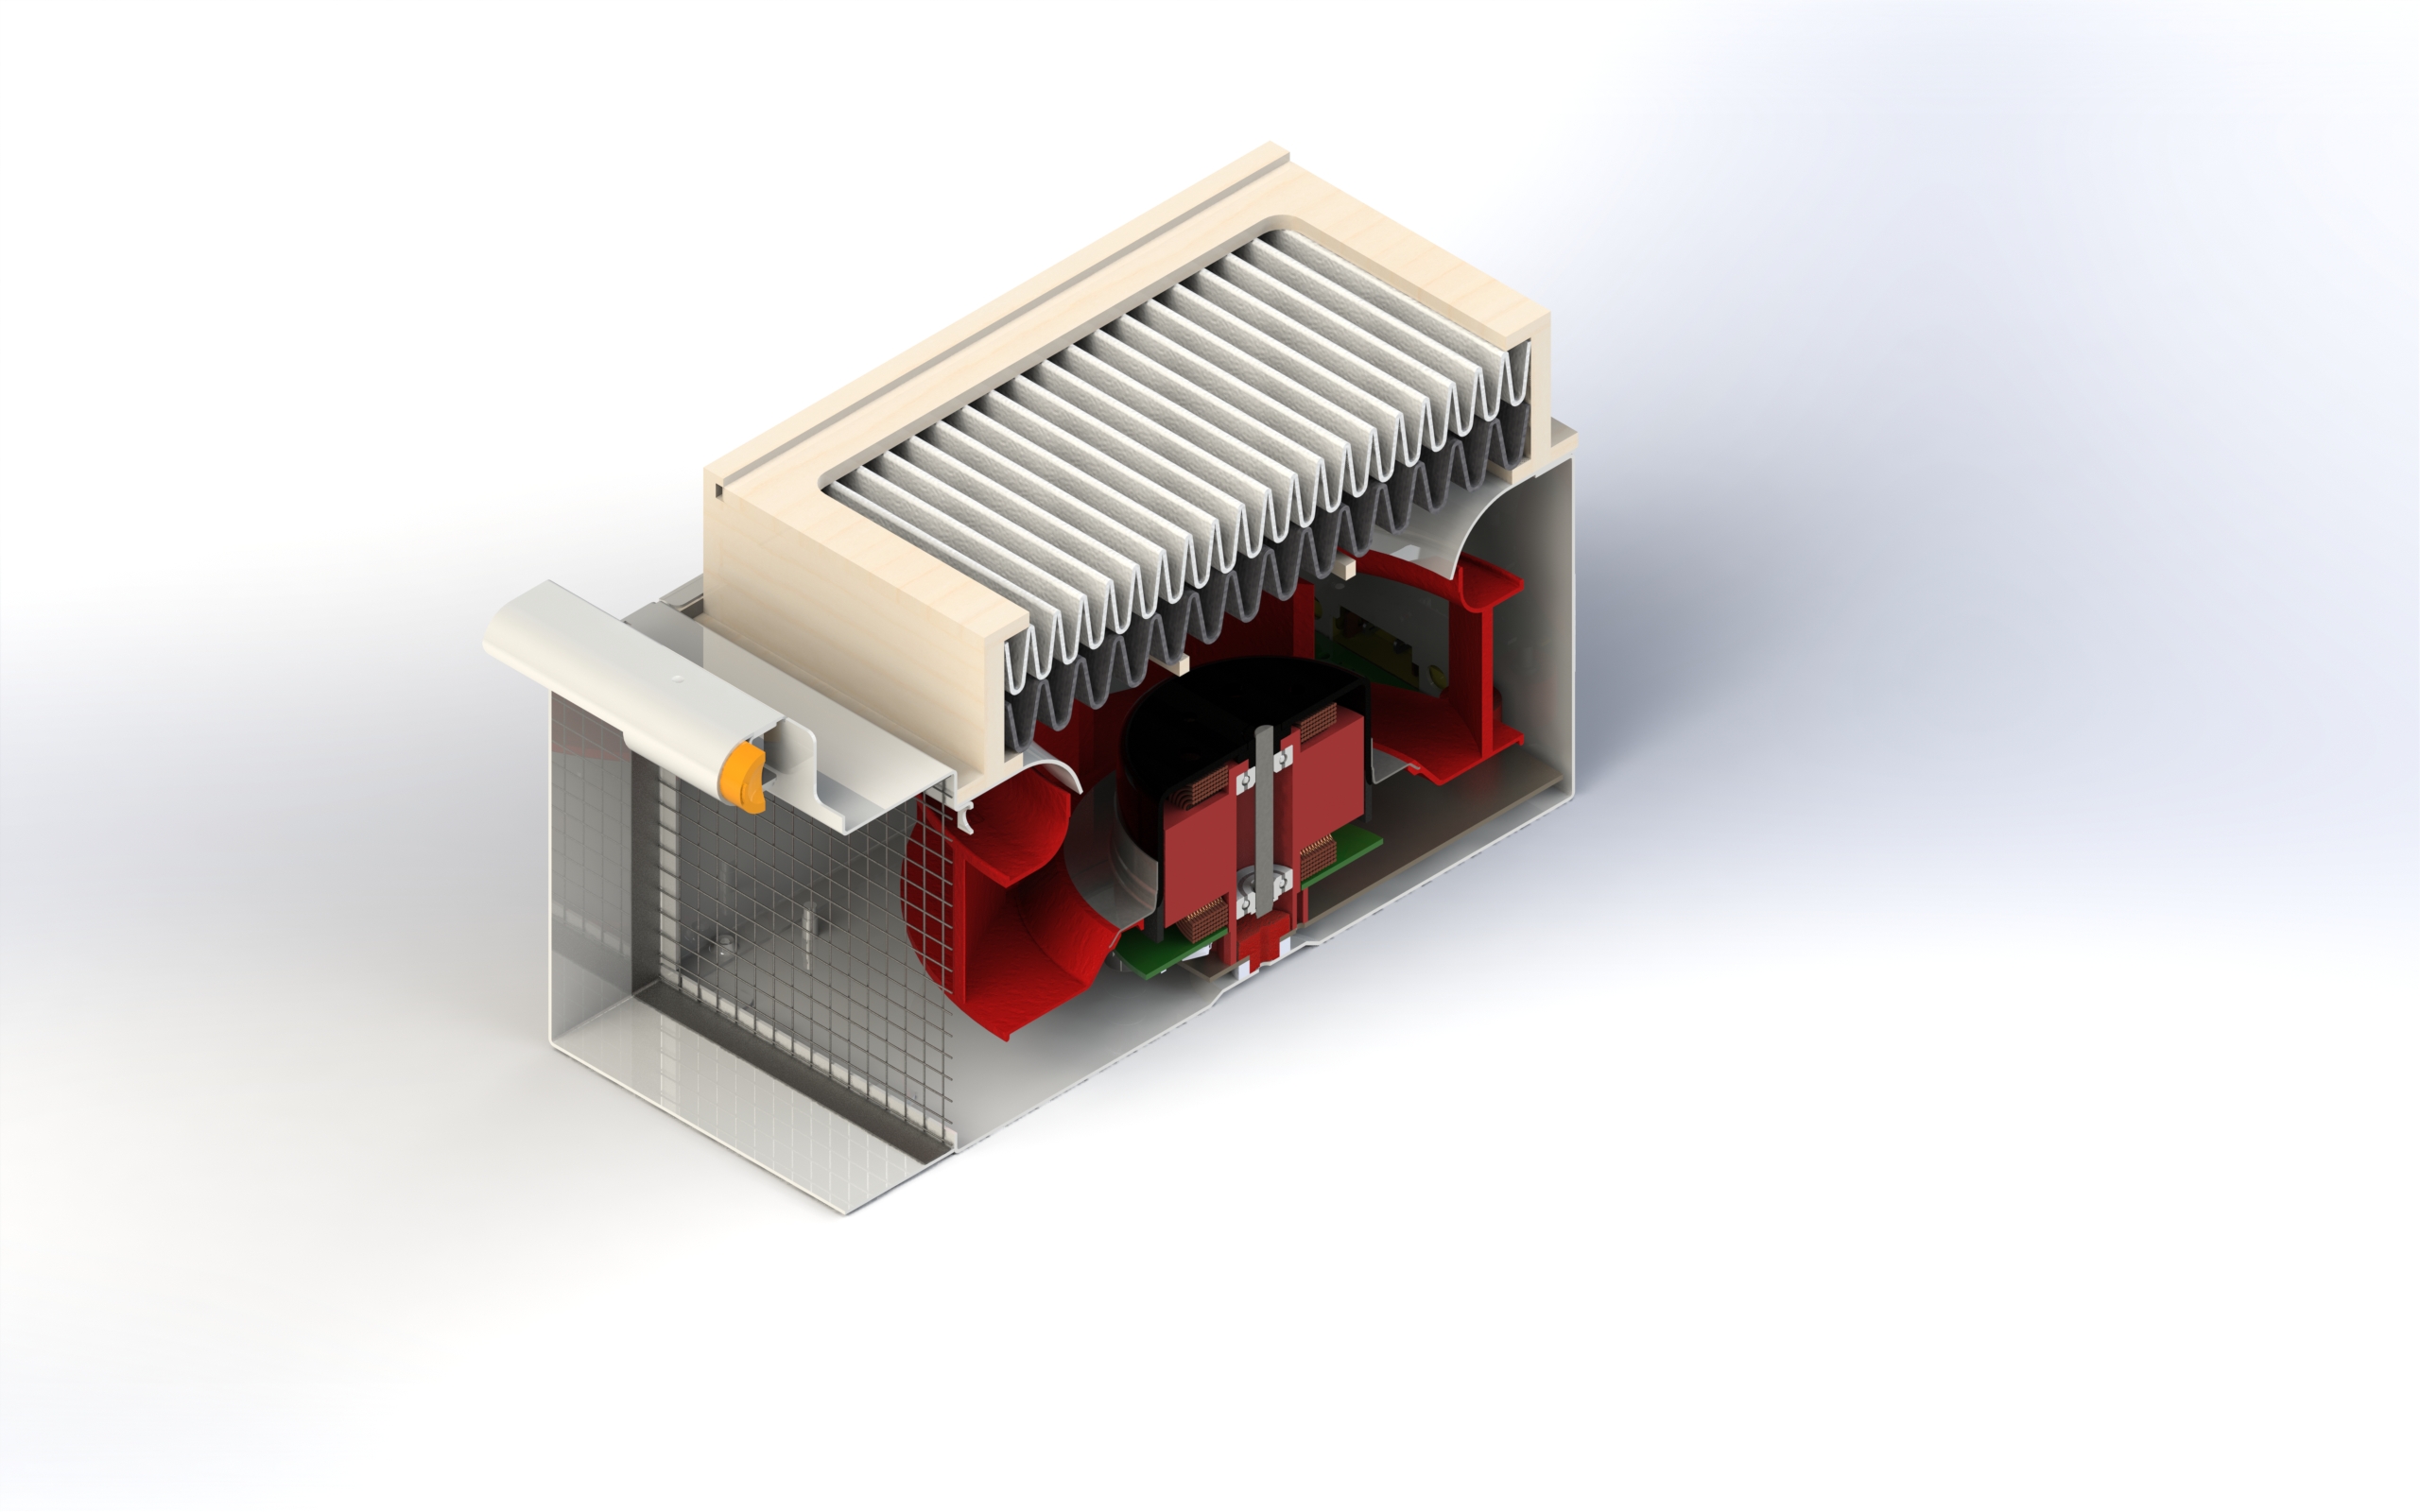
In this case, I found the IBM server fan to be perfect for a fume extraction application not just because of the excellent EBM Papst fan, but also because of the glorious integration of a cartridge-like design. The fan features a fully enclosed sheet metal shell with integrated edge rail shelf, allowing for a tongue-and-groove like fit for potential add-ons, like, say a filter. A cleverly designed filter tray could take advantage of this joint and sit snugly on top of the fan yet below the shoulder, with nearly zero play. The overall size also felt right. The fan enclosure stands slightly taller than a water bottle and about the same in width and 4 inches in depth. Of course, I was after a happy medium. I wanted to keep the extractor to as small of a footprint as possible yet retain an easy level of assembly and practicality.
With these critical first questions answered, it was time to do some research. This involves spending a lot of time looking through product photos and searching for teardowns or broken items on ebay so I can find more details or perspectives on a device. After a bit of research, I found that yes, centrifugal fans were ideal for fume extraction because of the higher level of static pressure created by transforming the air than a traditional axial fan. Through some ebay searching, it turns out the high end fume extractors all use varying forms of centrifugal fans. After sifting through product pages, I found that the specifications of Hakko and Pace units closely matched the centrifugal fan found in the IBM server fan. Here is an image taken from an ebay lising that closely shows the Hakko fan and Pace fan.
Feature Selection
One of the key points that pushed me to make a custom heavy duty fume extractor was the fact that there are no professional battery powered fume extractors available for purchase. I simply could not find any. There were DIY approaches that utilized alkaline of lithium ion cells, but I was after a more polished approach. In the performance class I was after, AC fume extractors were the only options. I wanted to use as common as possible batteries to run the fan, and a battery system that I could use for other intentions.

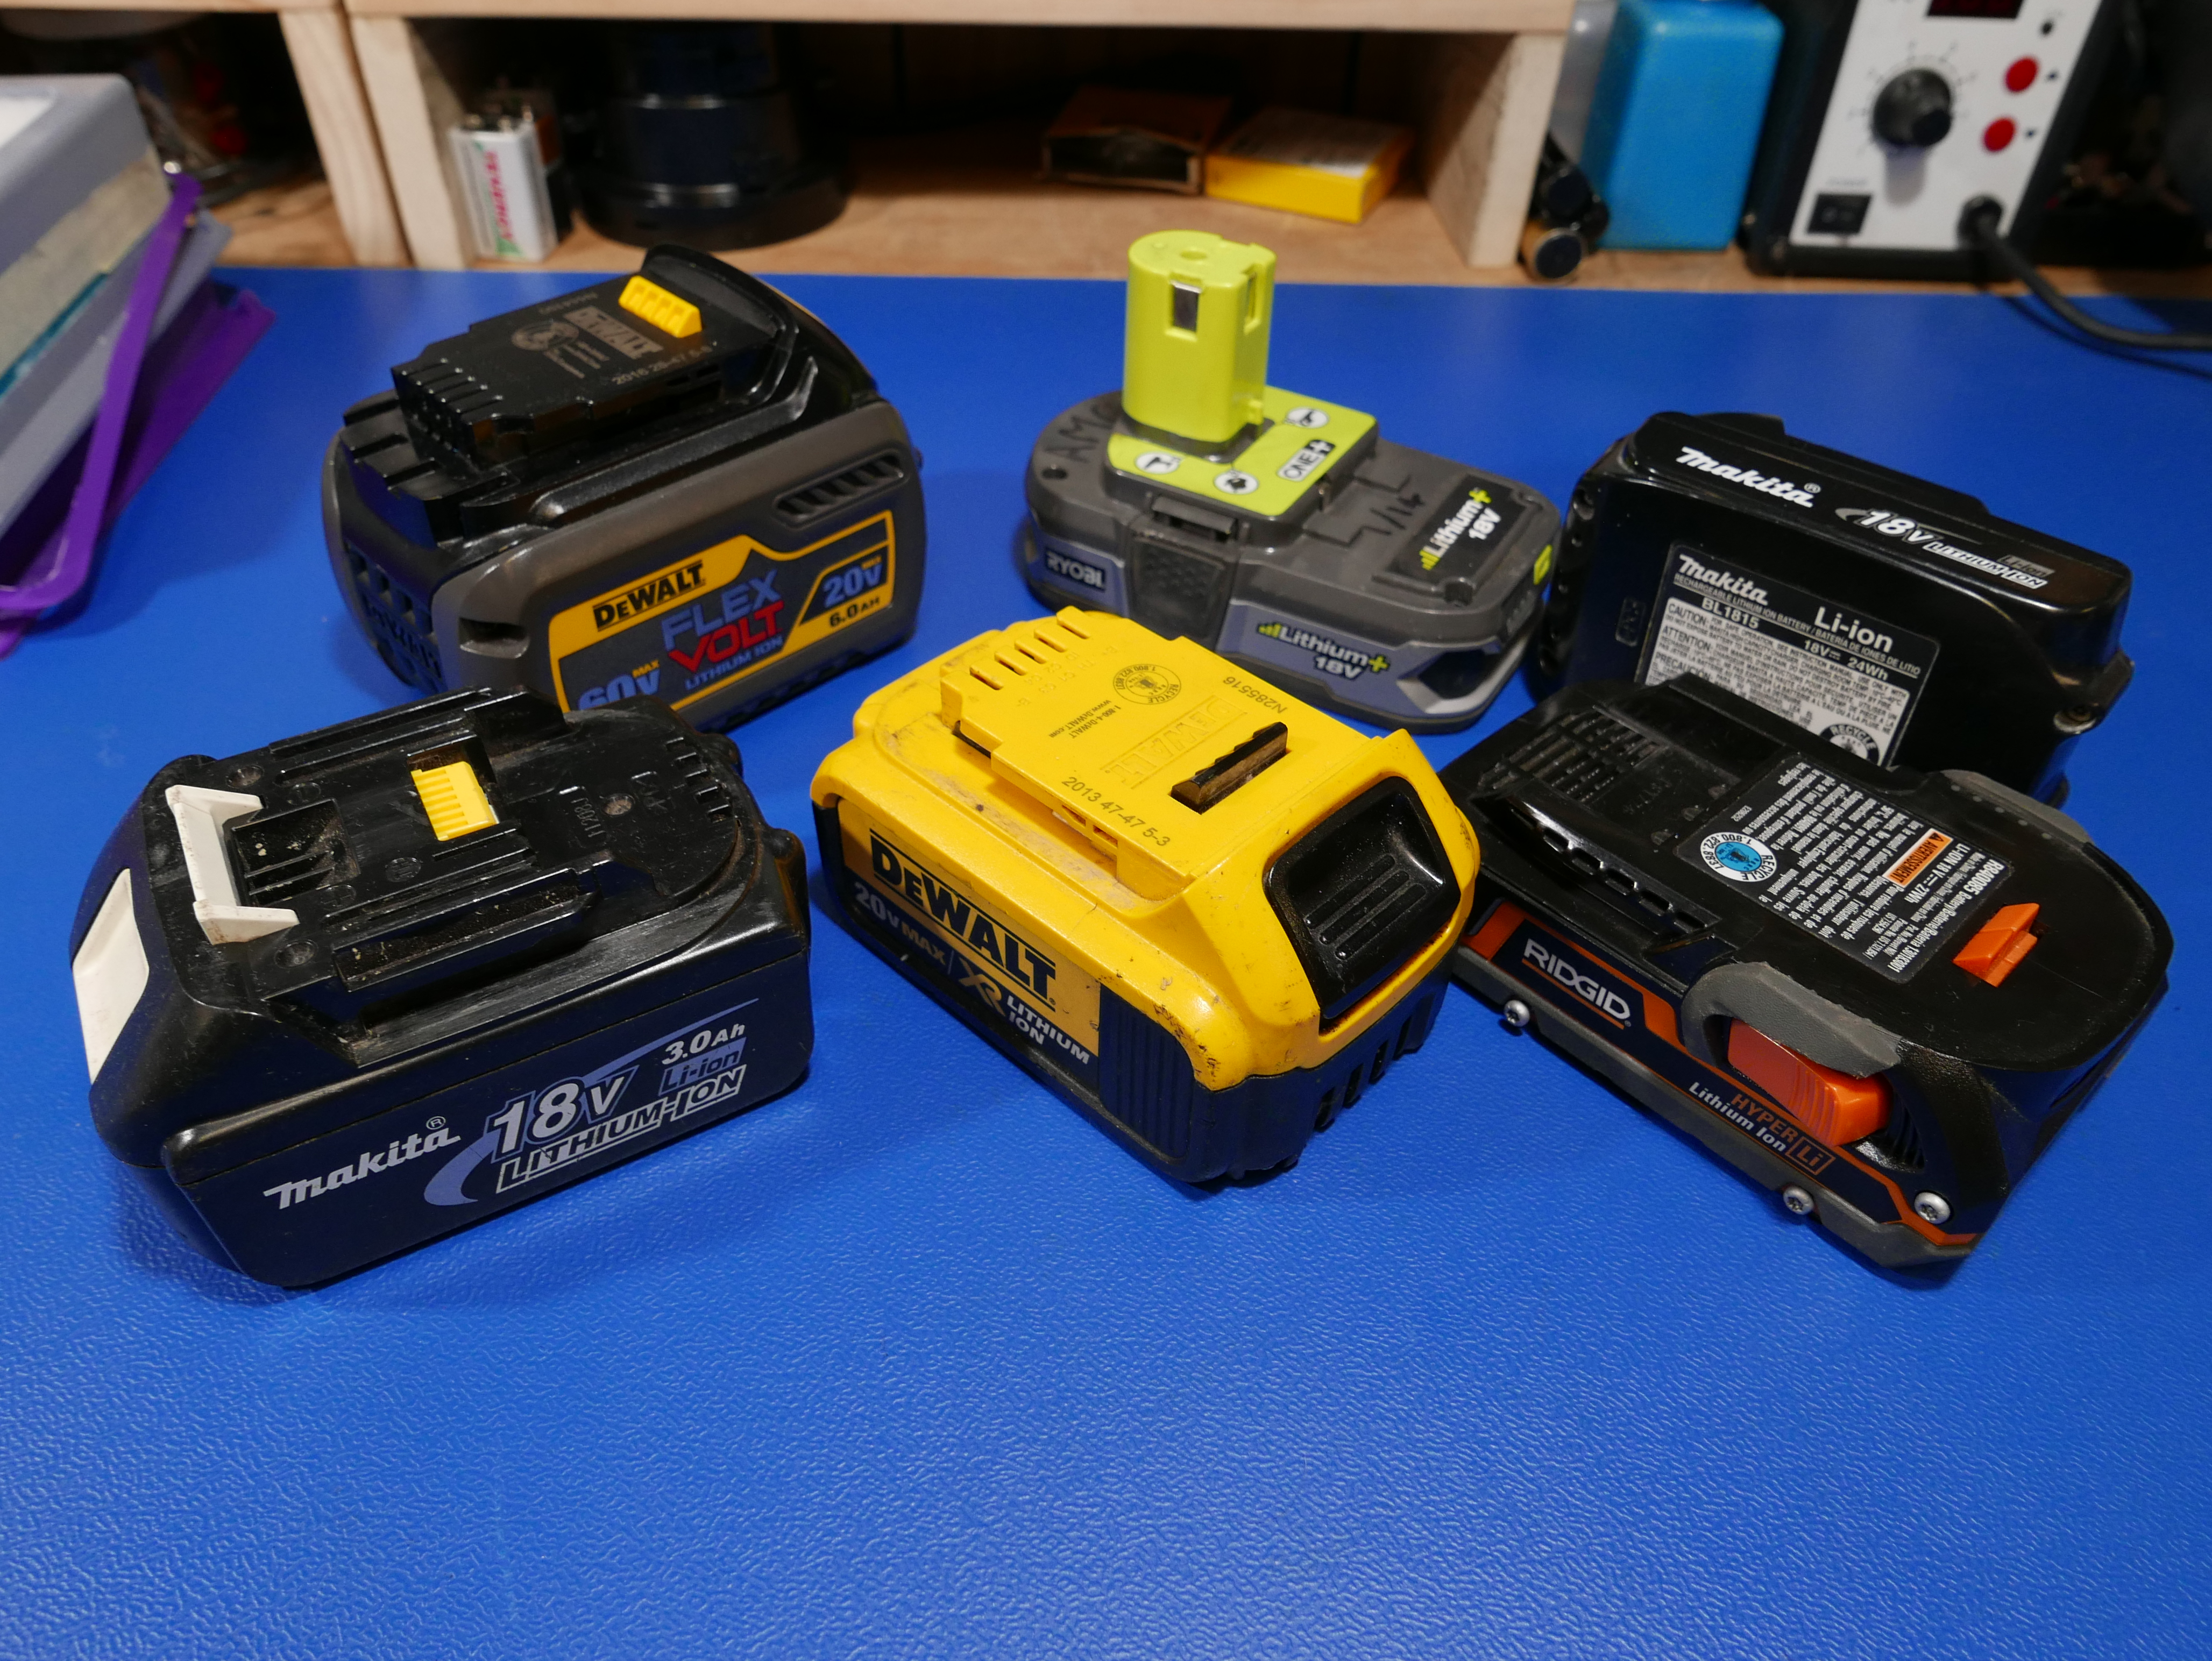
What unnerves me the most is having a custom battery for one device and one device only. It is a waste of resources since you end up having a bunch of custom batteries lying around, doing nothing and slowly degrading when you are not using the device that they were solely intended for. I wanted a fume extractor that could run on my drill battery. Modern electric drills feature a quick swap battery connection system that would be perfect for my application, so I chose to start with the Dewalt 20v system, as that is my main system at the moment.
As I went along my design process, I created a list of personal "must-haves" for a fume extractor. Features such as variable fan speed control, a swappable & rebuild-able filter tray and optional DC power supply were all within my sites. Feature lists can be tricky though. It is easy to start believing that, as a designer, a feature you want is a feature the consumer wants. This is not always the case and you can end up with some really disastrous results if you keep sailing on such a high-and-mighty design ship.
It is important to justify incorporated feature. The variable speed feature is critical because this will be sitting on a desk close to a user. A growing trend in electronics is for video documentation and adjusting decibel output of the fan is am absolute must. The replaceable and reusable filter is a nice option because it allows the long term operating cost to stay at an all time low, and doesn't milk the customer over time like the infamous printer toner model. Granted, this is not necessarily the best option in a business sense, but if you are motivated to get better filtration into more hands, it is a wise decision. The DC power supply addition is an easy addon feature that just incorporates extra value into the fume extractor at little to no extra cost. Since most drill battery systems are about 18V DC nominal, and almost every laptop known to man has been 18-20v DC for the past two decades, it is a no-brainer and easy addon. The choice of battery system is a cautious one as going with an unknown drill battery system without any other option can make the product DOA. A sweet spot is to support multiple platforms and give the end user the option to easily change, and of course, make it easy to change during assembly.
Filter Research & Selection
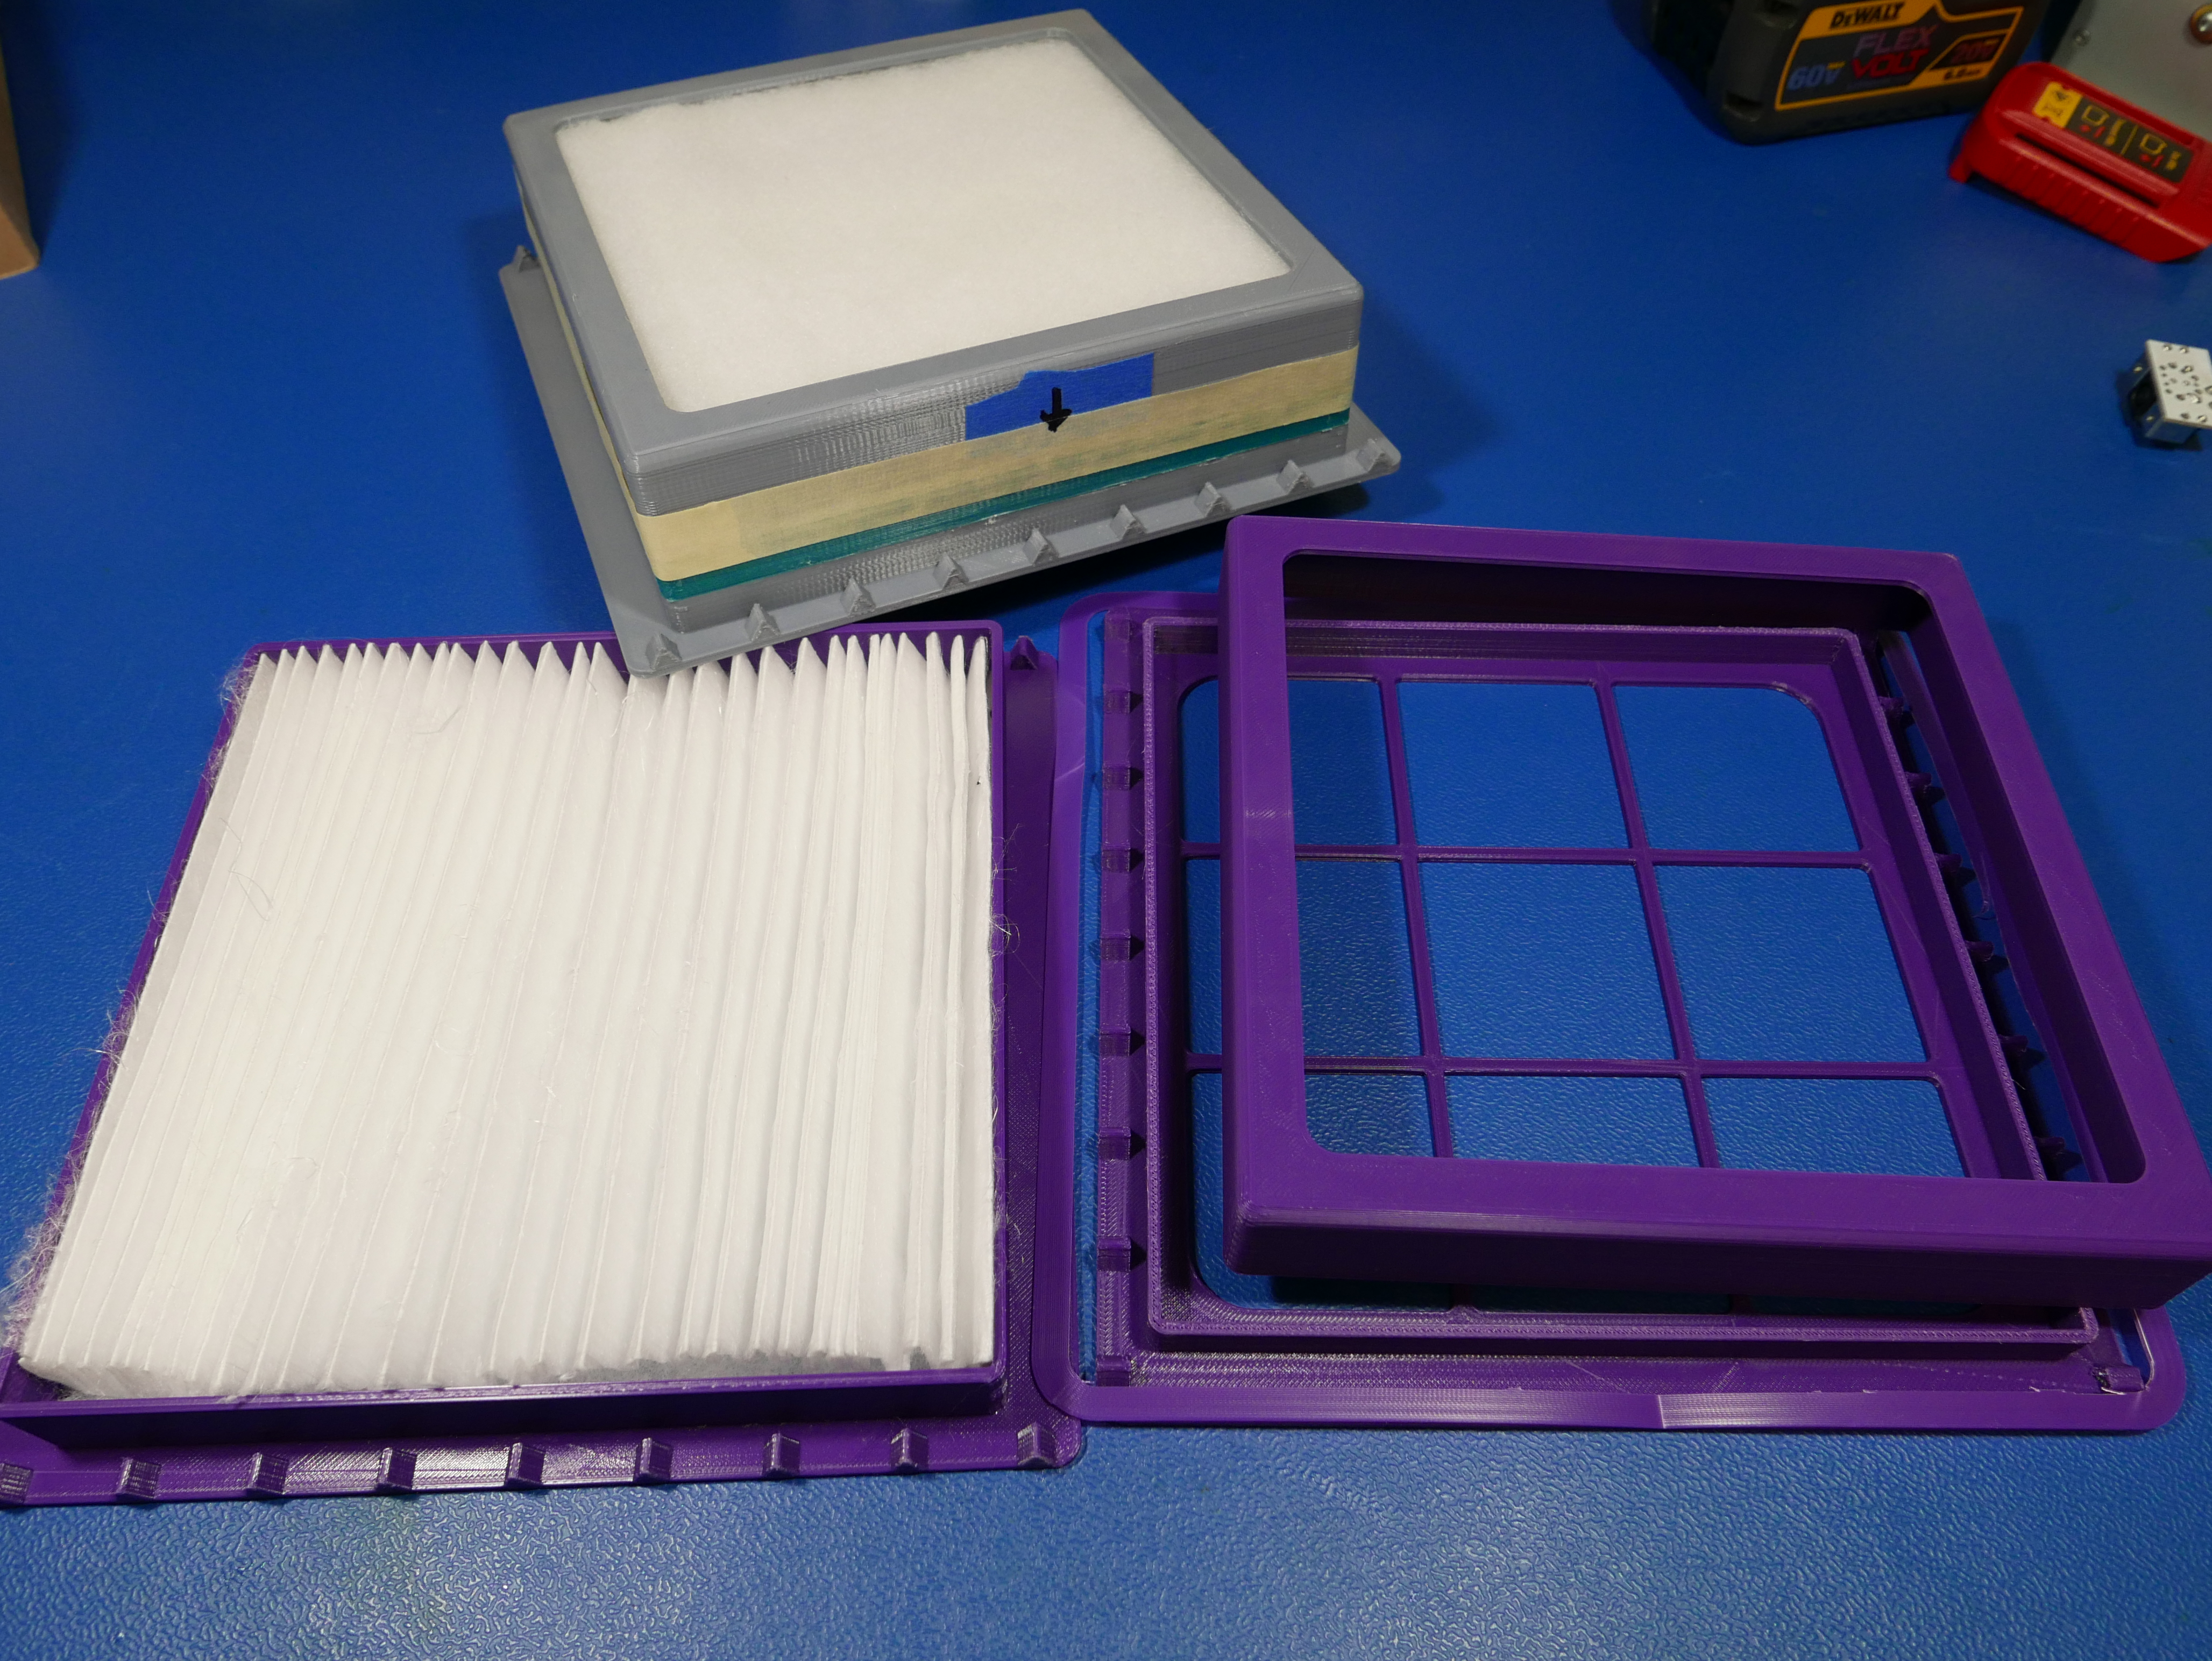
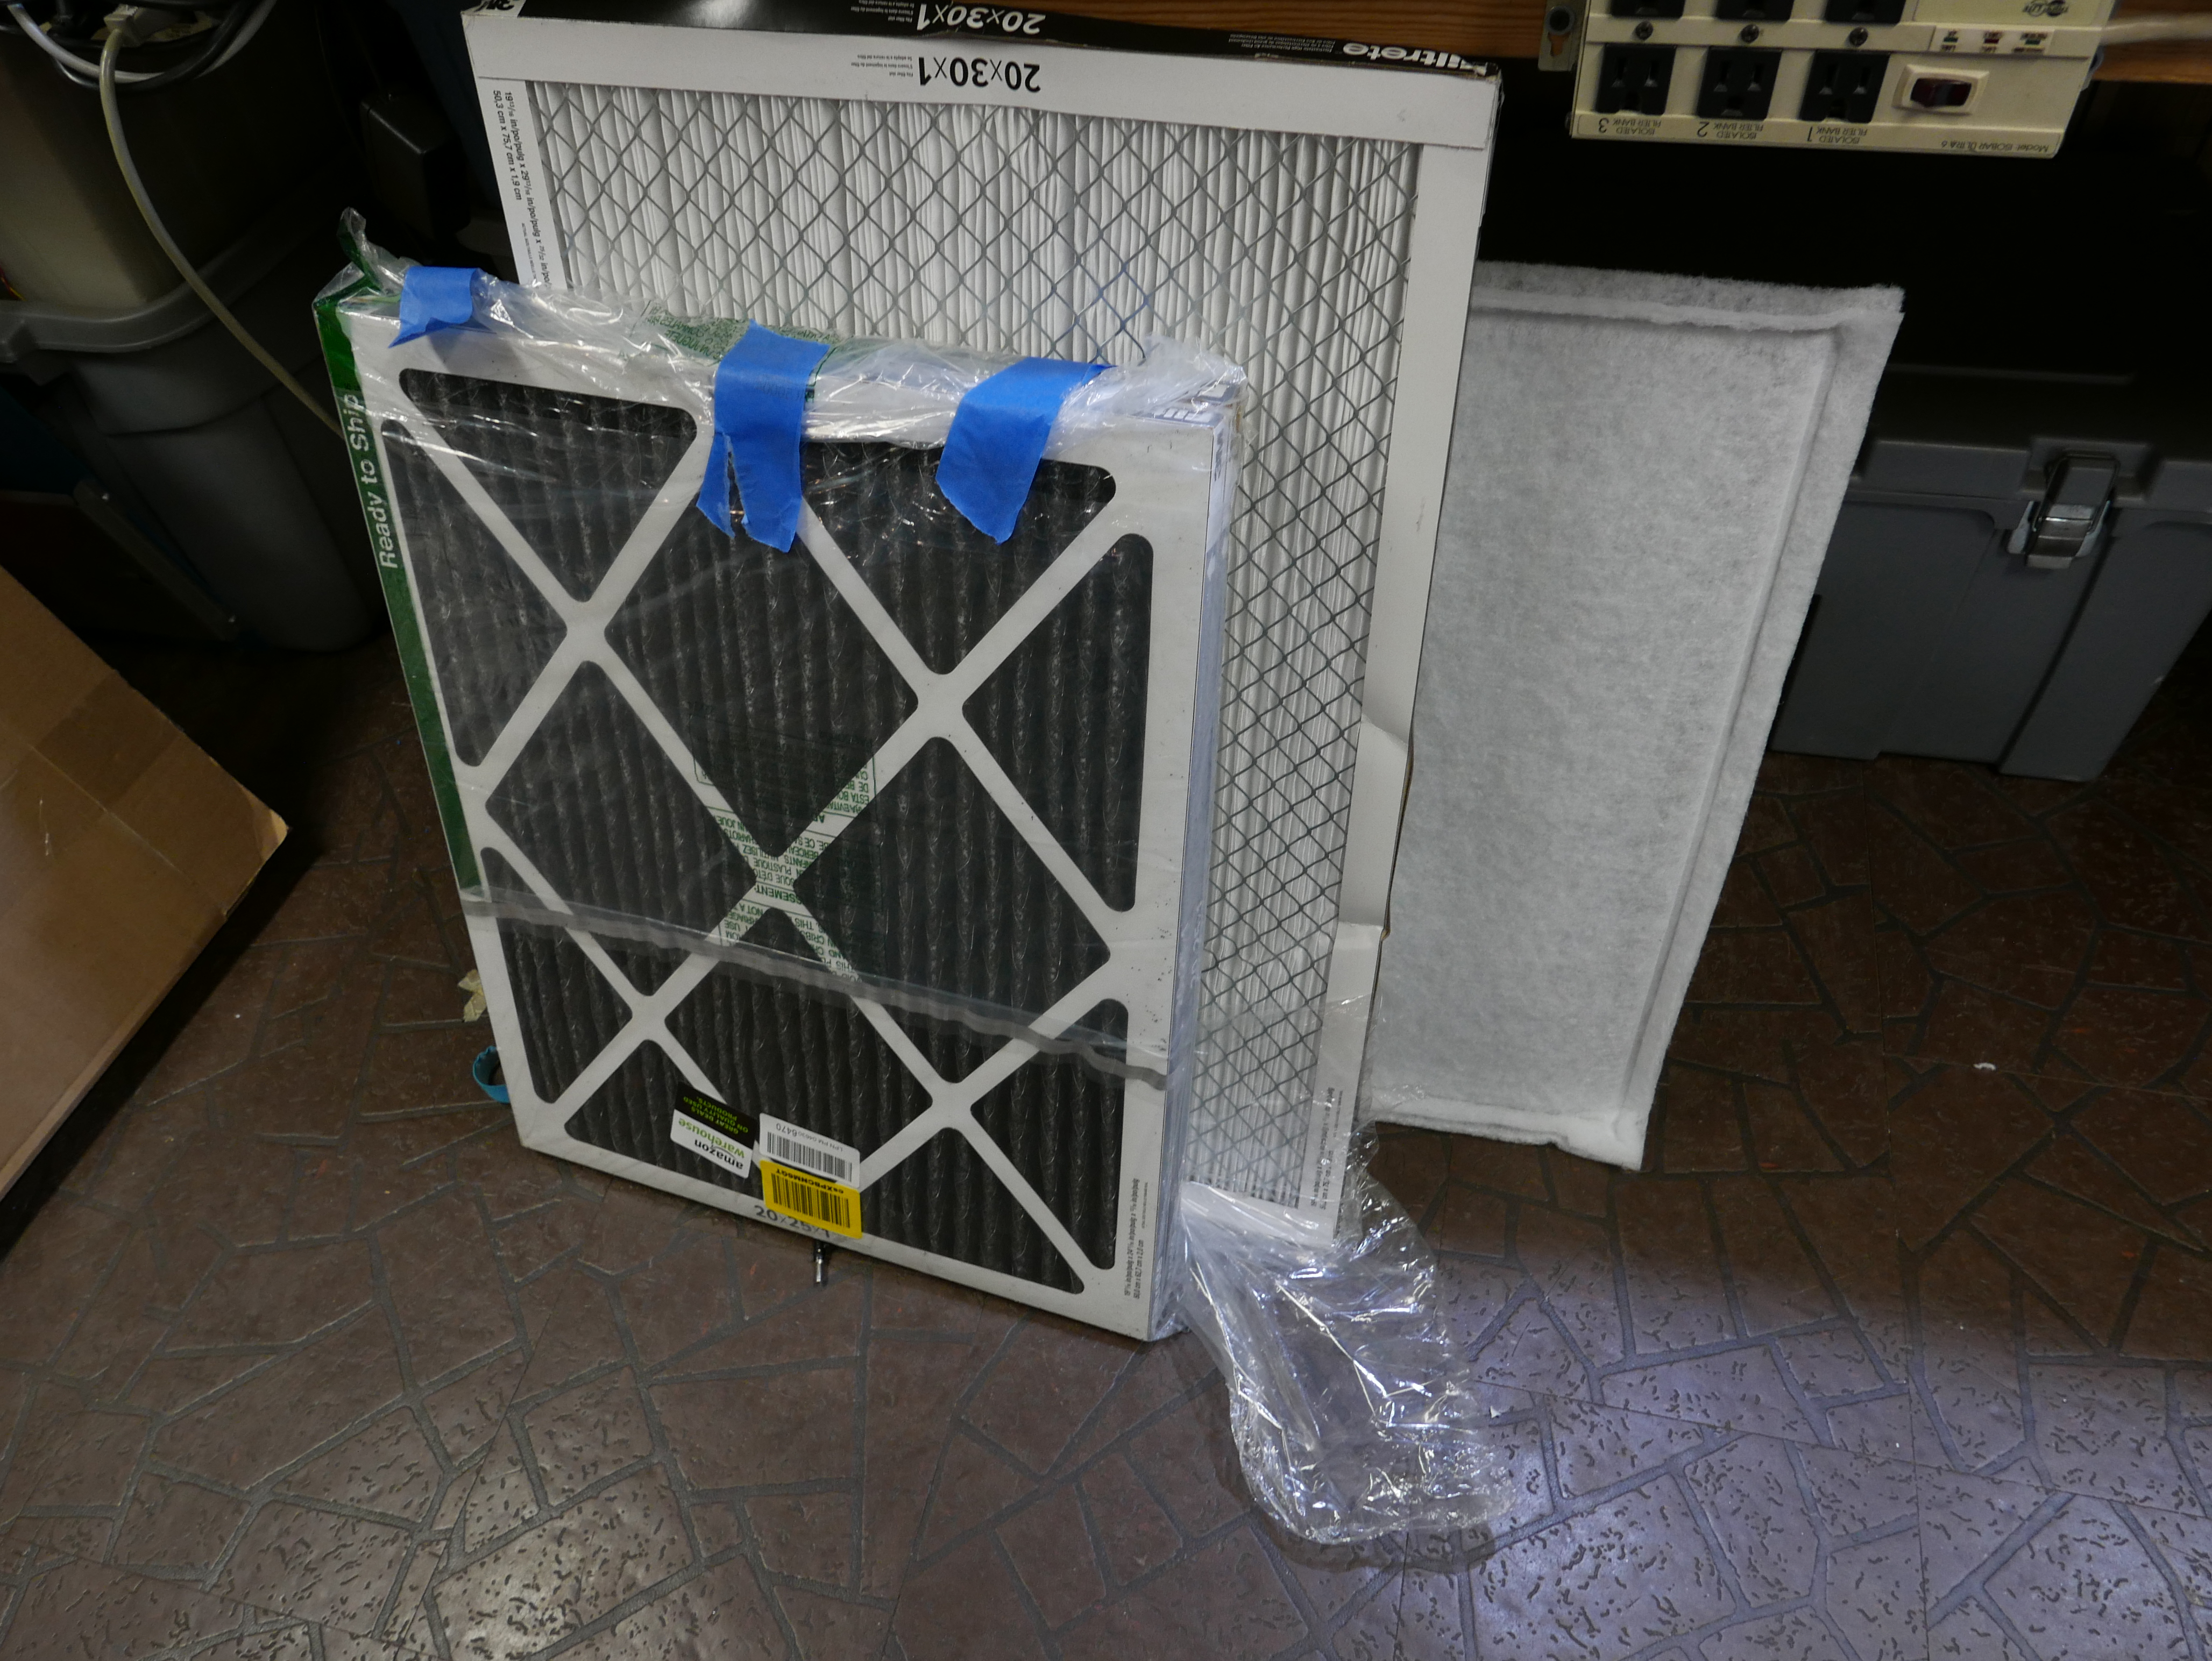
Knowing that the fan was capable of the job and having a clear line of reasoning, I set about researching filter material. I came across similar carbon foam / carbon mesh filters used in the low-cost fume extractors and oddly, fish tanks. It turns out the material is quite similar and can be picked up at pet stores, amazon and Walmart. I started by sampling different brands and vendors of this carbon mesh material. Each vendor and brand had a different texture, density and thickness. I was very unsatisfied with these results and went ahead and researched different filtering materials. I found out that activated charcoal was one of the main sources of filtration materials used in everything from stove top fume hoods to big factory scrubbers. Activated charcoal works incredibly well at trapping organic particles that would otherwise be considered IDLH (In Danger to Life and Health). The combination of an activated carbon filter and a small particle filter, such as a HEPA filter, would be an ideal setup for a fume extractor. It turns out, this is exactly the setup found in most high end professional fume extractors. I purchased a new in box filter from a Hakko FA430 for confirmation.
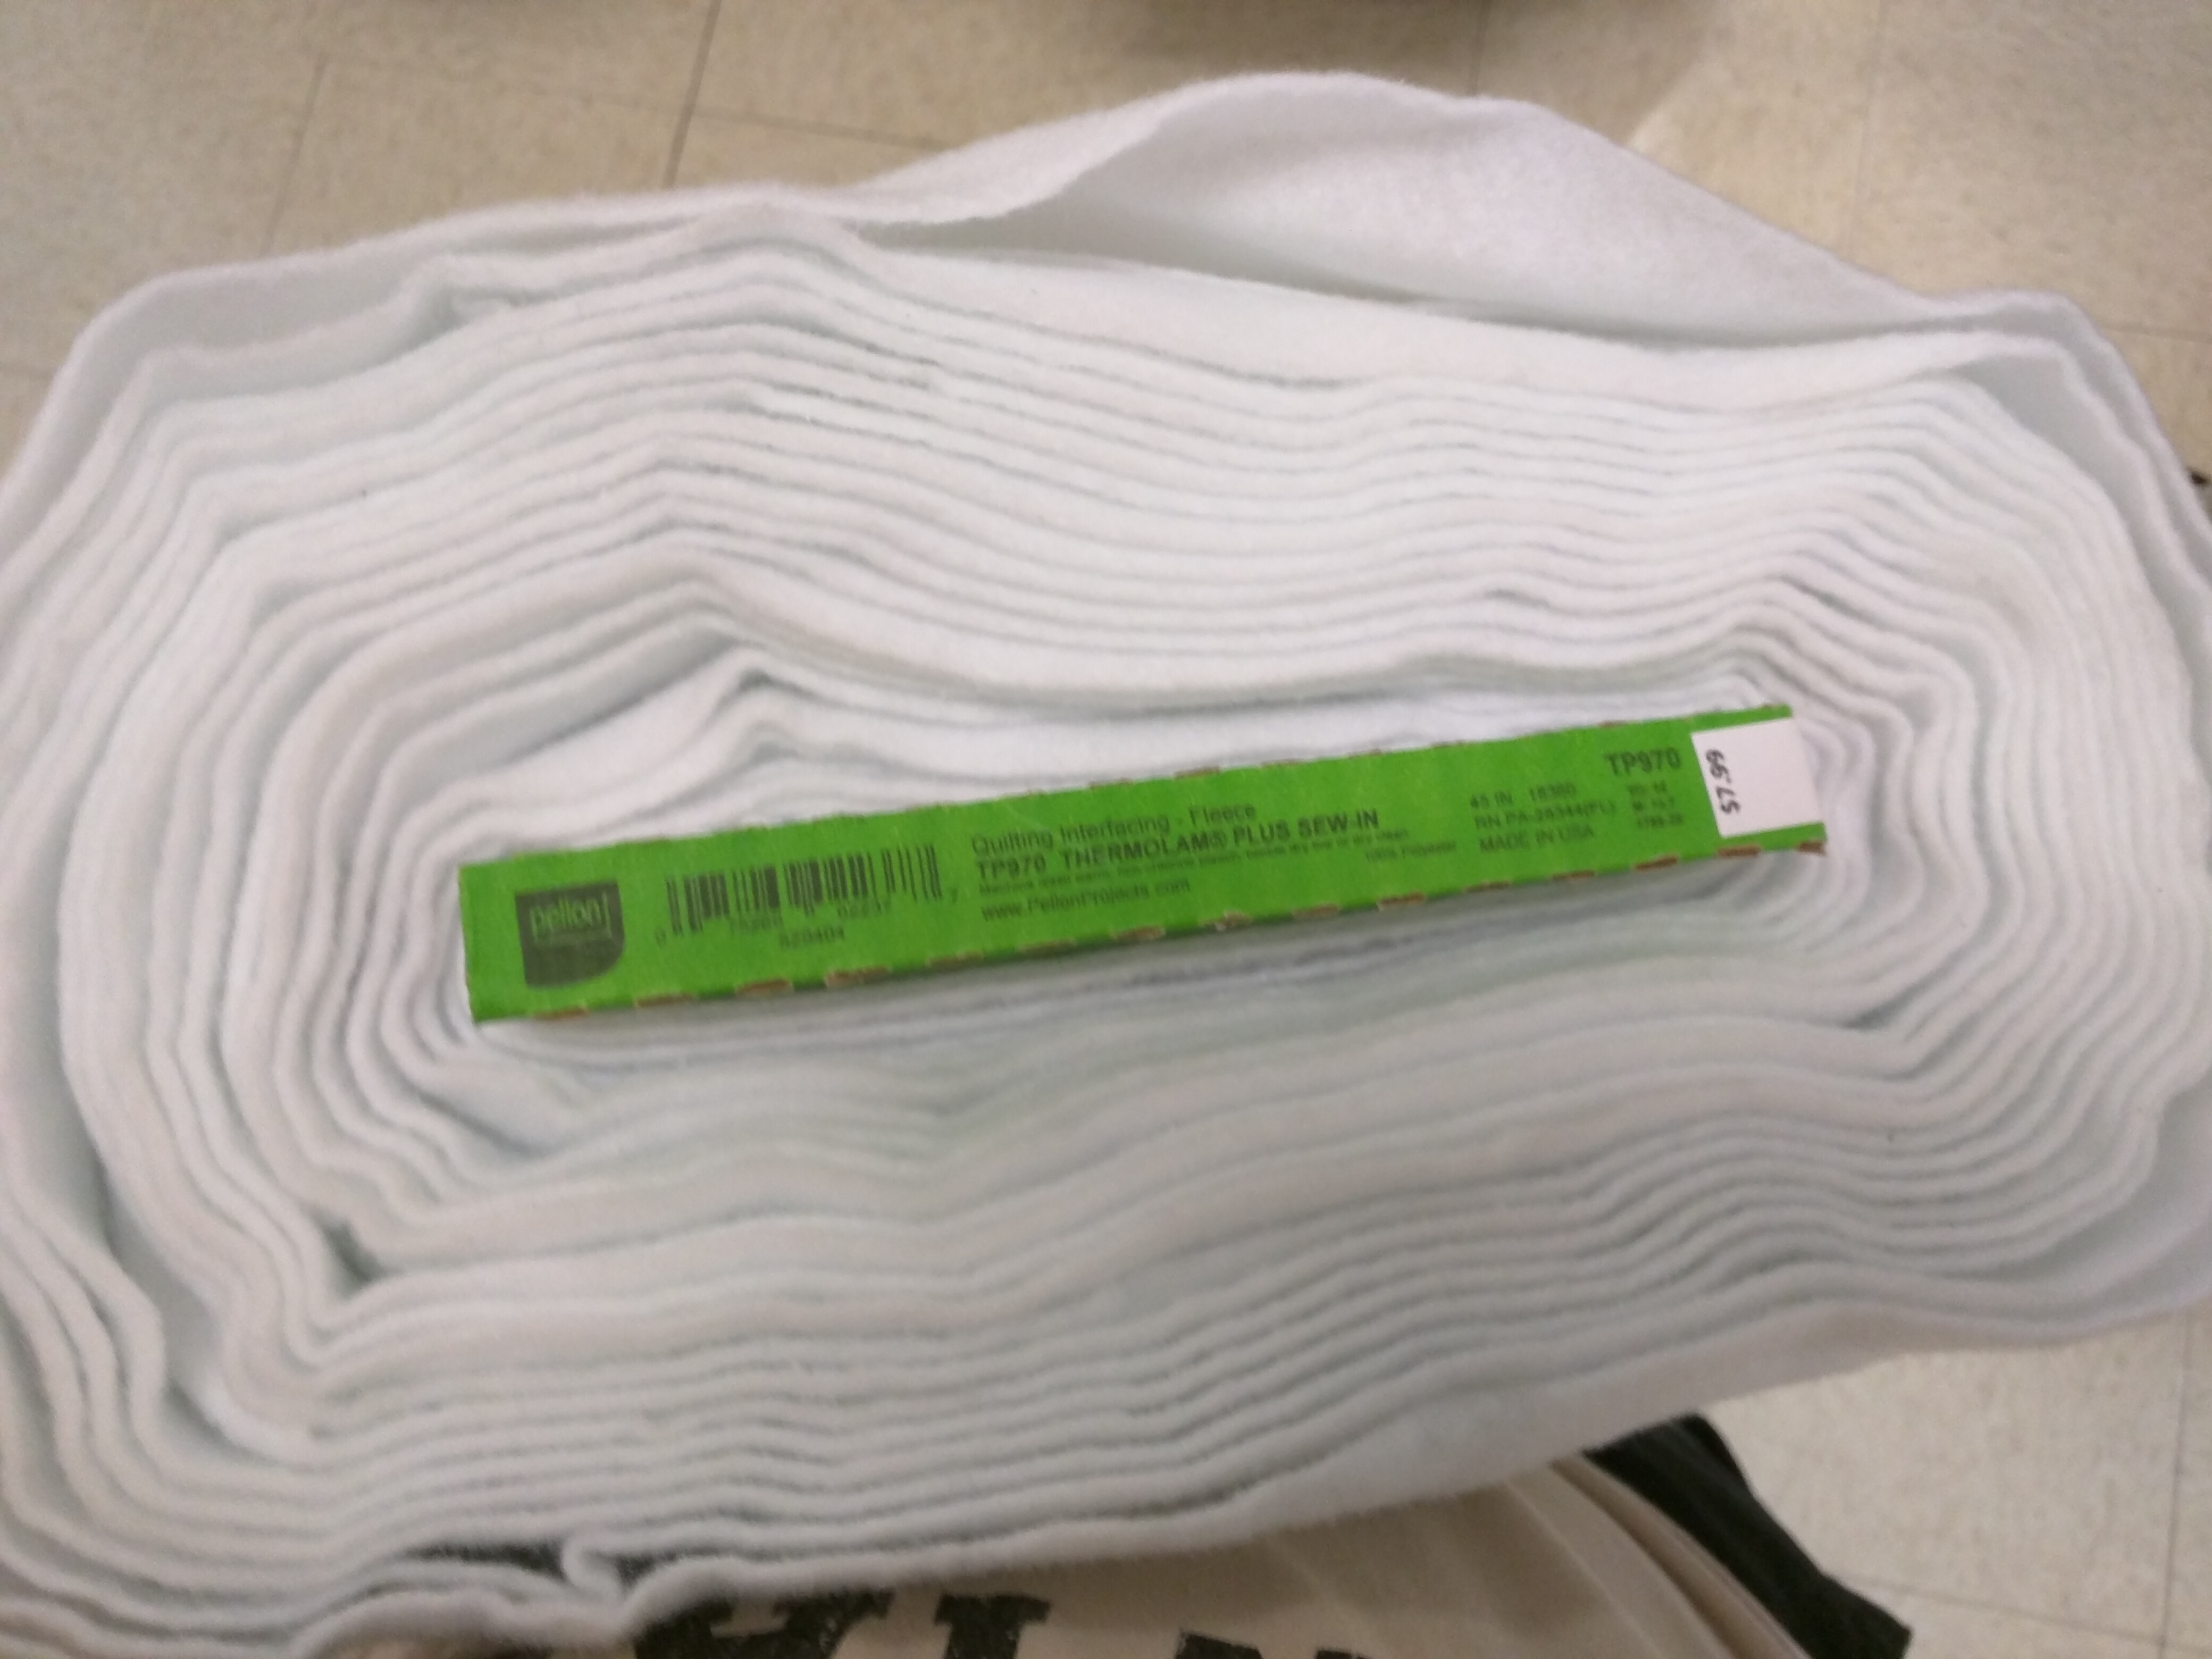
Besides this, it is common for filter setups to have a preliminary filter or pre-filter as the top most layer in the filter stack. The pre-filter is designed to keep large debris out of the HEPA filter to extend the life of the HEPA filter. Pre-filter material also tends to vary from vendor to vendor, but I couldn't help but notice the similarity between professional pre-filters and common interfacing sold at fabric stores. The texture, thickness and even porous nature are a near match. Interfacing is also 100% polyester.
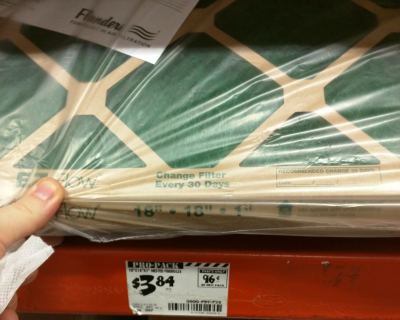
With a bit more research, I started looking into the various HEPA house filters and came across an activated carbon based house filter. This combination looked most promising and is the setup I am testing currently. I am starting off with 1in thick house filters made by reputable filter companies such as 3M and Honeywell.
Surprises Along the Way
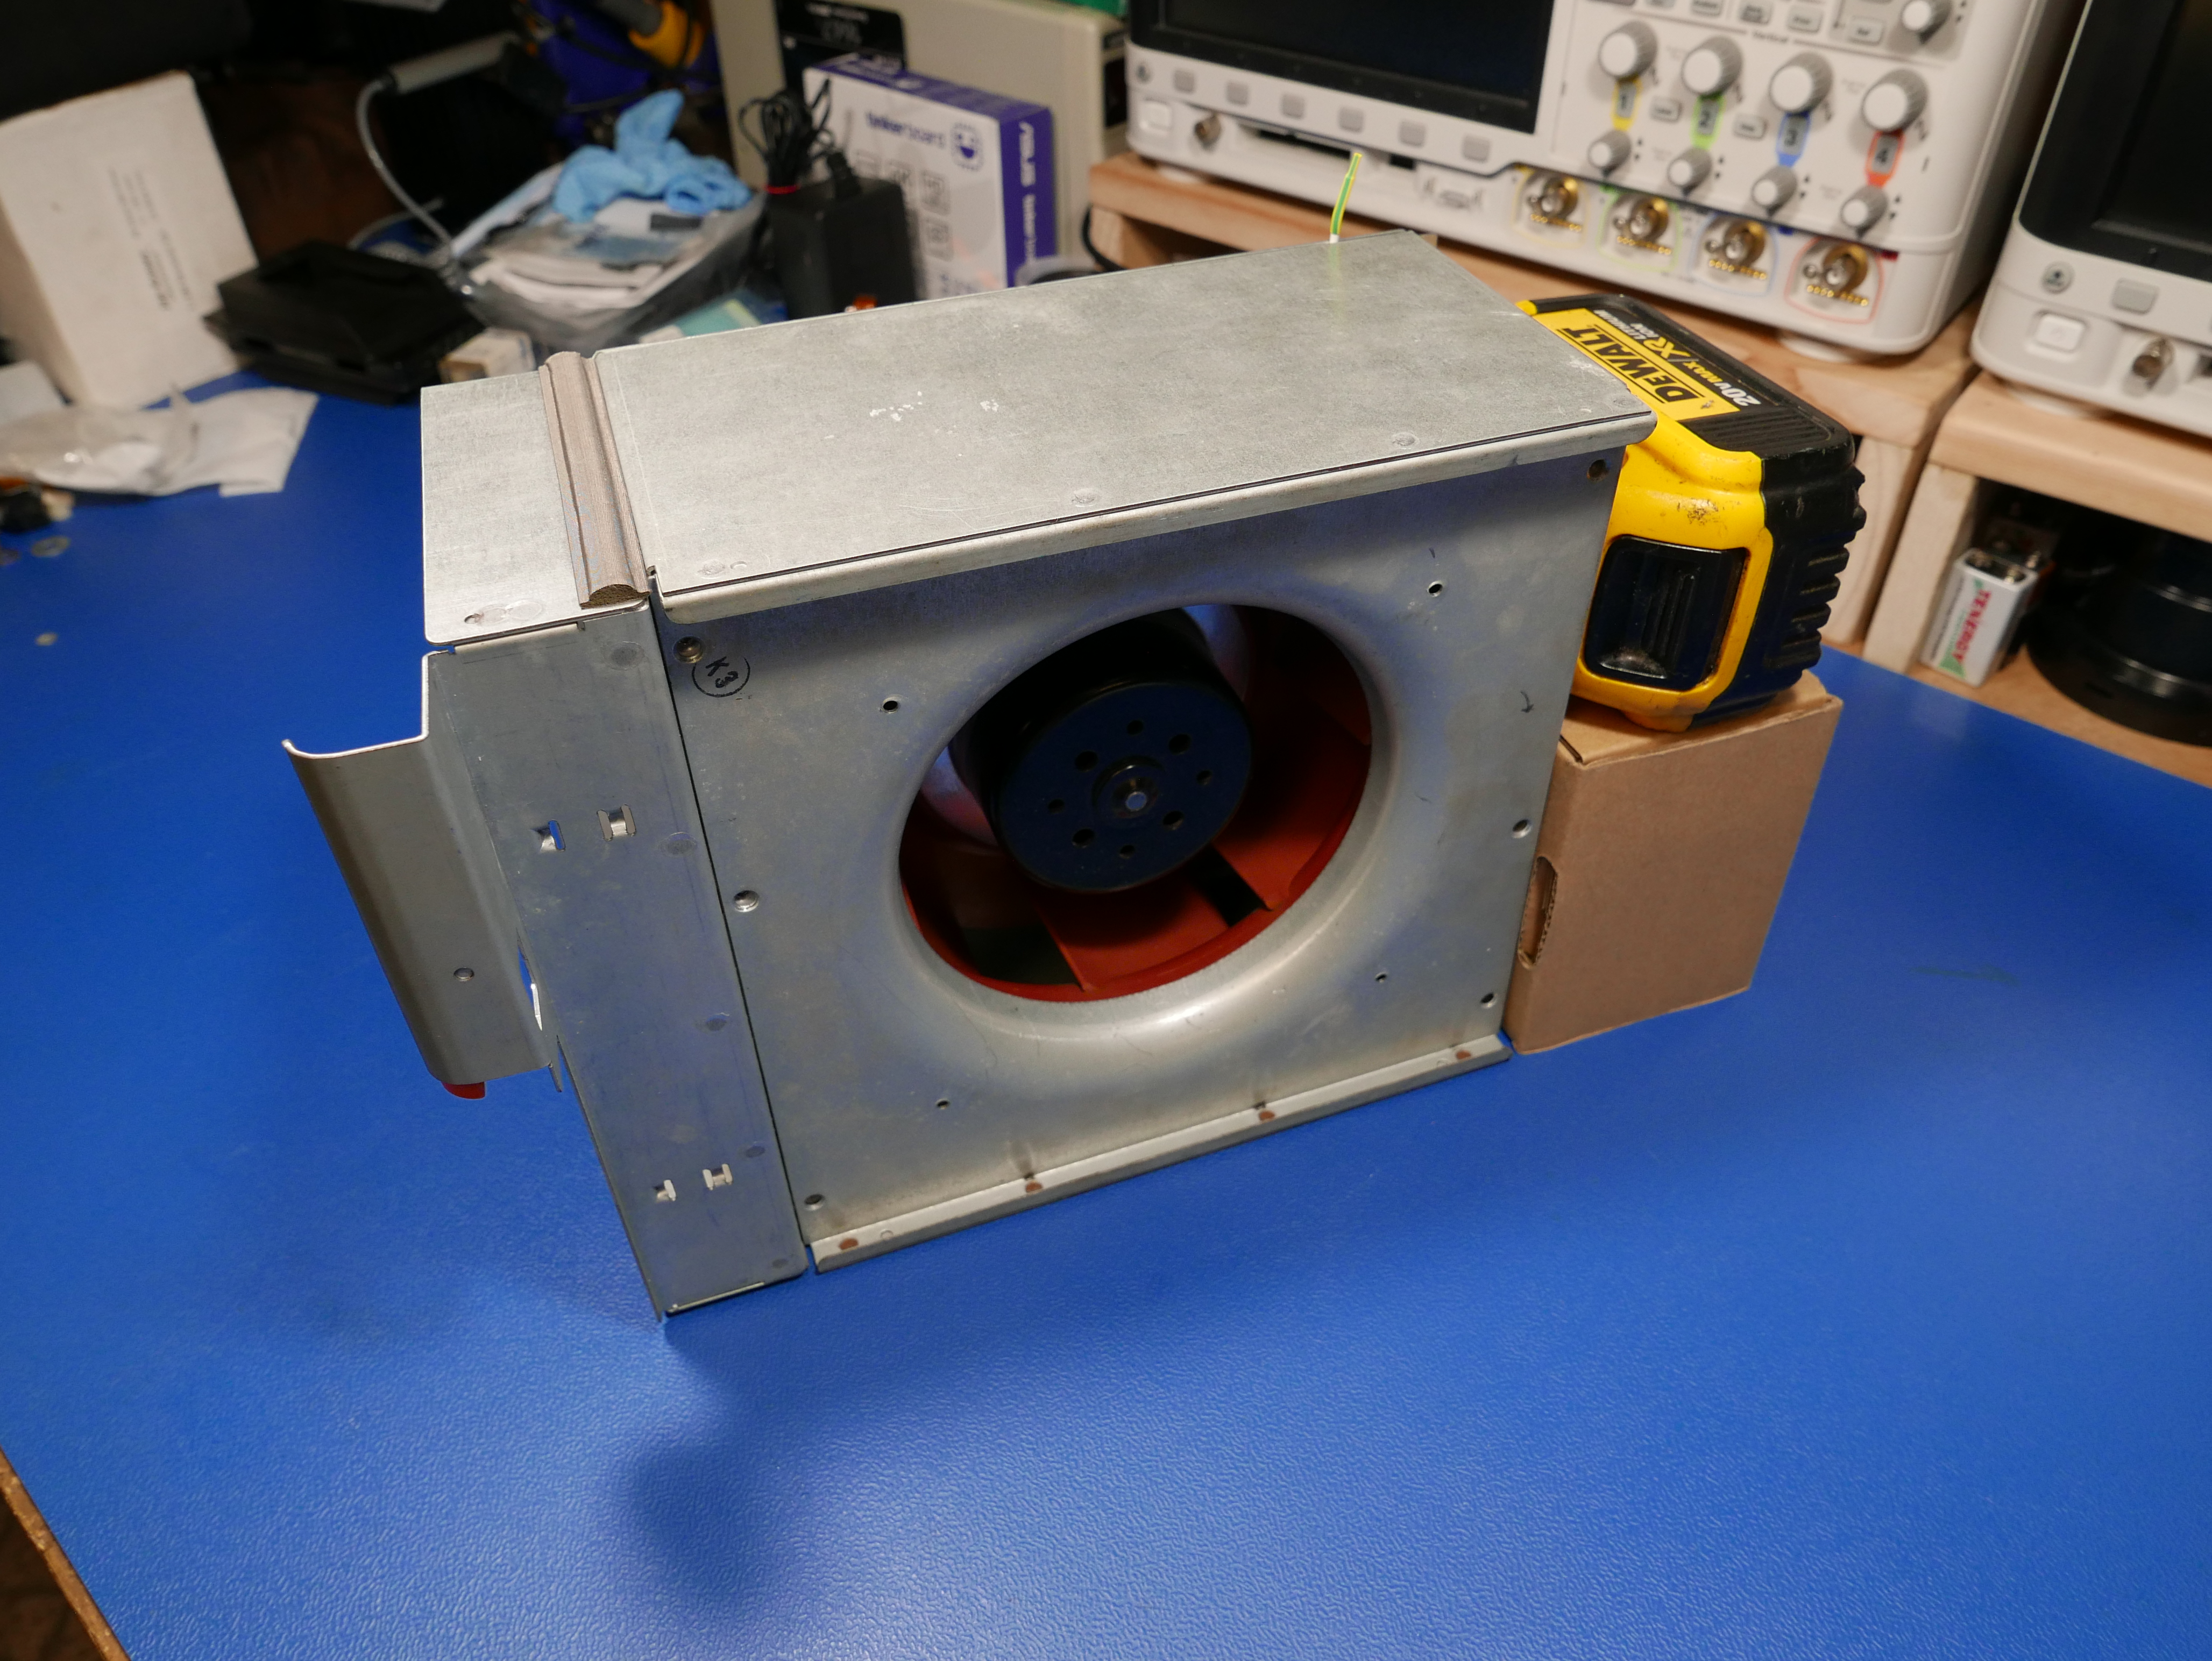
I severely under anticipated how great the server fan was. Traditionally, I would use a conventional axial fan to blow away smoke when soldering. This would leave my work bench a mess on the leeward size of the fan, and all my drawings and papers would scatter all over the floor. Since this is a centrifugal fan, the air is expelled in a 90 degree fashion, and I could easily repair a camera beside my solder work setup with little to no disturbance to even the camera screws on the table.
Originally, I cut off the quick release handle from the unit because it stuck out from the body and at first seemed unsightly. After making a filter tray mockup that protrudes out of the face of the fan, I wanted a better way to grab the fan, so I purchased a few more new old stock fans. I slid in my makeshift filter and the handle felt proper. It seemed to be in just the right place and helped with the positioning of the fan on the desk. I honestly thought I'd have to cut off every handle on each extractor but it turned out to be a saving grace. I was picking at straws to find a problem with the fan and honestly, the only negative has been the black front fan air baffle. This was designed to blow around in the path of the air. That air baffle rattles and vibrates a lot with a rather annoying tone and doesn't seem to provide any benefit. It is easily removed with a gentle pry from a screwdriver, so the problem was easily mitigated.
I make no attempt to hide that I am a knob aficionado. Dave jones is right. the more knobs the better. I hate a cheap knob. I hate an undersized knob. I hate an oversized knob. The variable speed knob had to be the right size, the right thickness and have the right feel. I found that a 1.25in diameter .25in thick parallel knurled knob was the proper choice for this unit. Granted, this is a personal want and a smaller more affordable knob will probably be chosen for the final production design, but I was surprised with how proper it felt in the hand.
Initial Electrical Challenges:
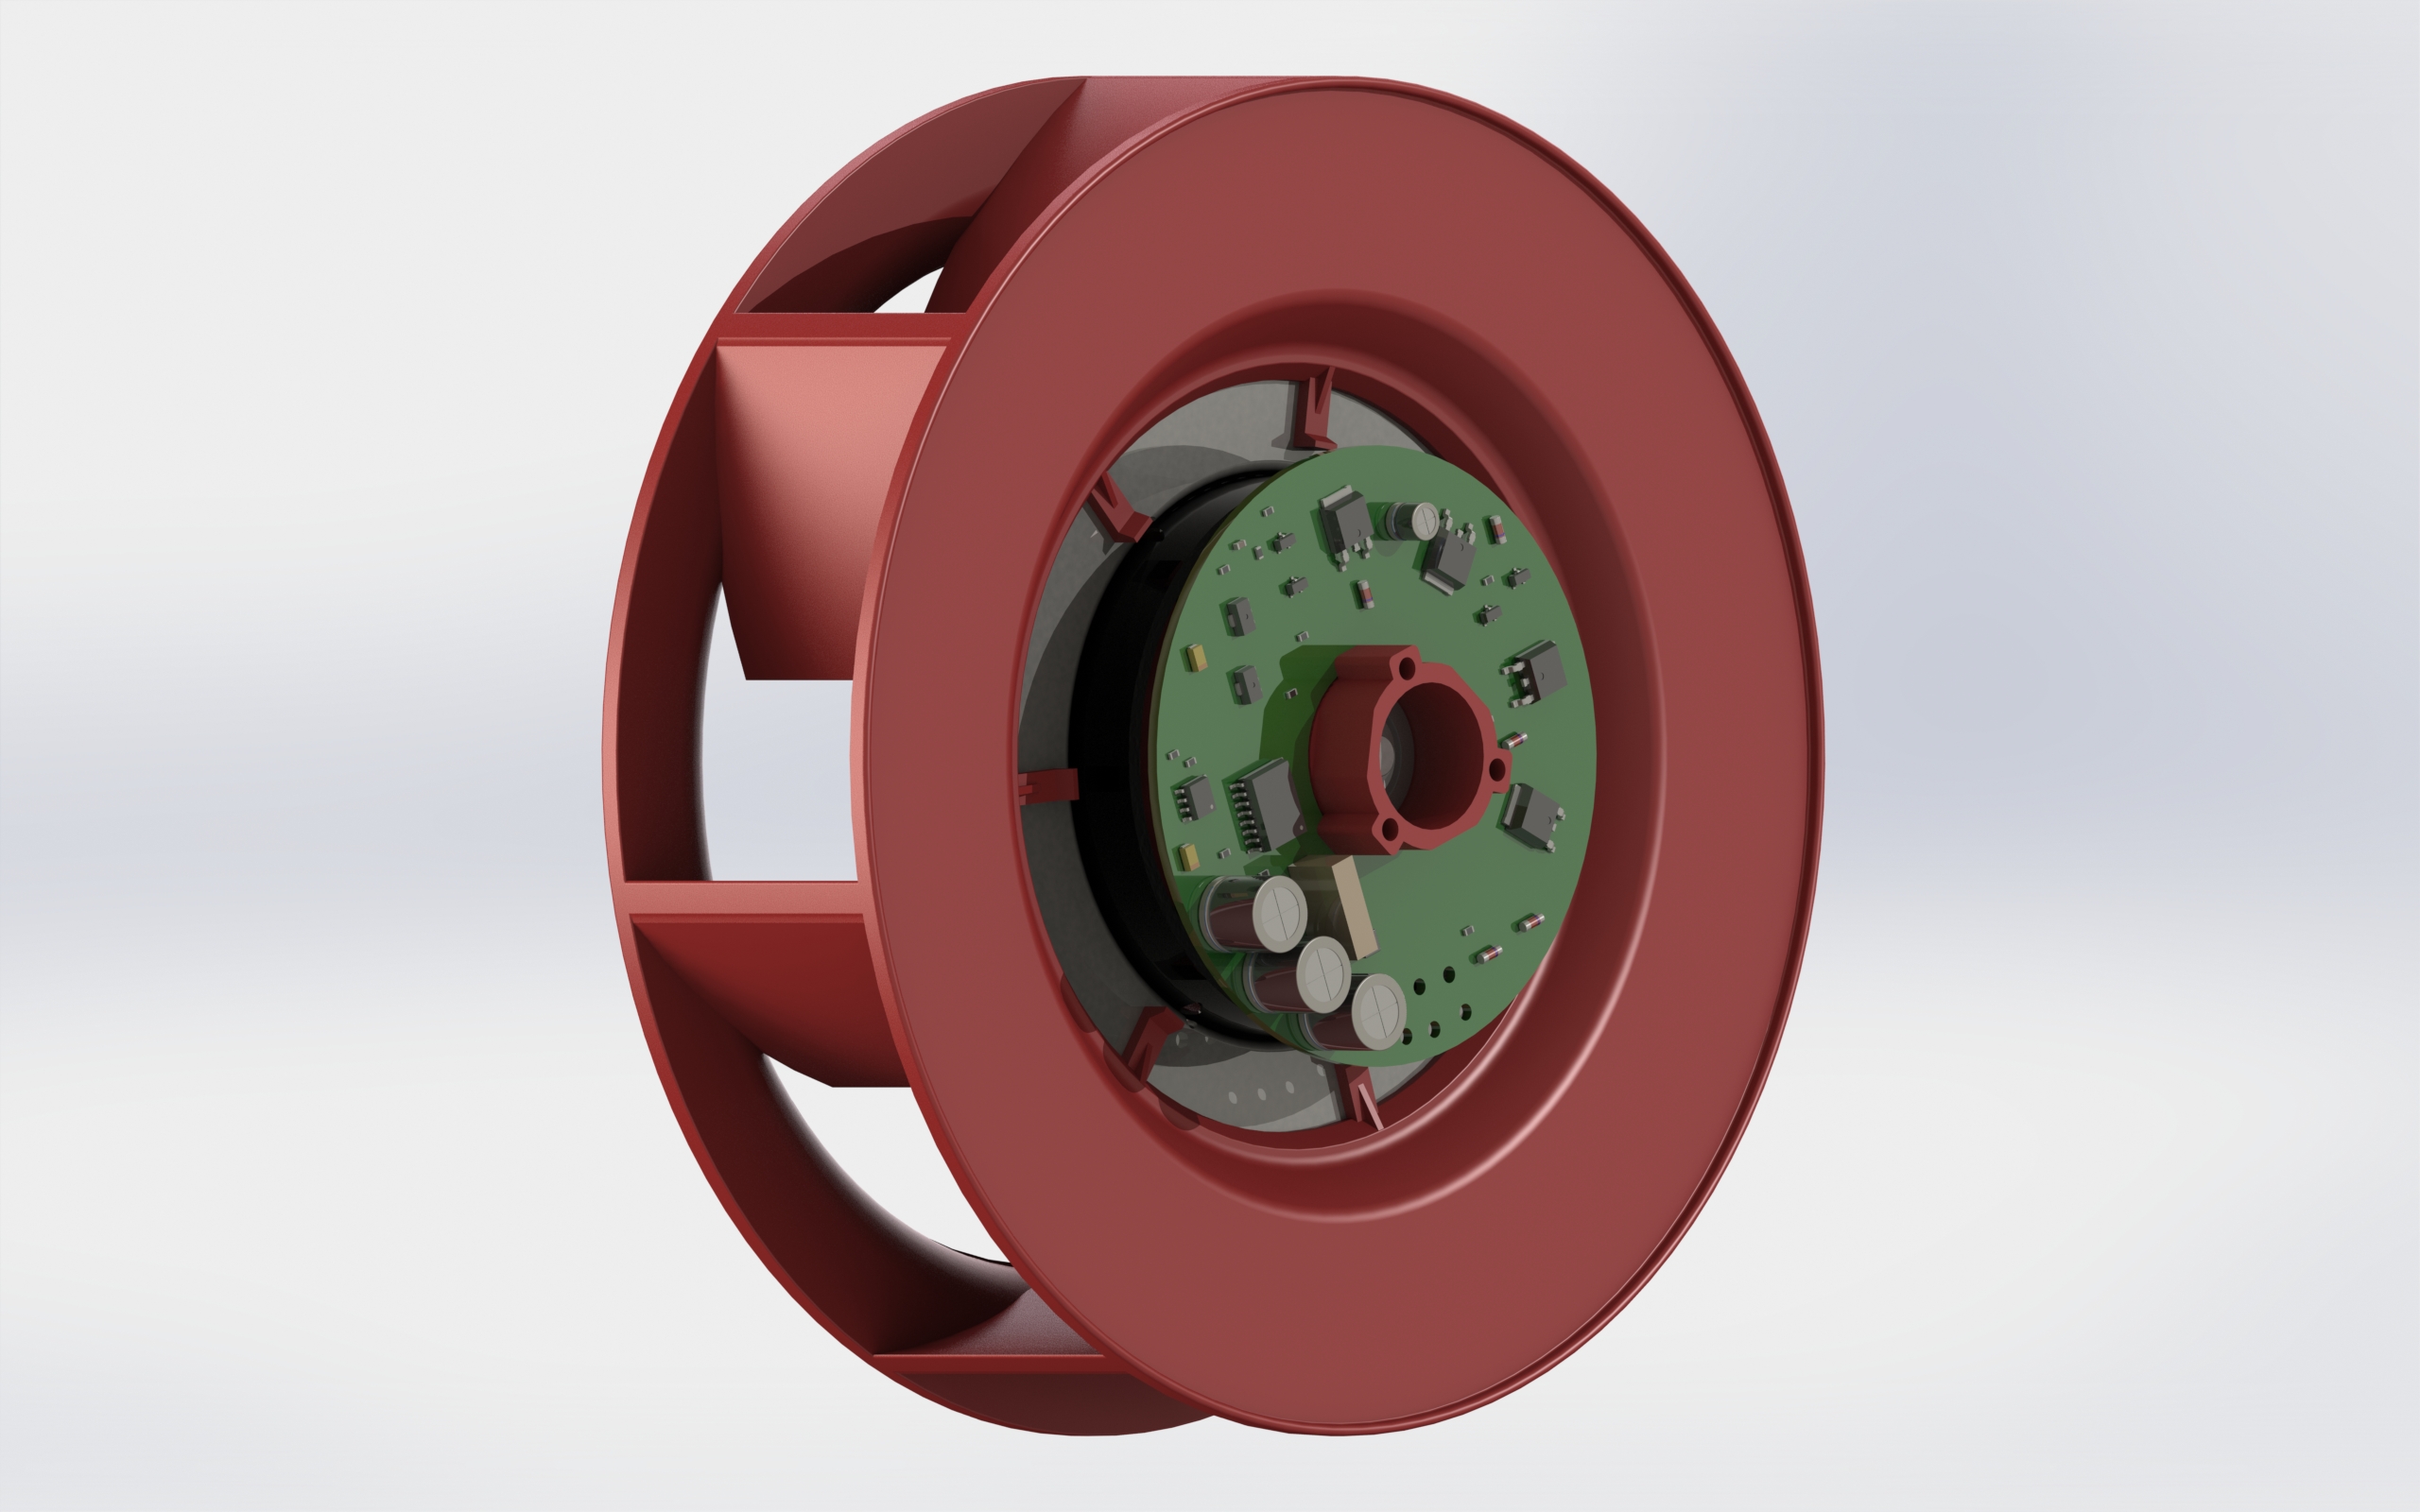
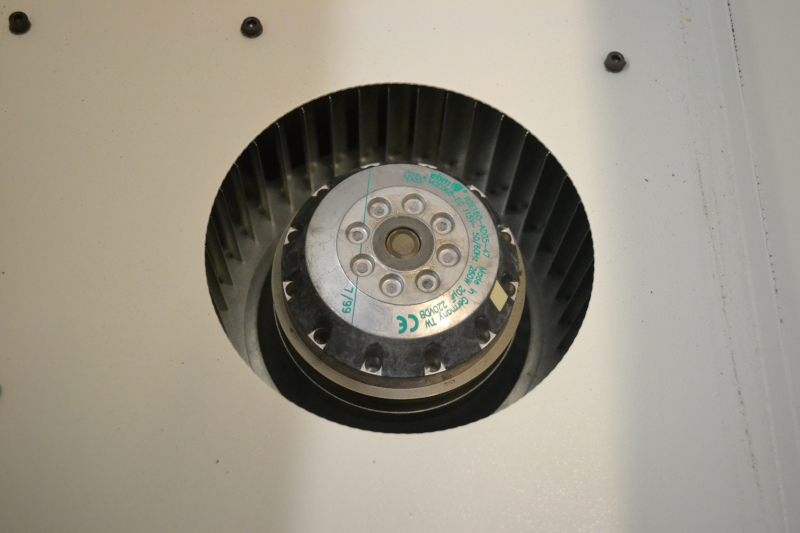
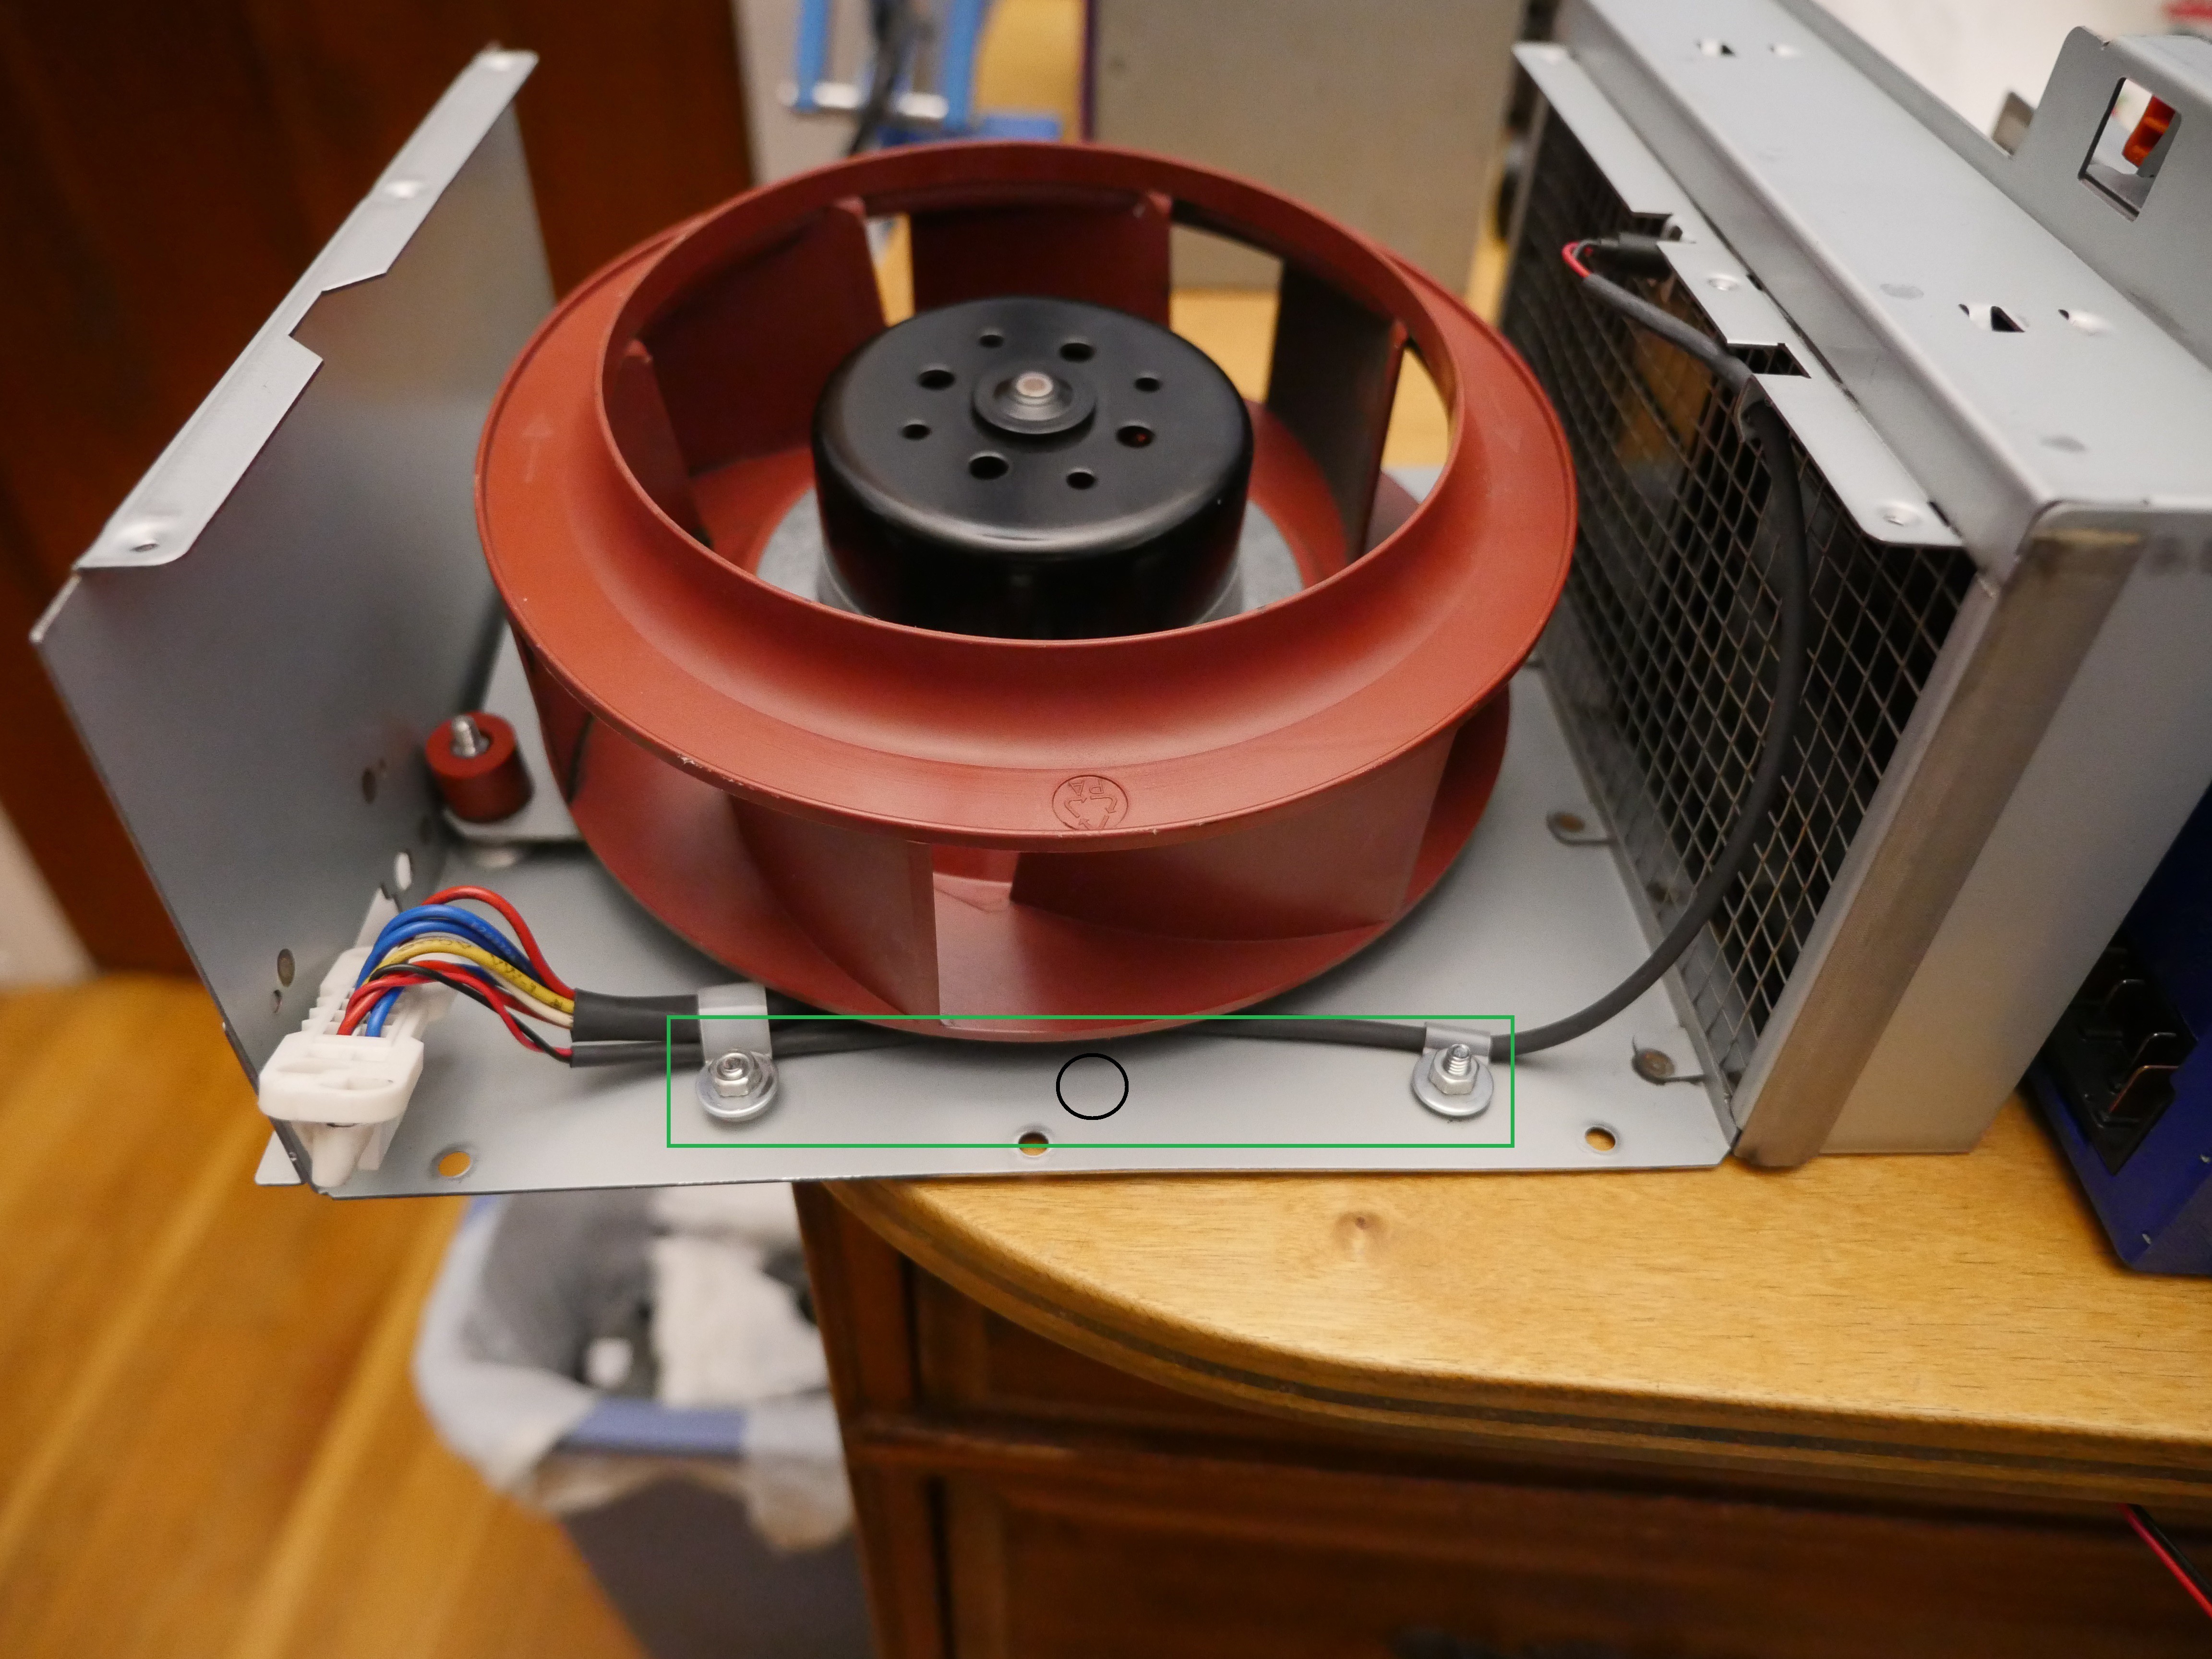
The fan I had was not within the operating range of a common drill battery. The EBM Papst fan was designed to work as a nominal 12v fan, but could safely operate from 8-14v DC. I needed from 16-20v DC. I didn't want to just plug the fan into a variable power supply and let her rip. I wanted to know if it would safely work at the desired voltage range. I took the fan apart and inspected the fan PCB. Again, this fan stunned me again and featured an open back design, not a sealed design. I could just monitor and probe the circuit components without disassembling or damaging the fan. I didn't need to crack open a rear fan housing or desolder the rotor from a PCB. It was all out in the open and ready for probing. The only drawback was the fan was upside down making the PCB hard to access. As any product developer knows, the solution is to just make a jig!
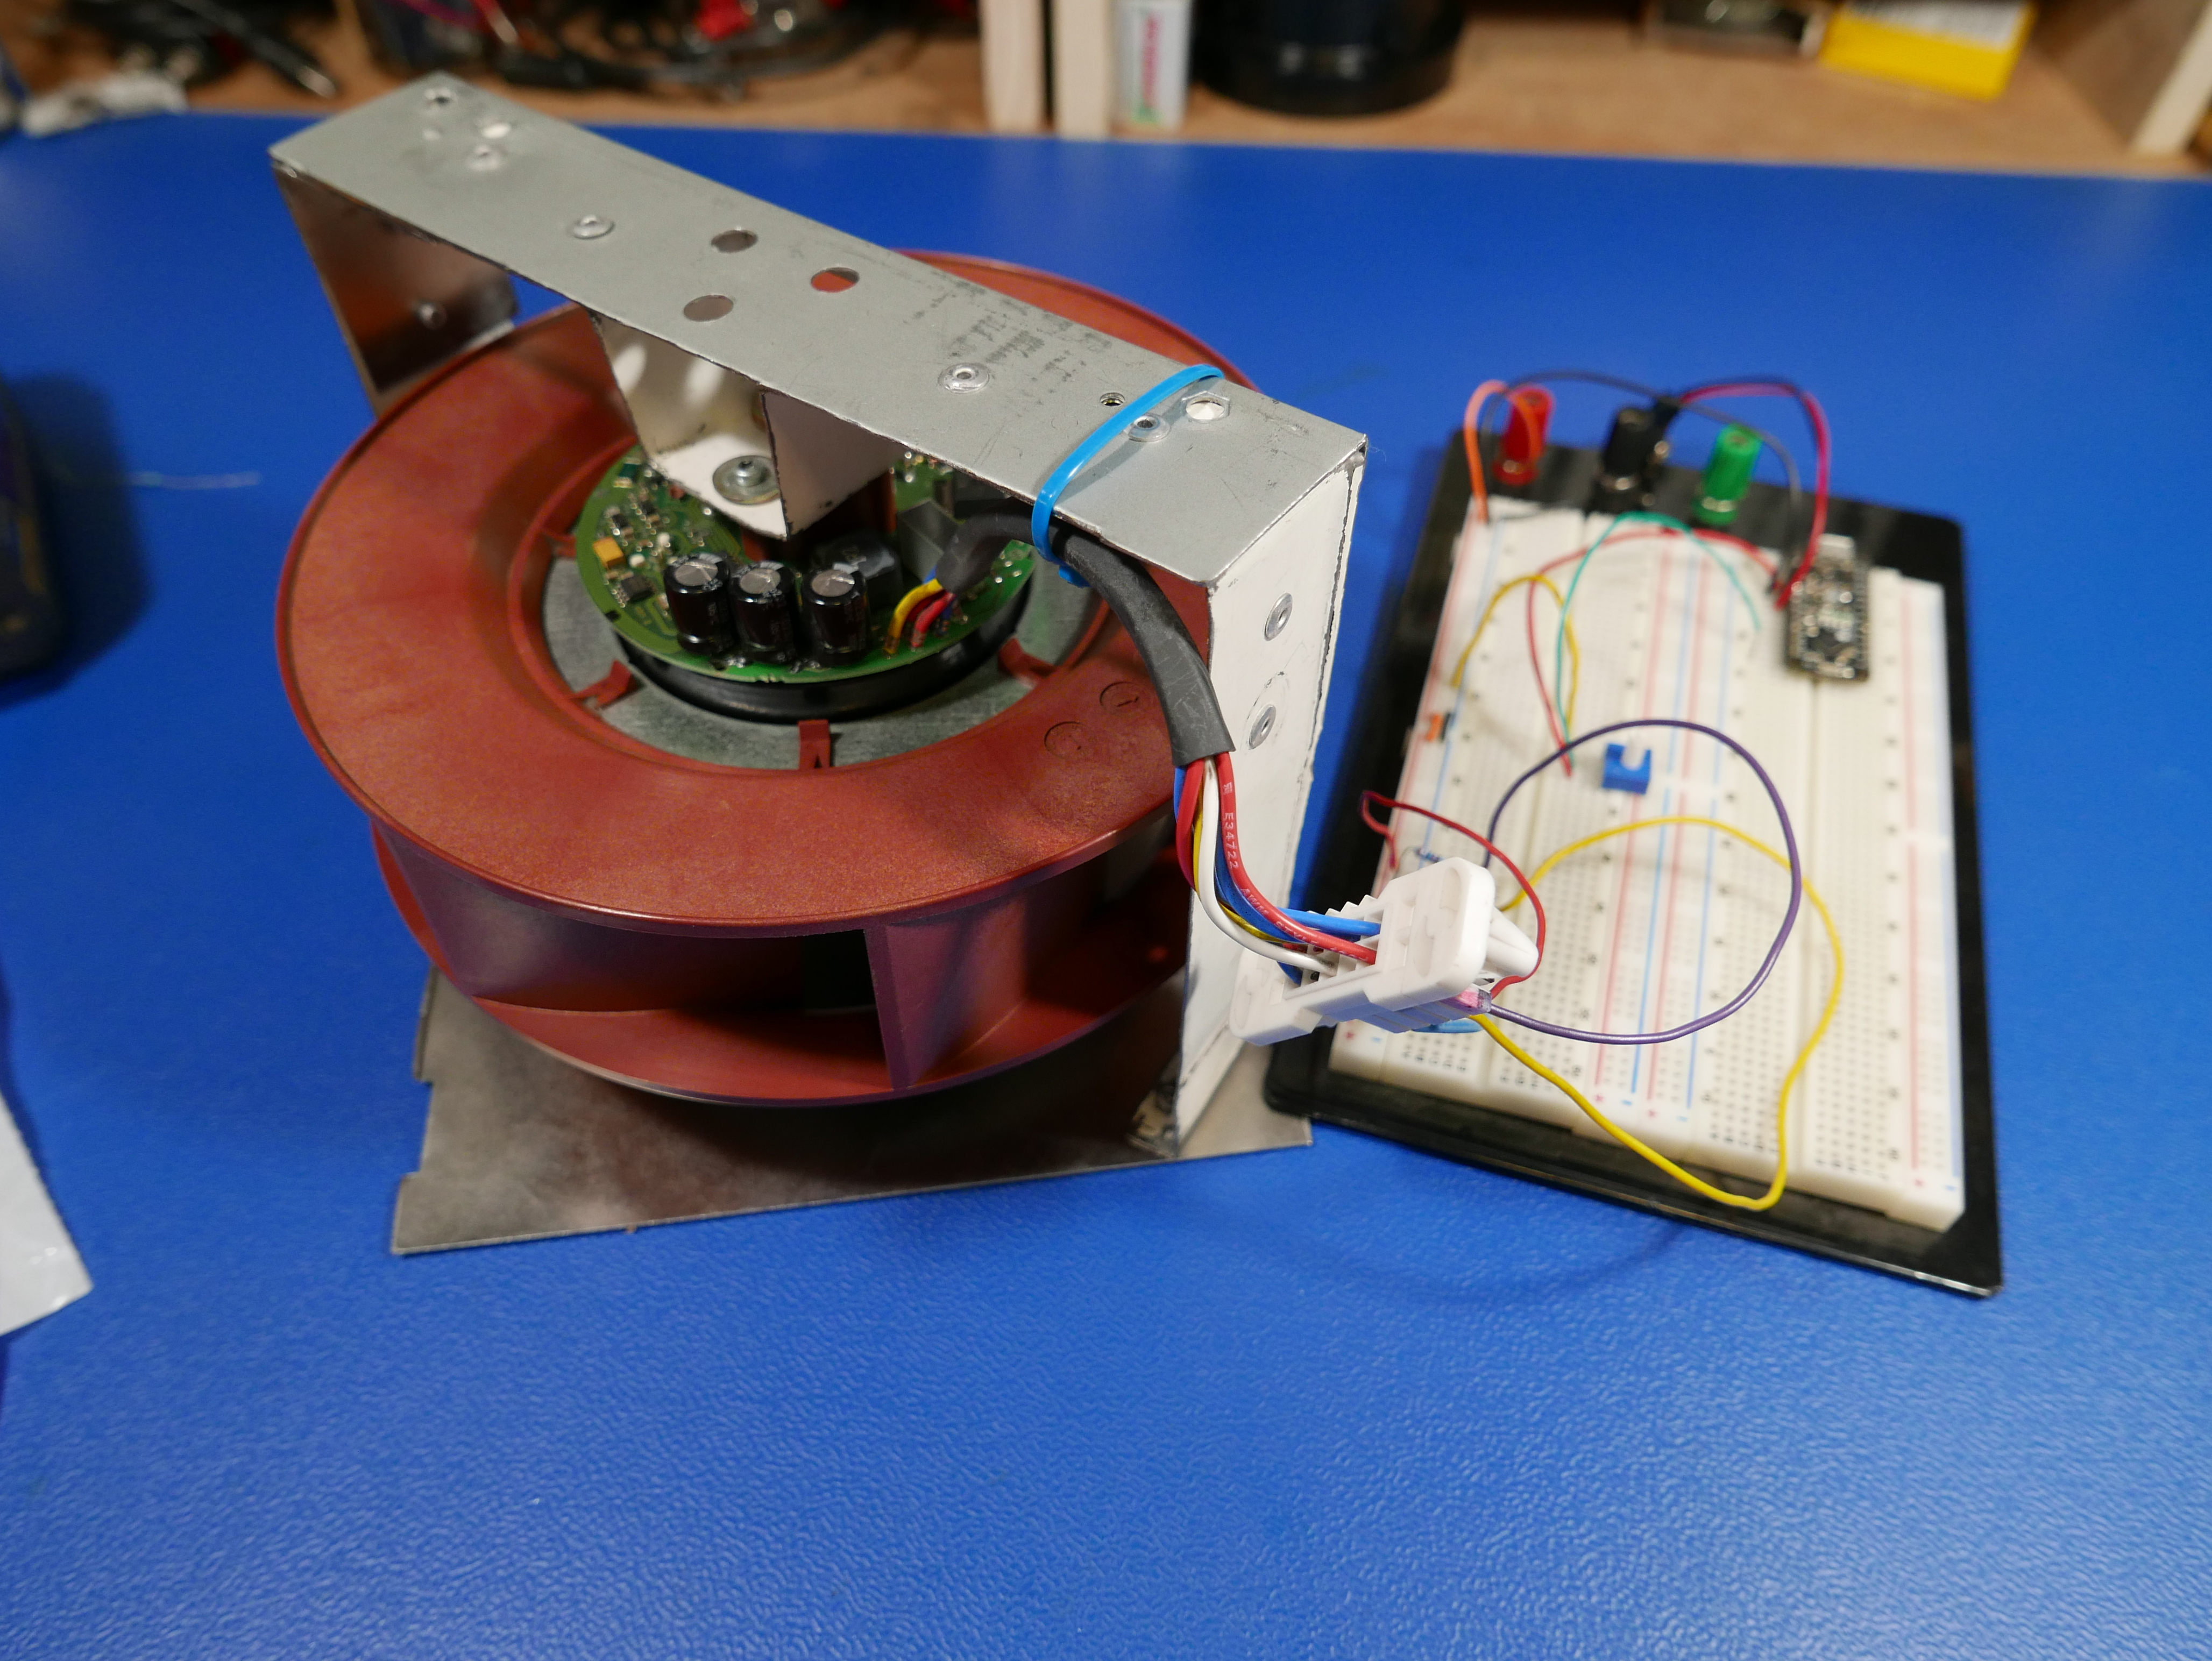
I constructed a sheet metal jig that held the fan in suspension so the PCB was facing upwards and not pressed against the back of a conductive metal shell. With a better view of the PCB, I took an inventory of the components on the motor drive board. The PWM and digital control of the fan was handled by a Microchip PIC16C62X micro, the 5V input source for the micro was handled by a ST 78L05a 5v regulator and the fets to drive the fan were Infineon 2n03l05 mosfets. These are all well documented components which was a godsend.

The good news is the ST 78L05a regulator can safely produce 5v output with as quoted a <=20v input. Since 78L05a regulators are made by several vendors, I checked out alternative datasheets. Some stated slightly above 20v as the highest extent of operation. The infineon 2n03l05 mosfet datasheet mentioned that 20v was within the range of normal operation, with minimal impact on performance. Other unforeseen problems with making a portable system based on a drill battery system was securing the legitimate battery connector. Many drill companies make sourcing their proprietary connectors or connector assemblies impossible. luckily, I came across the Dewalt genuine 20v port part after searching through an older portable vacuum unit repair page. It is available directly from Dewalt service net and also via 3rd party suppliers. The connector is not exactly cheap, but it is a legitimate connector that does not rely on using 1/4in spade connectors shoved in a plastic housing with a little added super glue for good luck.
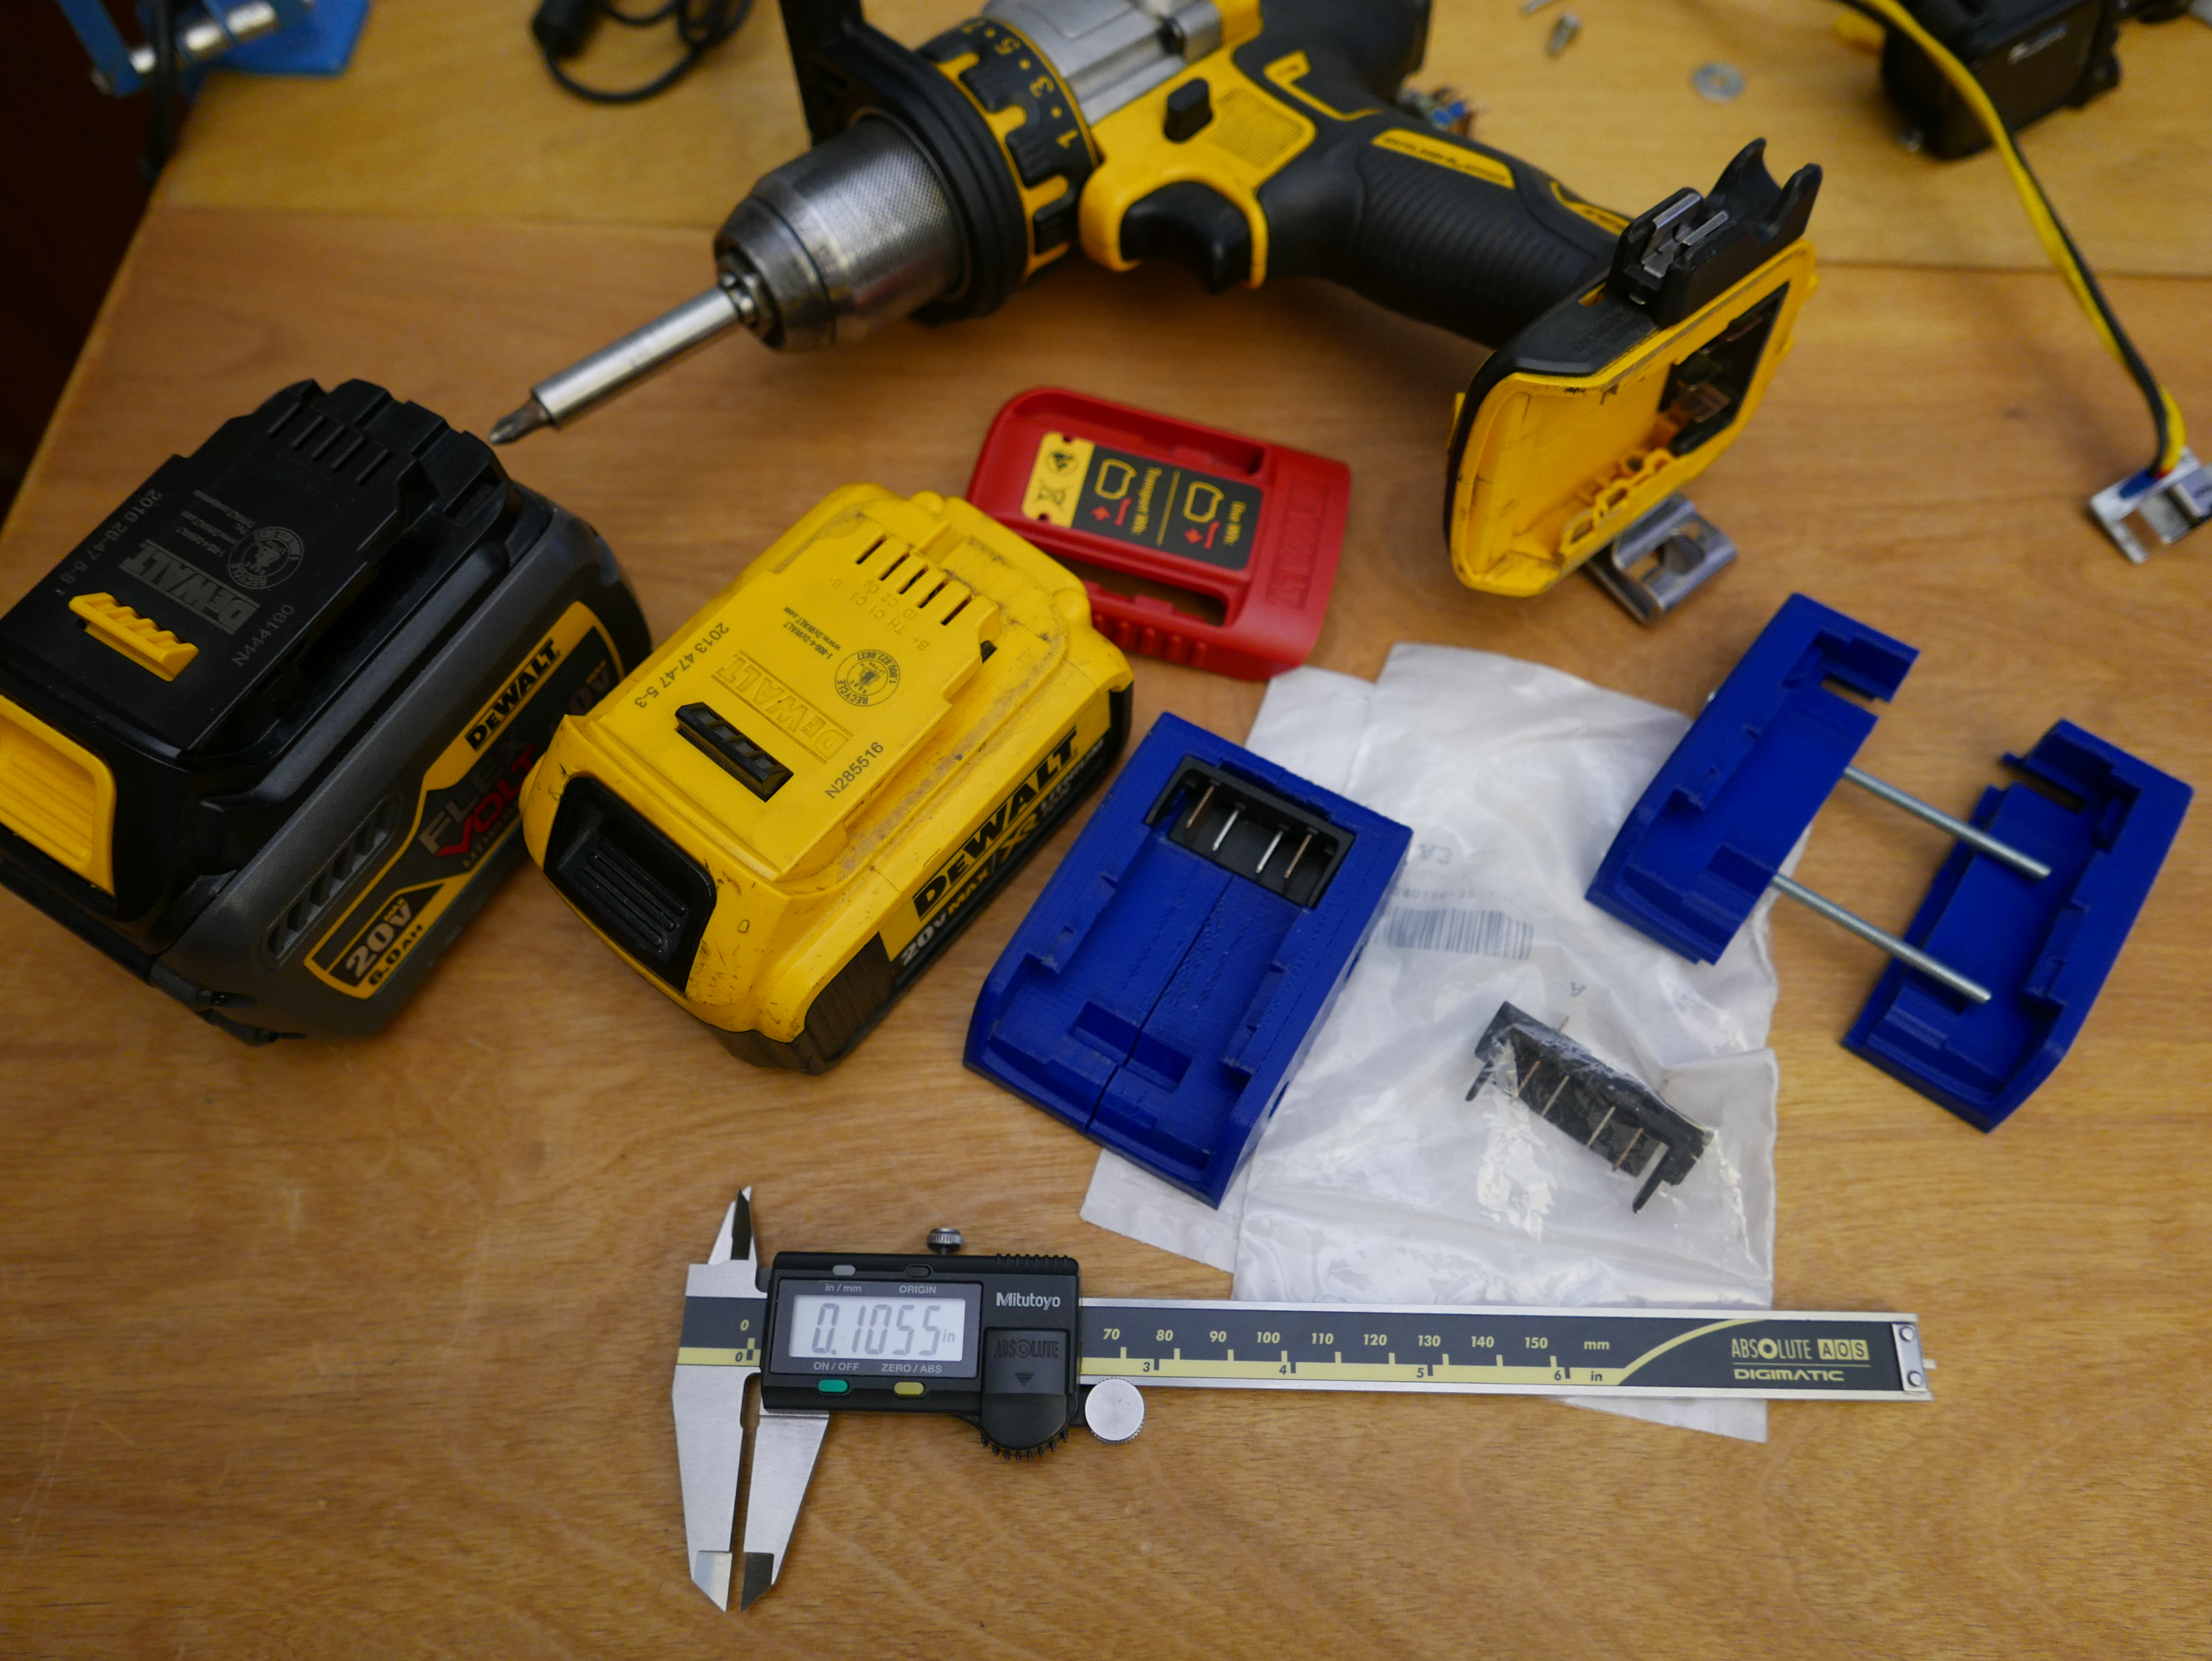
At this point I'm still on the hunt for the perfect potentiometer. I was not anticipating the potentiometer search to be so challenging. It turns out that there are an incredible amount of variety with panel mount potentiometers, as long as you are looking for one that does not incorporate an on/off switch. I am after a linear potentiometer instead of a logarithmic one as linear should offer the most predictable gradual control best suited for this application. A quick Digikey search reveals 698 types of linear panel mount pots with solder lugs and only 22 that include a single pole, single throw switch (SPST). None of those 22 are fully enclosed potentiometers either.
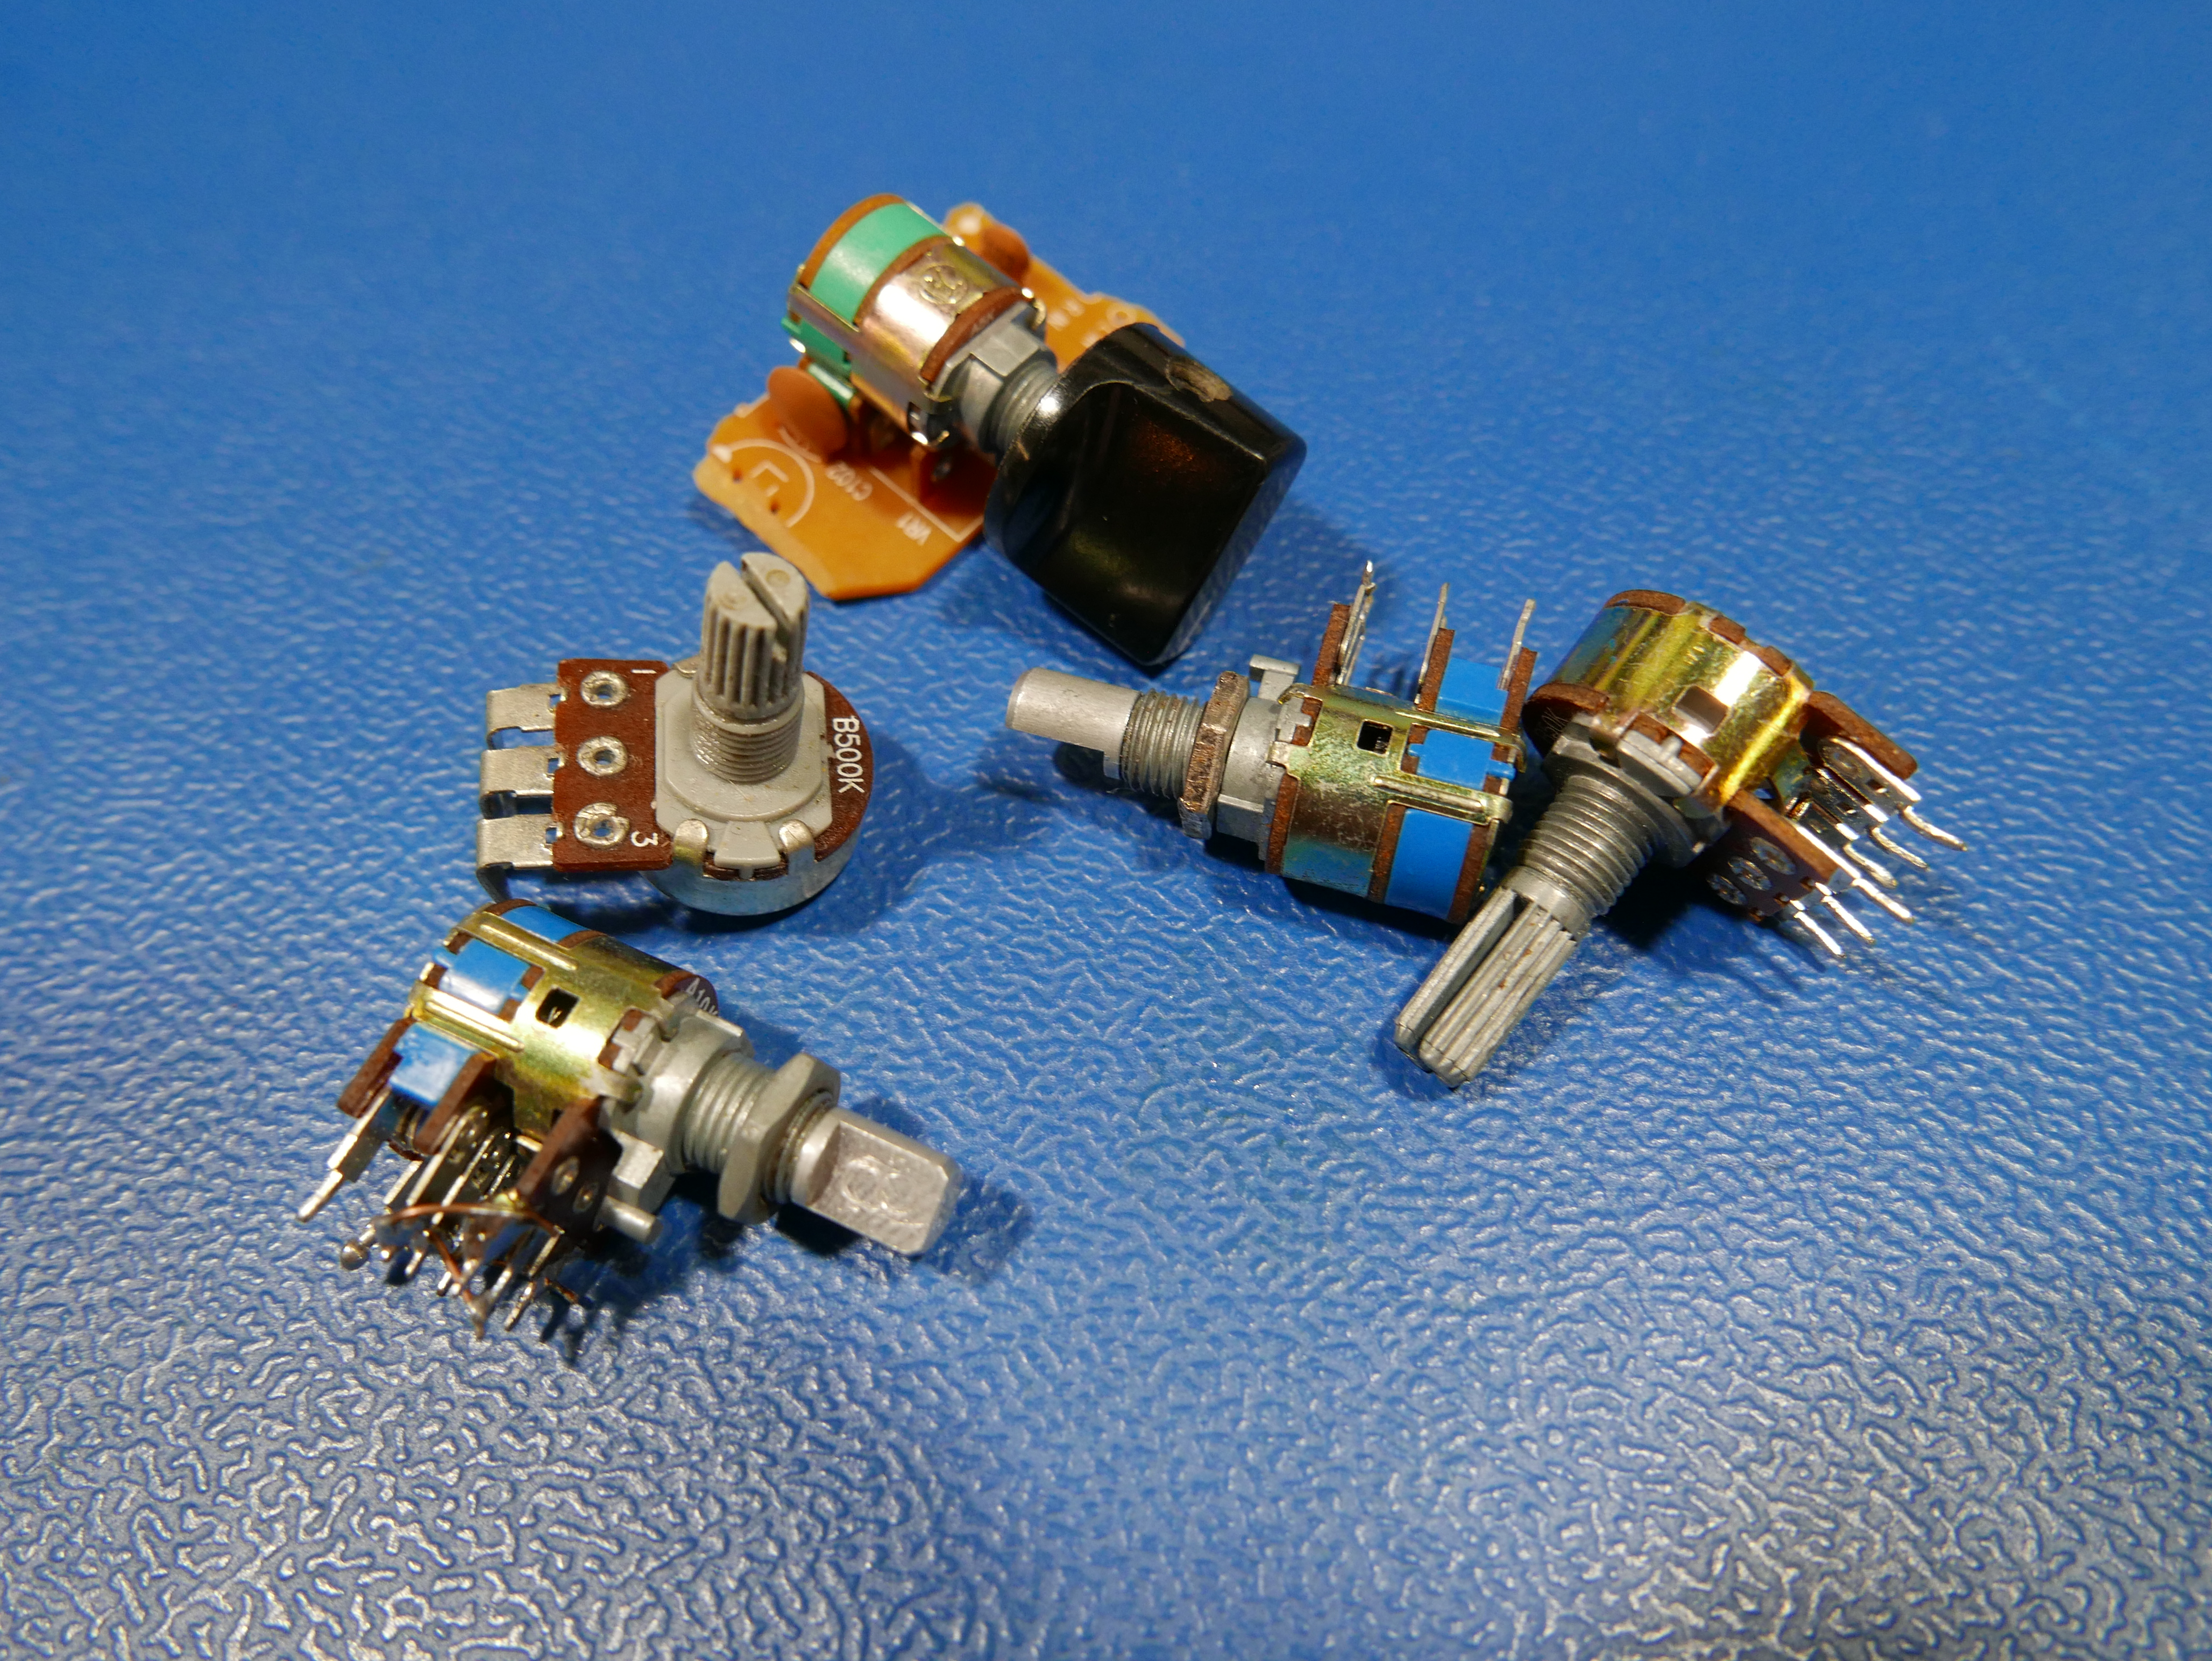
Unless I find a better SPST linear potentiometer, I may decide to cave in and settle with a logarithmic one or move the on/off button to potentially the handle. The handle option would definitely add to the cost and complexity of the unit because there is no easy way of mounting a button board inside the handle. A separate PCB, tiny metal bracket and drilling jig would need to be set up to achieve a handle mount button. However, if that means having a nicer potentiometer, it may just be worth the effort.
Mass Manufacturing Techniques:
The key to making this project happen is efficient manufacturing. There are many ways to peel an apple, but not every way will make you the leading pie distributor in the area. Since IBM took care of all the metal work required for a fan enclosure, I can focus my efforts on PCB design, part optimization, connector selection and filter tray production. For this project, I decided to minimize the amount of hand soldering at all costs. Hand soldering is a time consuming and fiddly process that eats up precious time and creates inconsistent assembly times. Solder may not wick into a hole as nicely from one wire to the next. A pad may burn off the control PCB if the soldering assembler applies too much heat. Heatshrink is a must if wire-wire soldering is needed. These are all nuisances to the production workflow and I didn't want anyone to have to spend time mitigating such issues.
I'm designing the PCB around common through hole connectors. I am planning on reusing the fancy molex connector on the back of the fan, having a JST connector on the PCB for the potentiometer and a mini-fit Jr like connector for the battery input and motor tone generation. The enclosure features two threaded binding posts for mechanical mounting, which is an absolute godsend for easy modifications. I originally was planning to put my custom PCB between the two binding posts. The rough size was 130mm x 20mm, plenty of area to fit the control circuitry. I started board design in Kicad, but a problem came up with physical assembly that made me reconsider my design.
The binding posts are 1/8in away from the side of the top shell of the fan enclosure, leaving little means of egress for wire routing and wire placement, let alone the use of connectors. The PCB would have had to sit below the fan and be soldered only. That would create a very frustrating assembly process and frankly one that no one should bear. Moving the PCB to the back right corner alleviated all of the problems I had with the first PCB and allowed me to reuse the incorporated molex connector. This saves me precious time as now I don't have to cut the connector off, wire strip each of the 9 leads and manually solder them to the board.
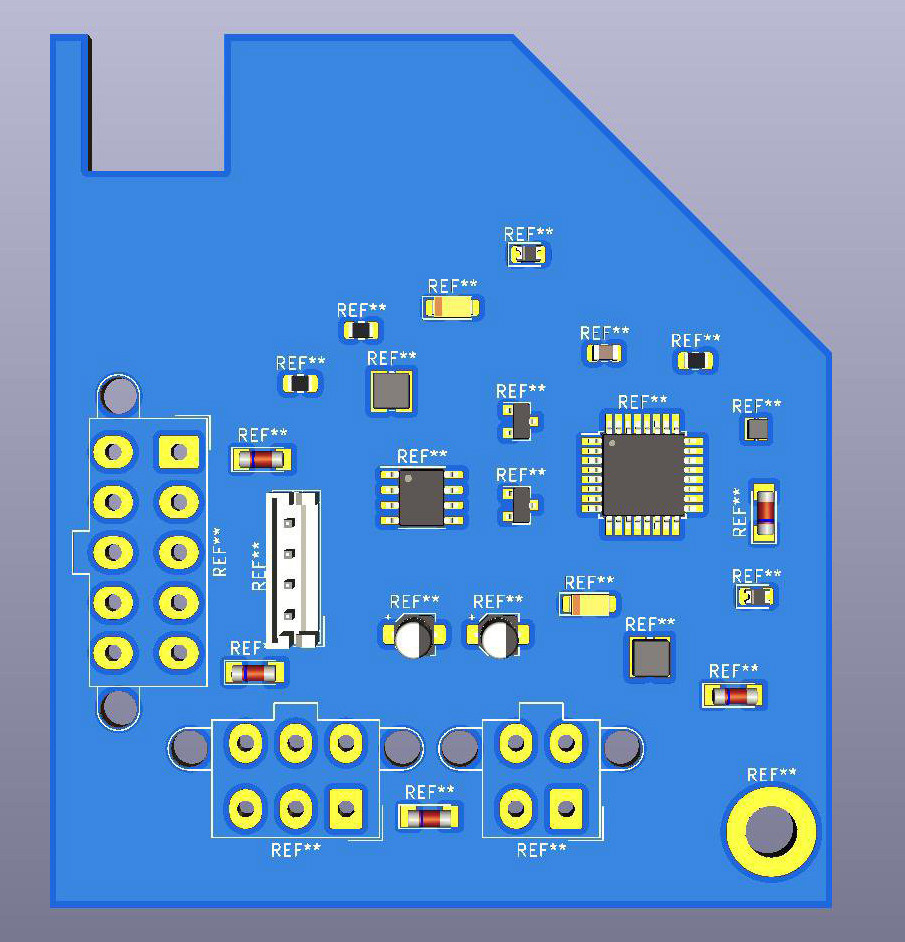
This back right corner had some challenges though. For one, there was only one binding post accessible in this corner. A quick and clever solution was to use one side of the the PCB as a toe-in mount, where that corner would feature a fork designed to fit around an internal fan mounting post. The above kicad render is a placement mockup, the design has not yet been finalized but is roughly what it will look like.
An important consideration for any PCB in a metal enclosure is isolation. Since there will be through hole connectors on the PCB, the board needs to be offset from the shell. Plastic washers and adhesive backed rubber spacers will be used to mount the PCB into the case. clear plastic adhesive backed sheet, commonplace in most PC power supplies, will also be used to line the back area of the PCB mount area.
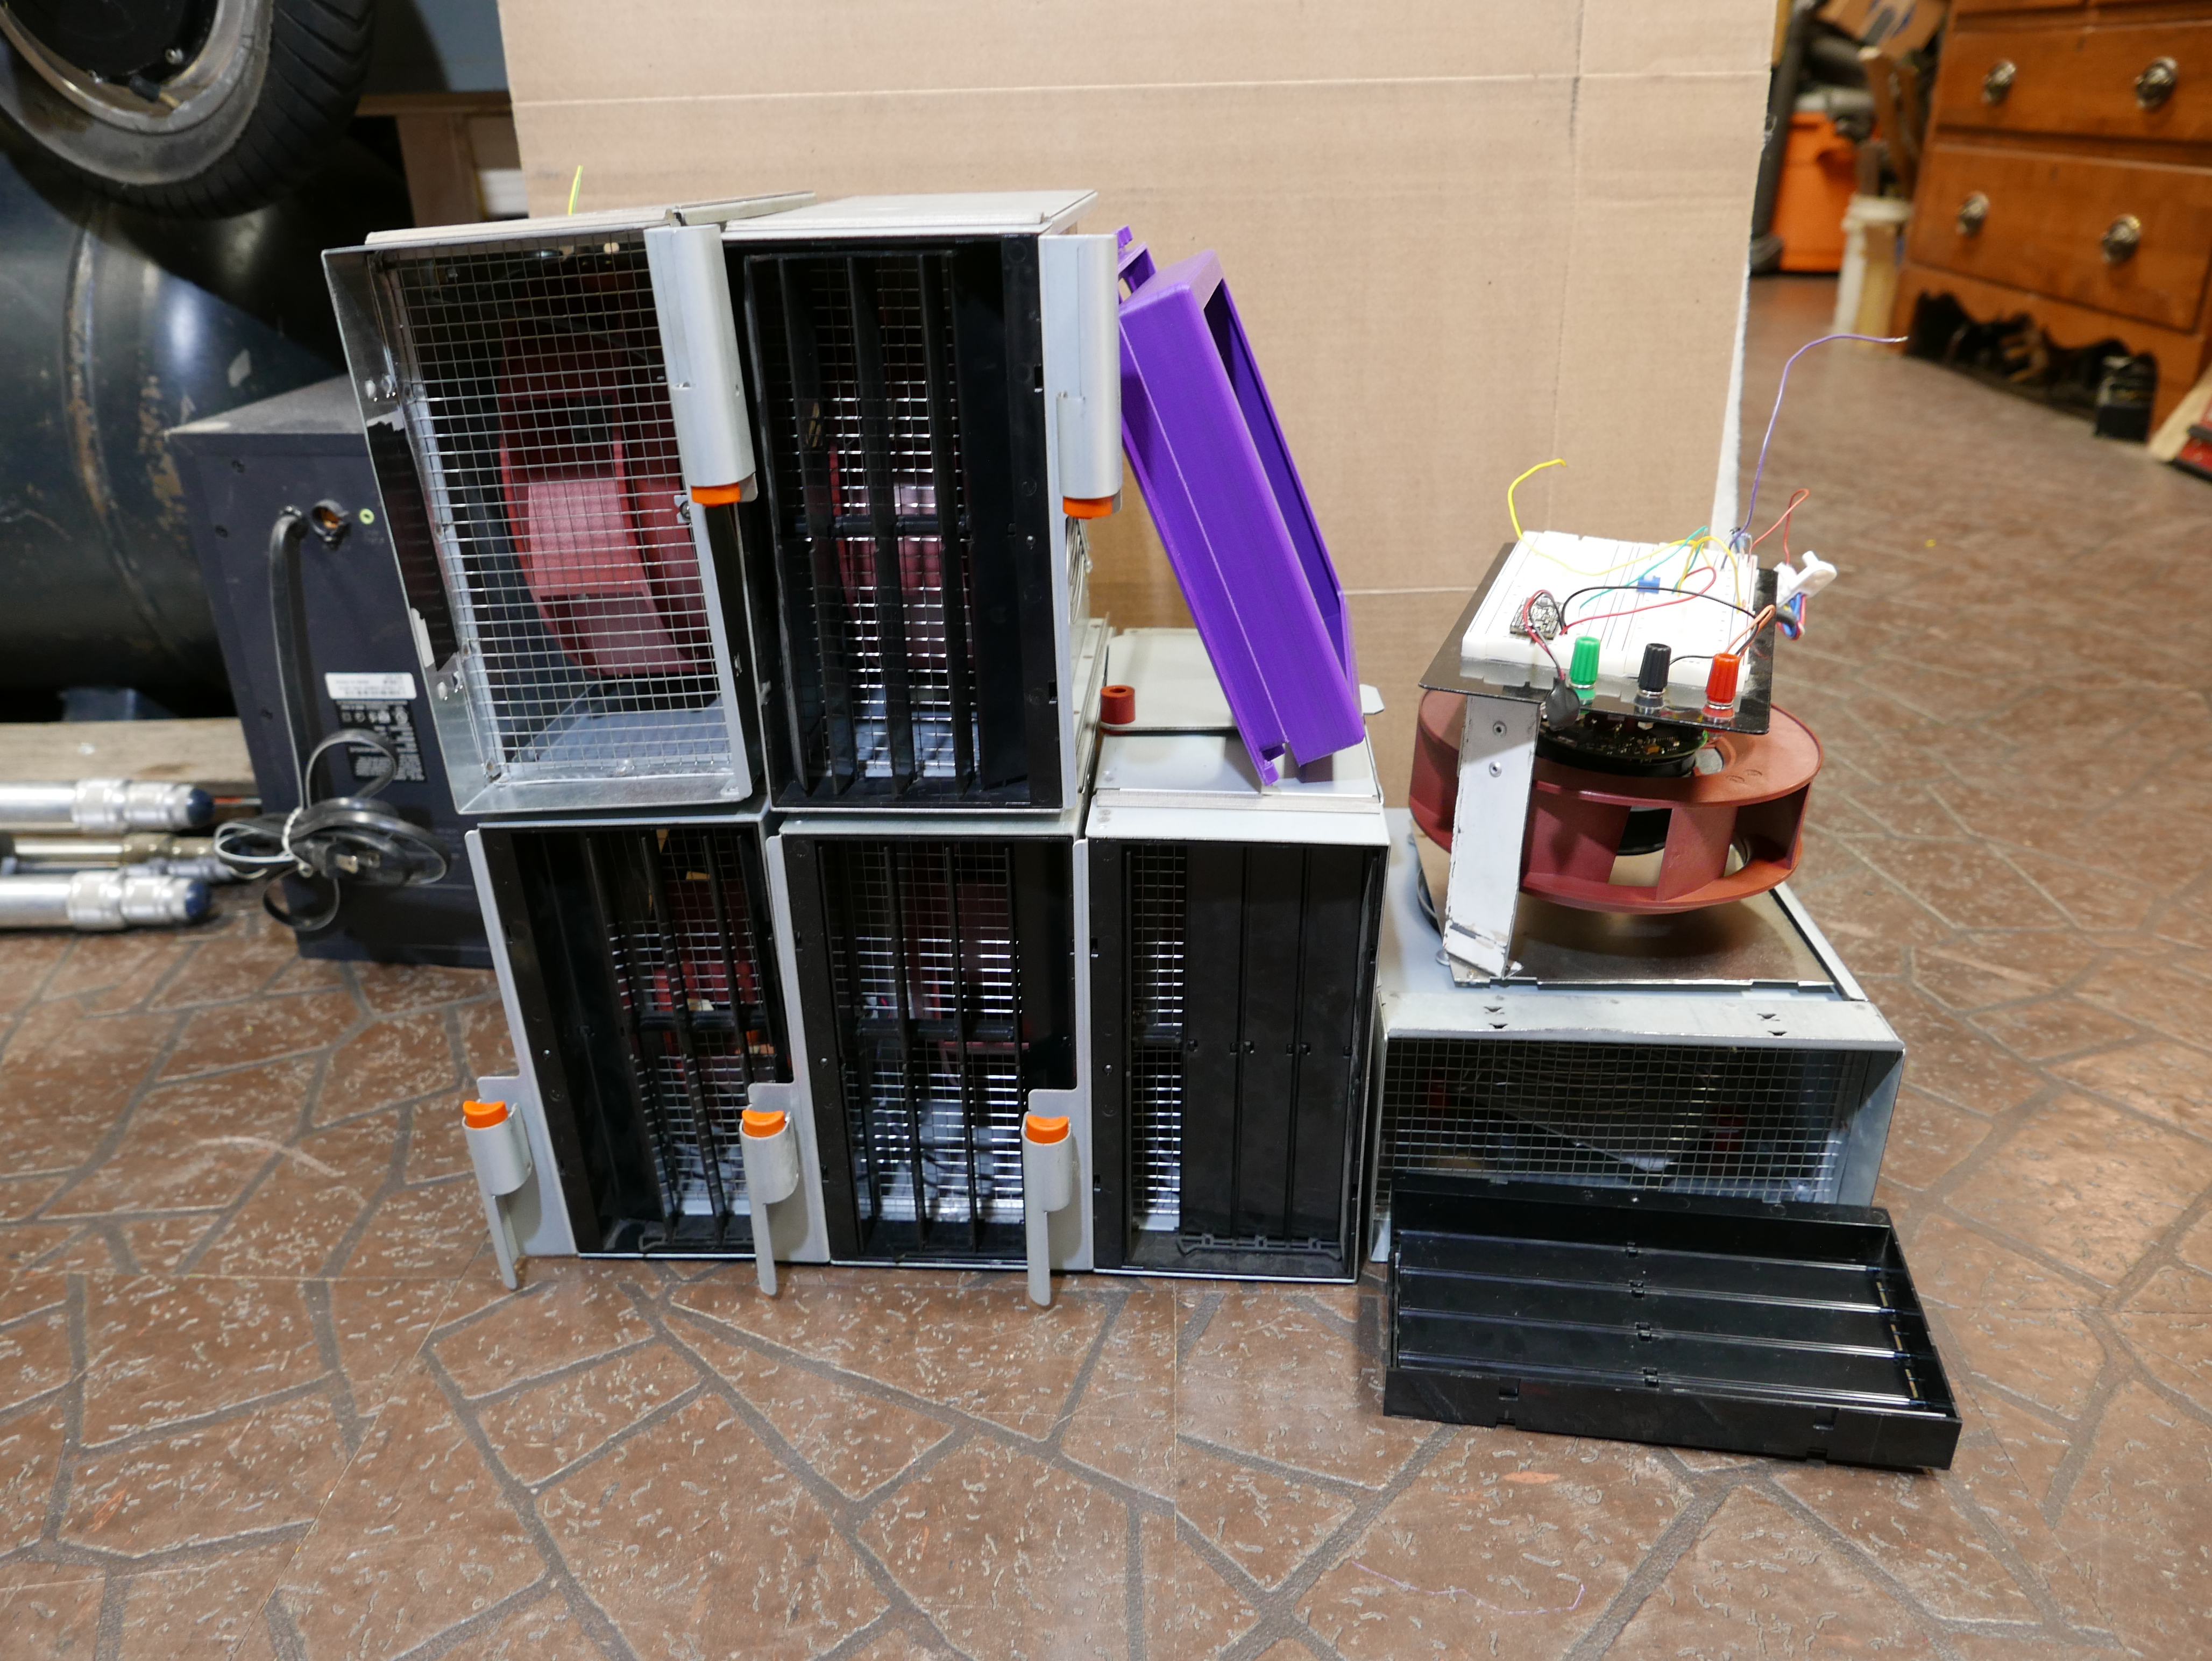
Since I'm working with ewaste / old parts, some of these fans will be used, some will be new old stock. The used ones will have to be cherry picked and analyzed for dents and defects. Used fans will also need cleaning. I plan on using compressed air to thoroughly blow out each used fan, but final hand cleaning with a damp cloth will be up the the end user. Cleaning by hand is easy and harmless, but it is time consuming. Compressed air is a good common ground and at the same time, by the end user cleaning their unit, it can provide them with more of a sense of value for their fume extractor (like the economics of a picked apple at the grocery store).
Another major manufacturing challenge is the mass production of the battery adapter plates. More often than not, Drill manufacturers make intentionally overly-complex battery connector geometry in effort to mitigate knockoff production. Regardless of how absurd the battery mount CAD looks, the major problem is finding an easy way to mass produce high quality battery mounts that will work every time and fit genuine connectors.
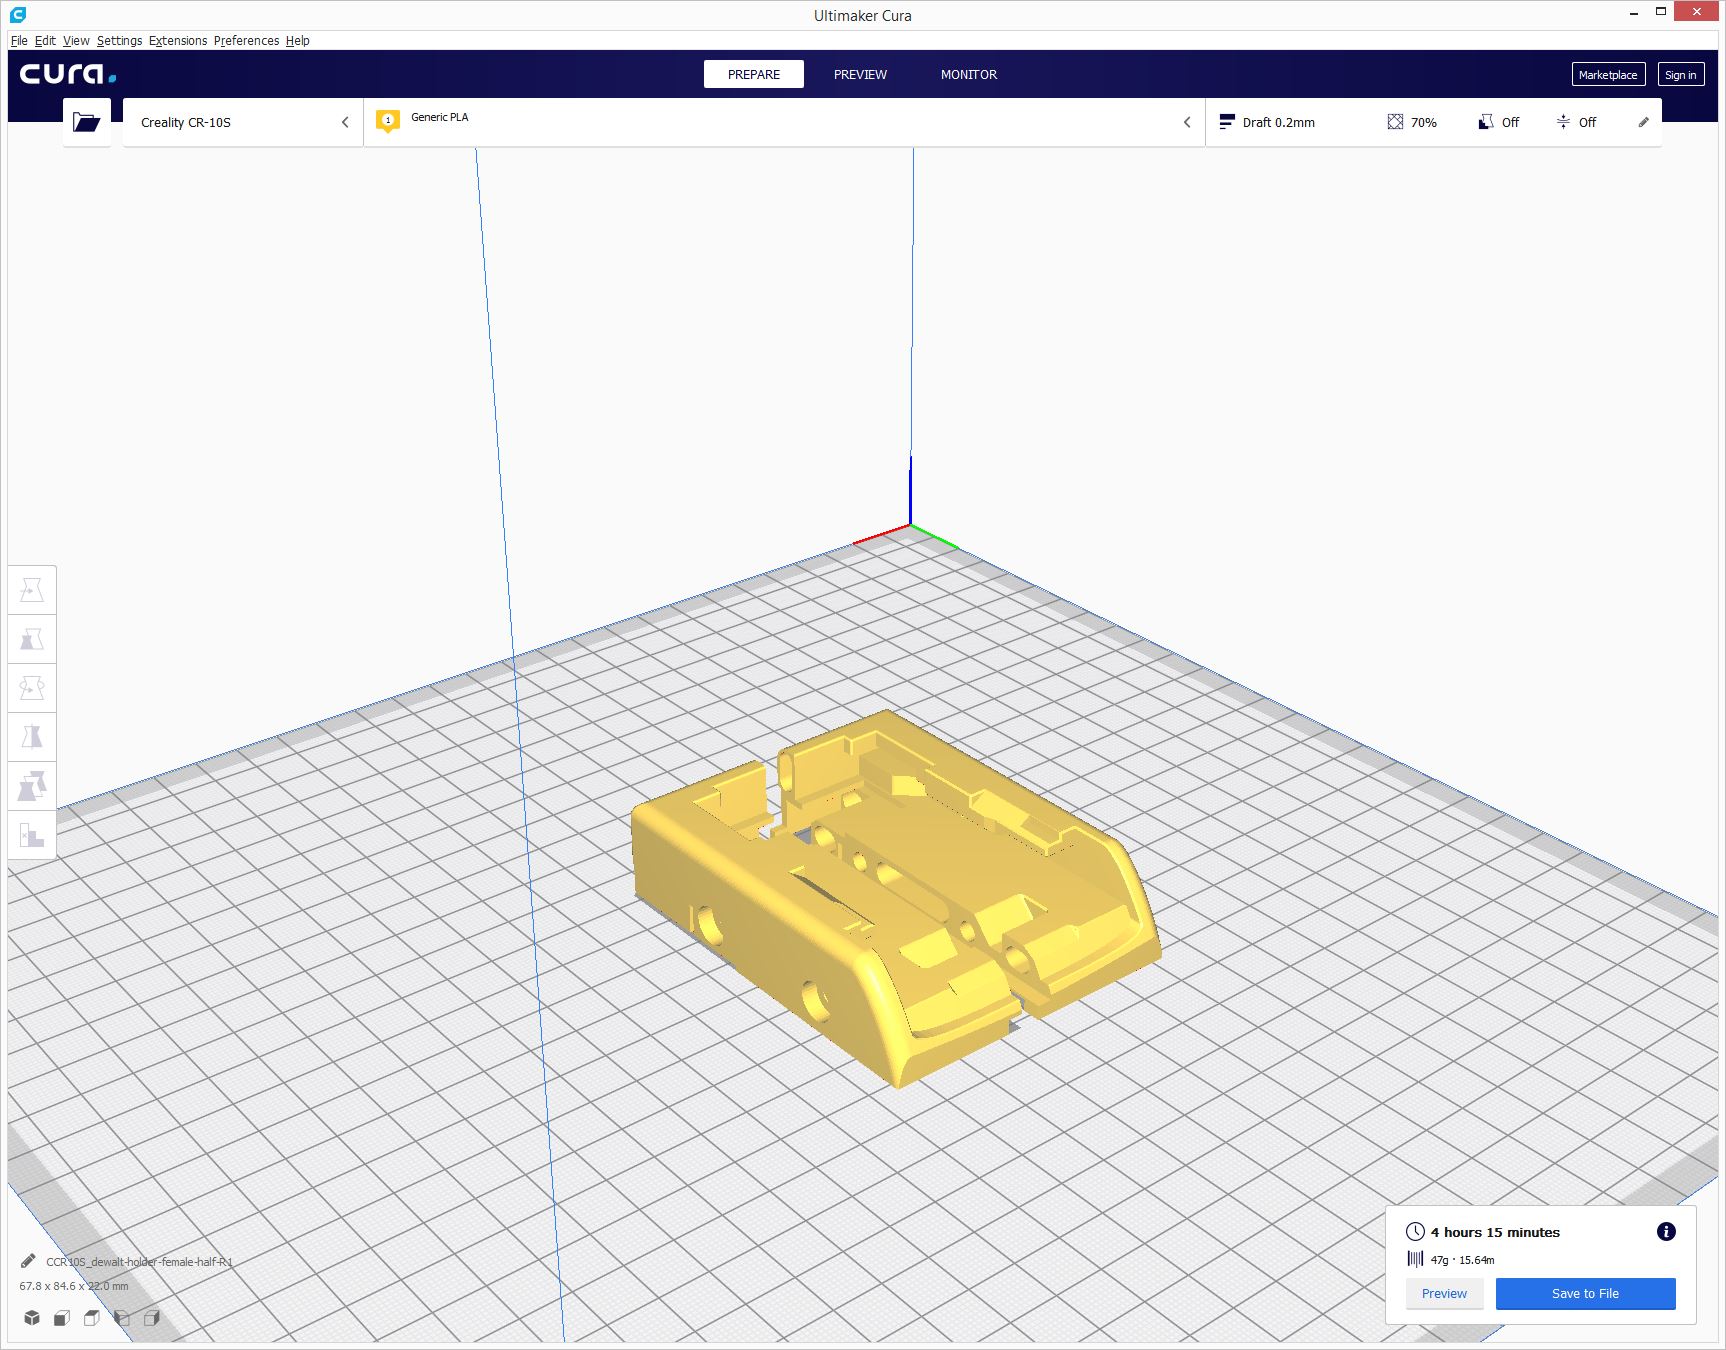
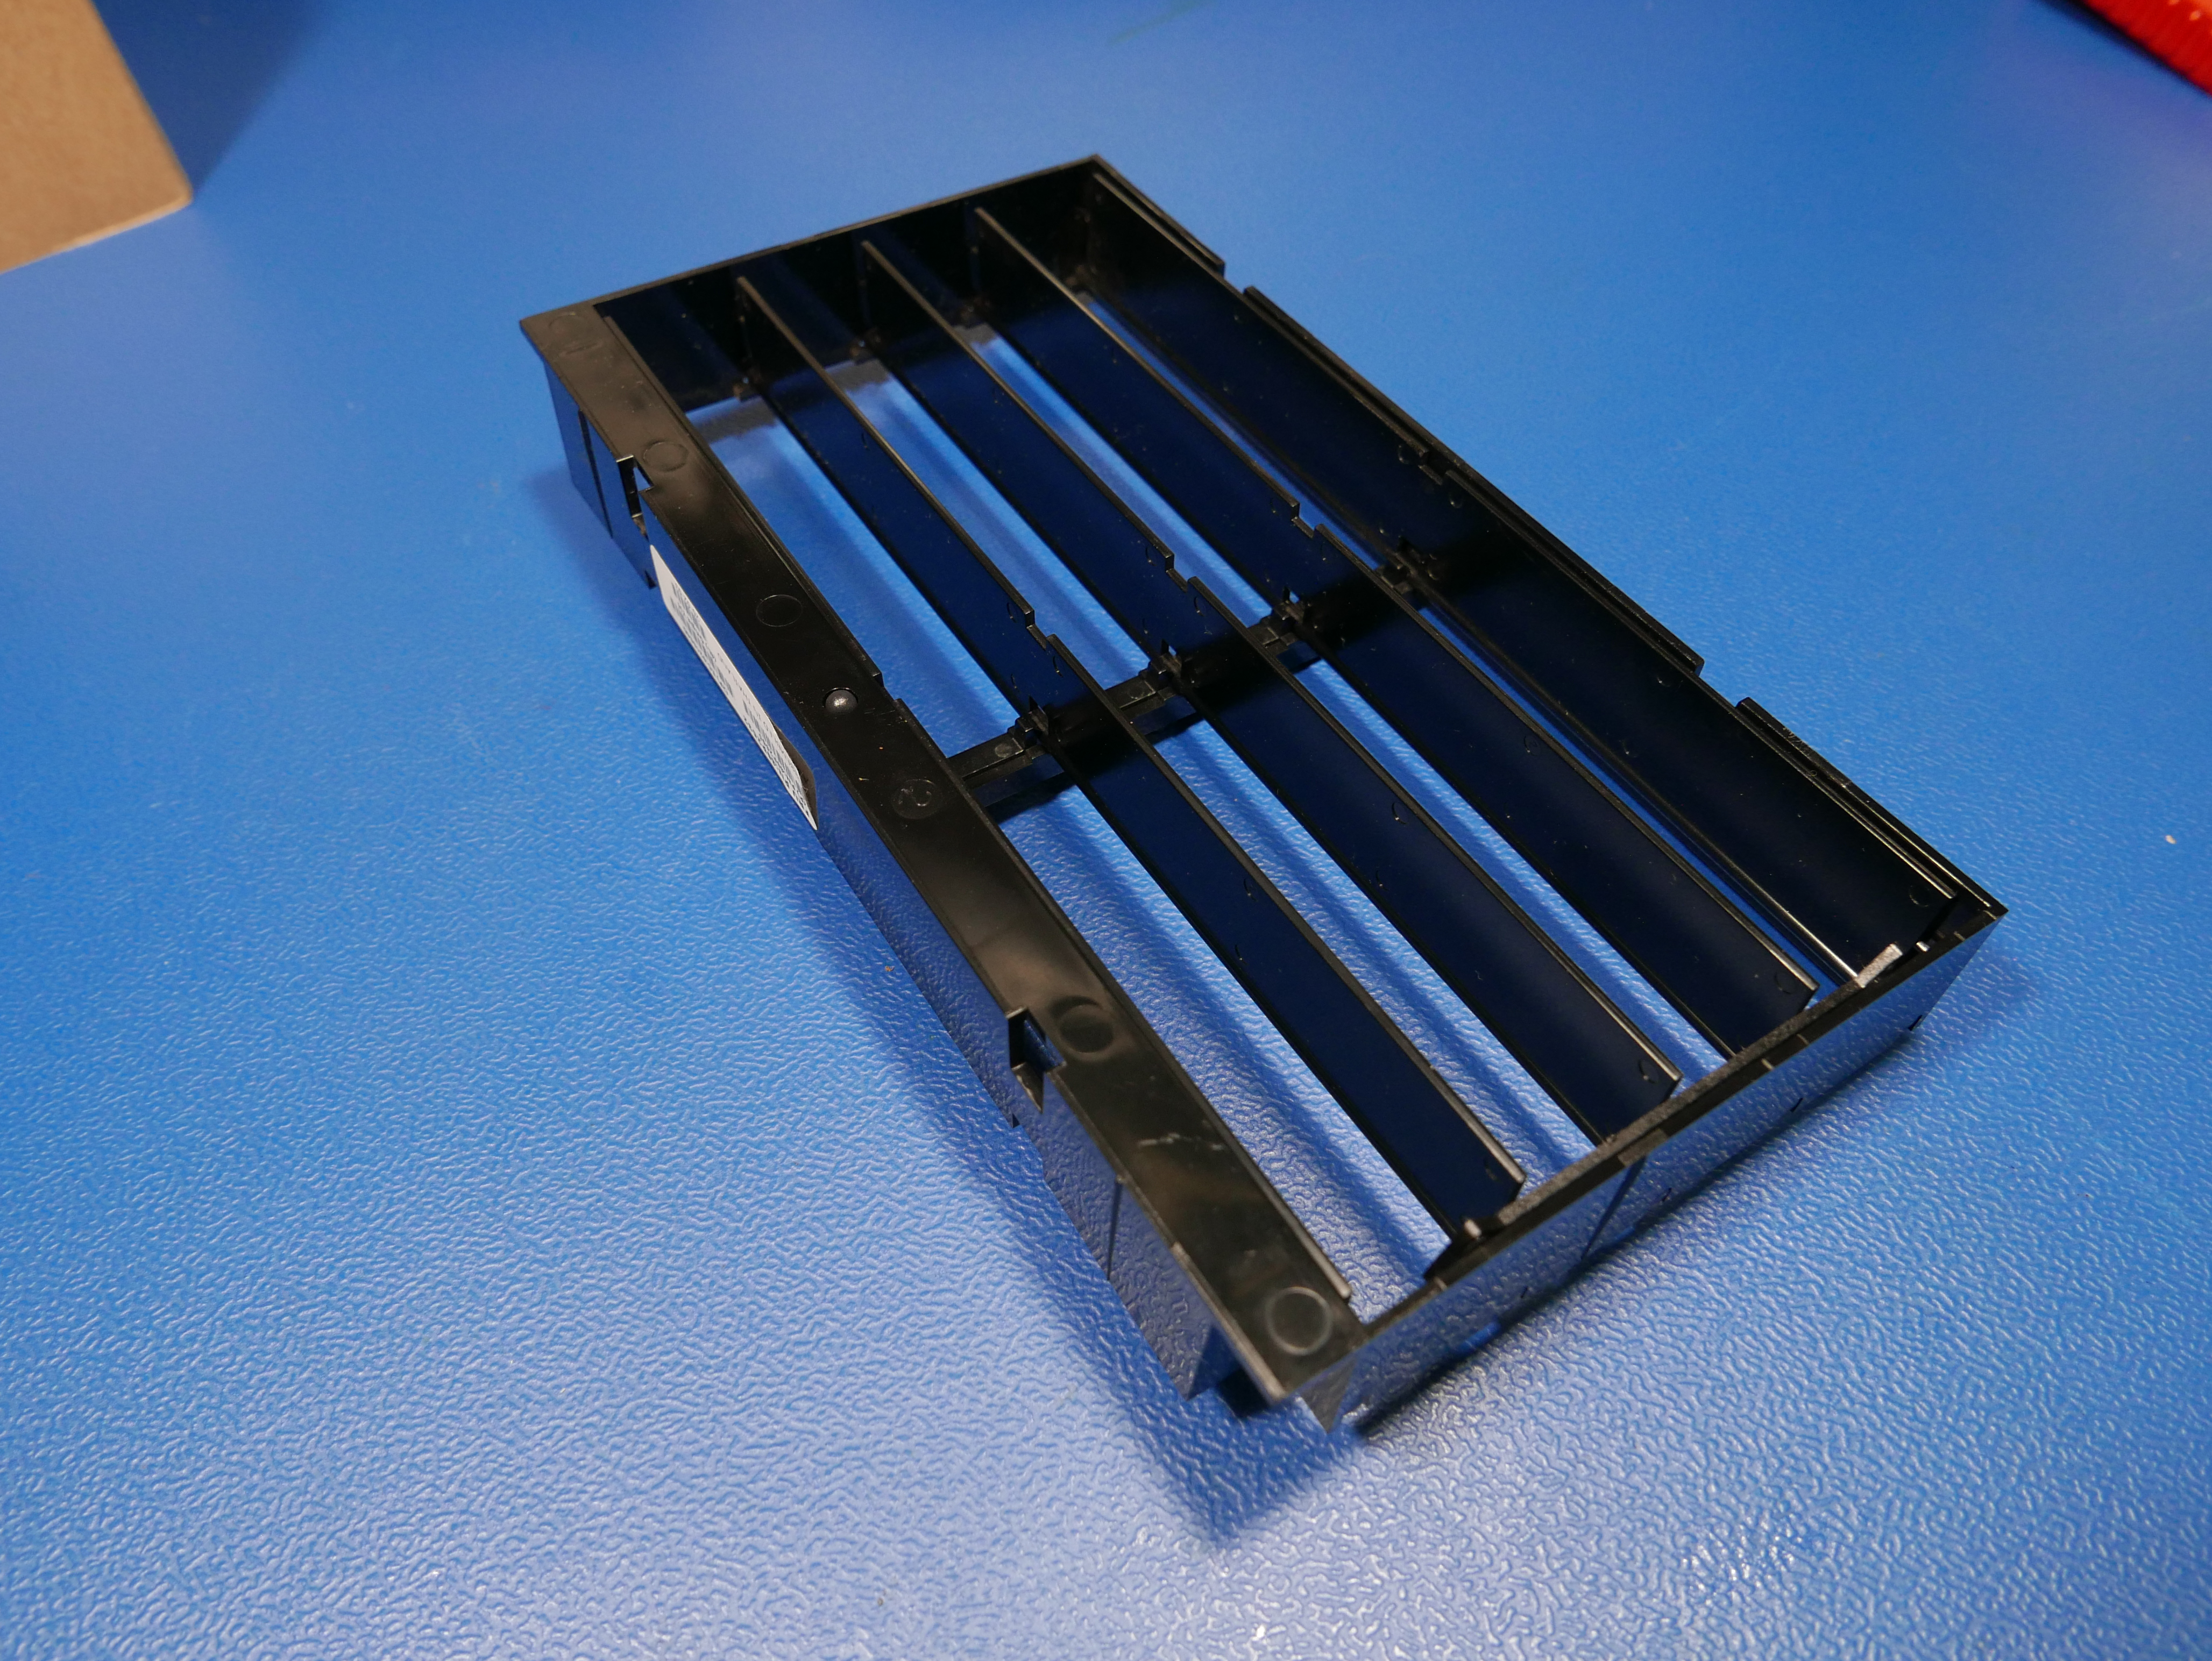
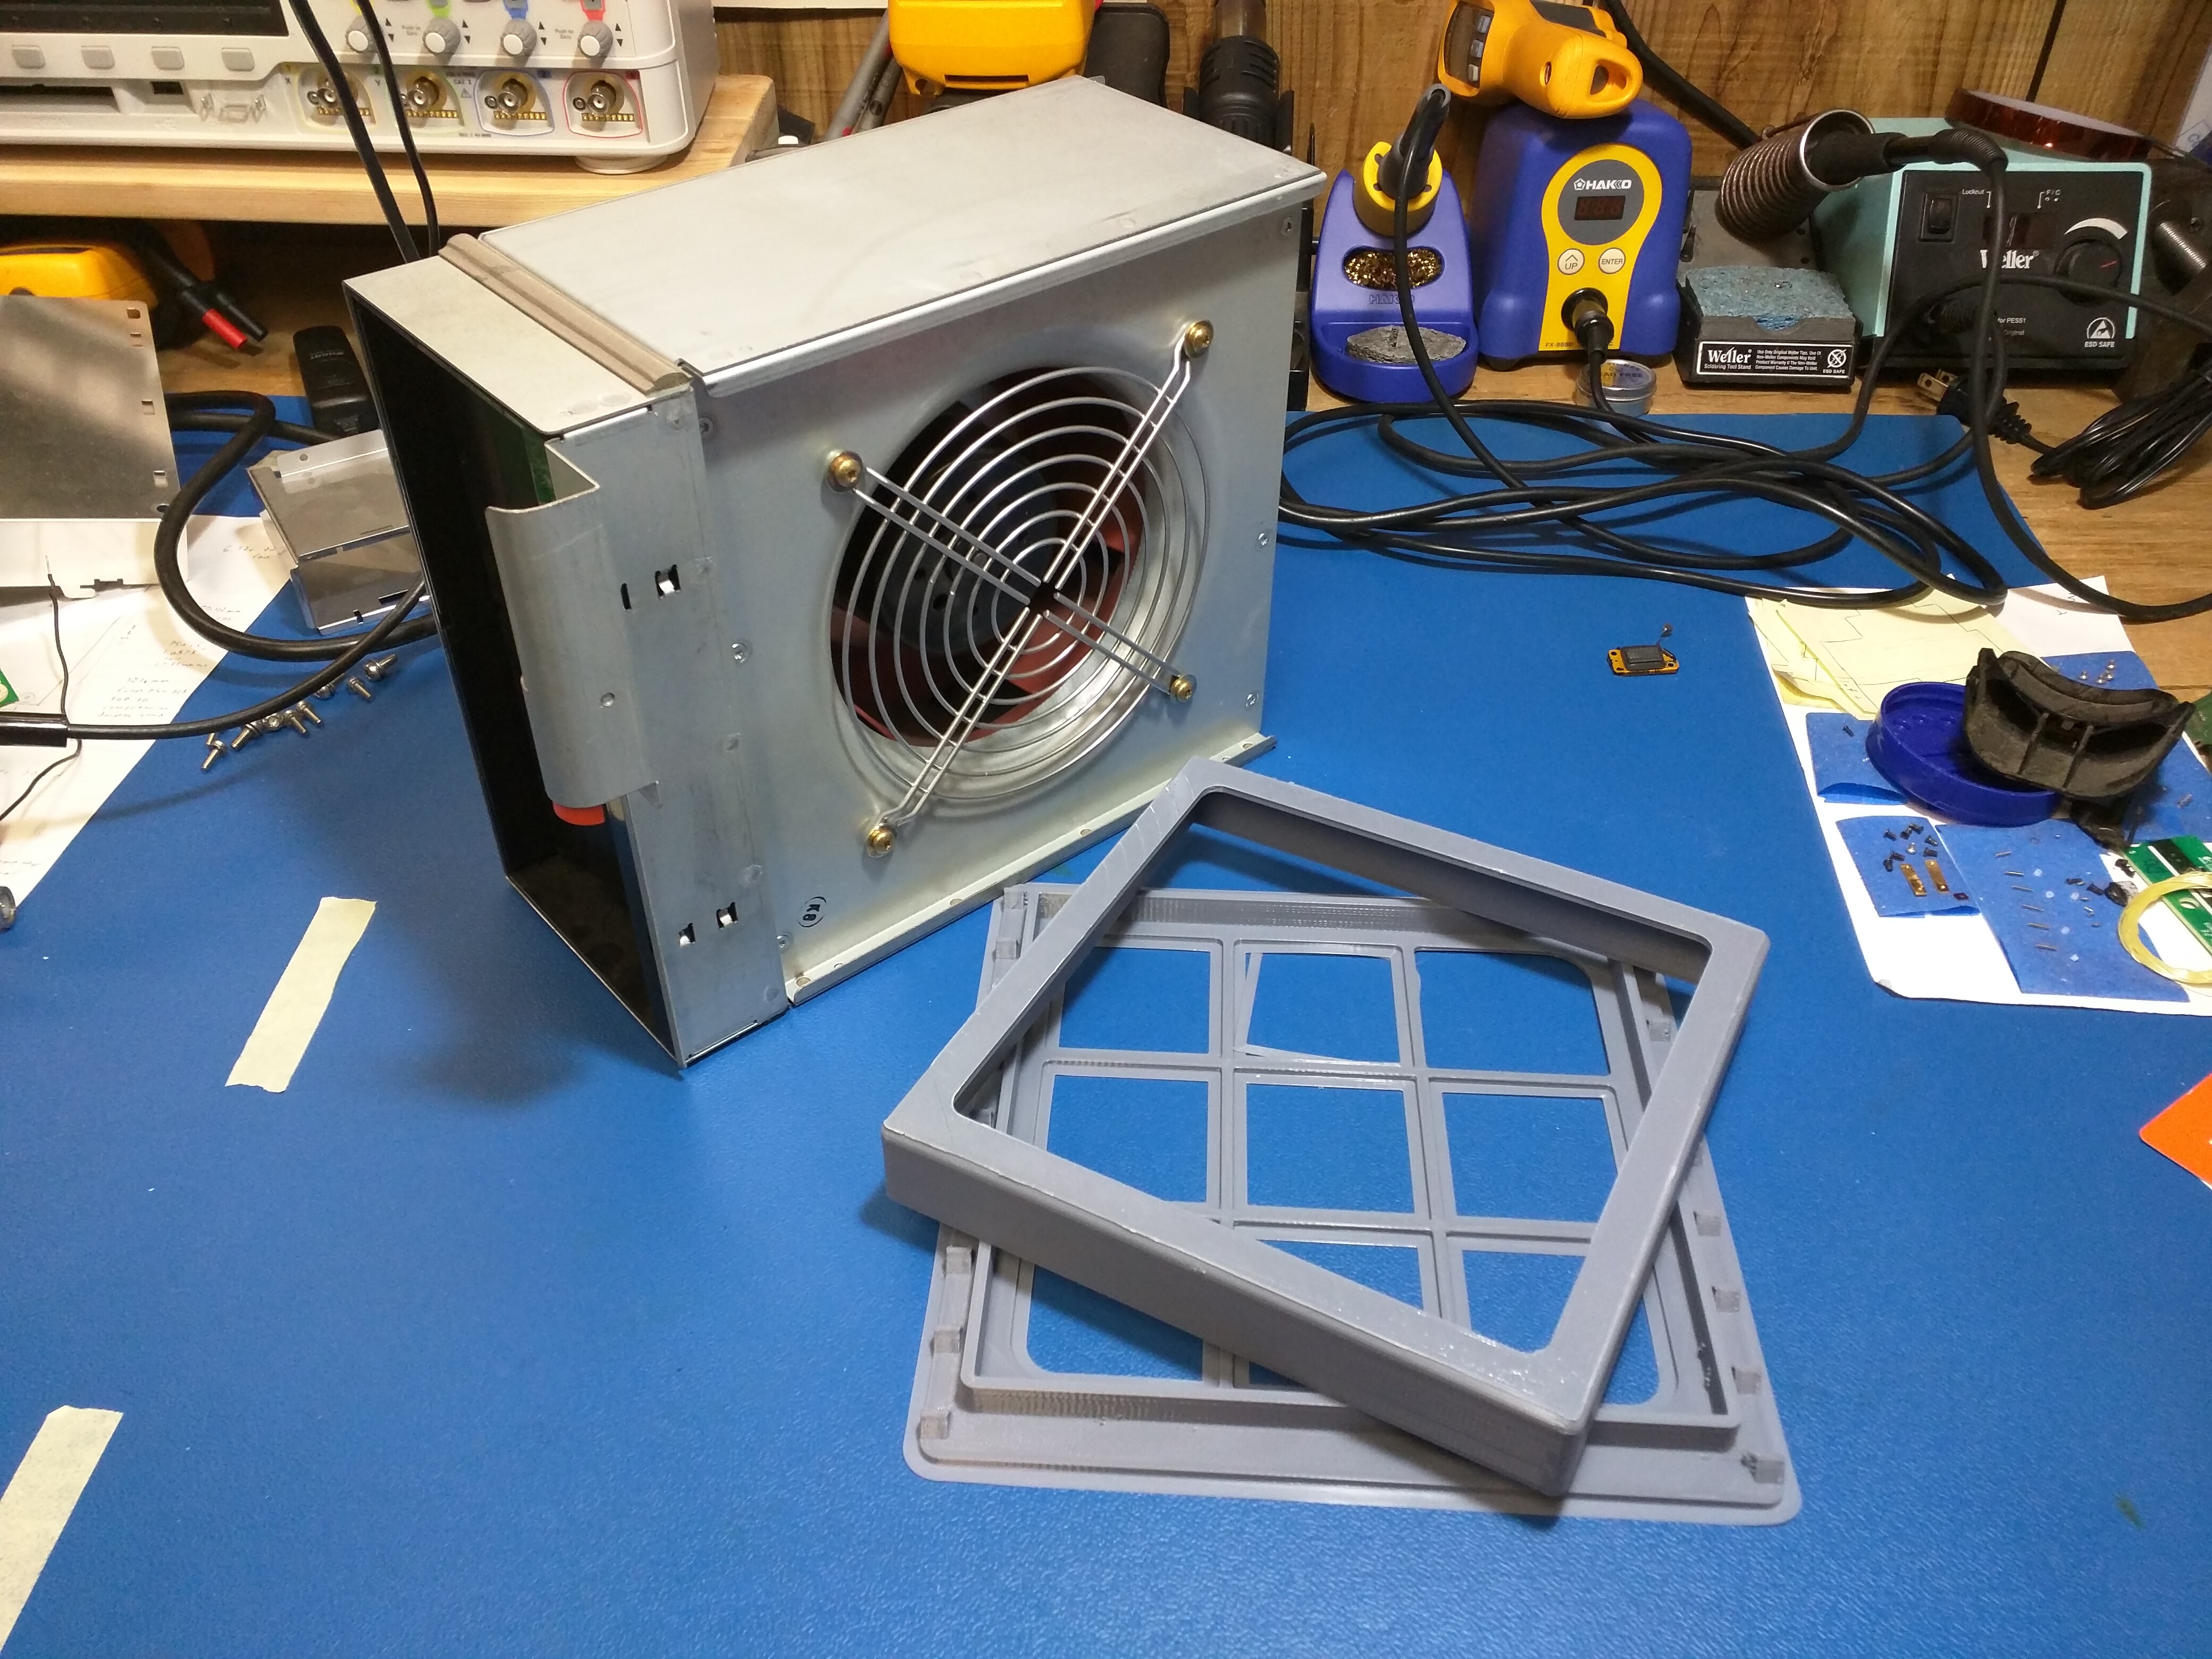
So far, I have resorted to 3D printing, but I have found that 4 hour print times are a bit much. I am in the process of redesigning the cad to optimize for machining. The good news is that the clam-shell nature of the dewalt 20v mount should make it easier to machine the halves out of Delrin or HDPE. I could just rely on a series of end mills instead of needing a symphony of woodruff cutters to complete the oddball geometry. The filter tray design was a bit tricky. This is not because of unfriendly geometry, but rather because of the size of the part and the nature of the item. The filter tray measures 8.25in x 7.95in x 1.74in tall. This size pushes the item into injection molded plastic territory, because my FDM 3D prints had a build time of over 14 hours! That's with optimization and ruggedness factors built into the print.
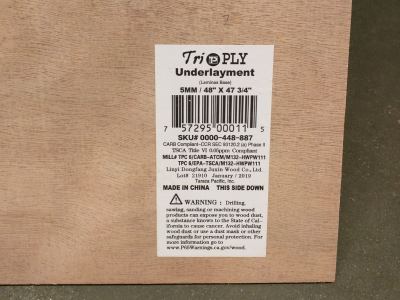
However, if the demand for this unit is under 5000 units, injection molding is totally not an affordable option either. At ten thousand, it may make sense. An easy way to buy time and thwart the high initial financial burdens of injection molding is to simply use another material altogether! Wood is a cheap and easy to source material, can be easily cut and glued together. A laser cutter, titebond and a wood band clamp can go a long way.
The initial production run will rely on a wood based filter tray. I can easily enough farm out the laser cutting to a service or job shop and do the gluing and filter assembly in house, or with a small discount, pass that assembly burden off the the consumer. Everyone has woodglue. It has been an essential school supply since the dawn of time. There is no reason why the enduser could not glue together pieces of supplied wood unless they simply did not want the hassle. That is why I am offering different levels of assembly in terms of buying options. Here is my approach to assembly of the fume extractors in a convenient diagram:
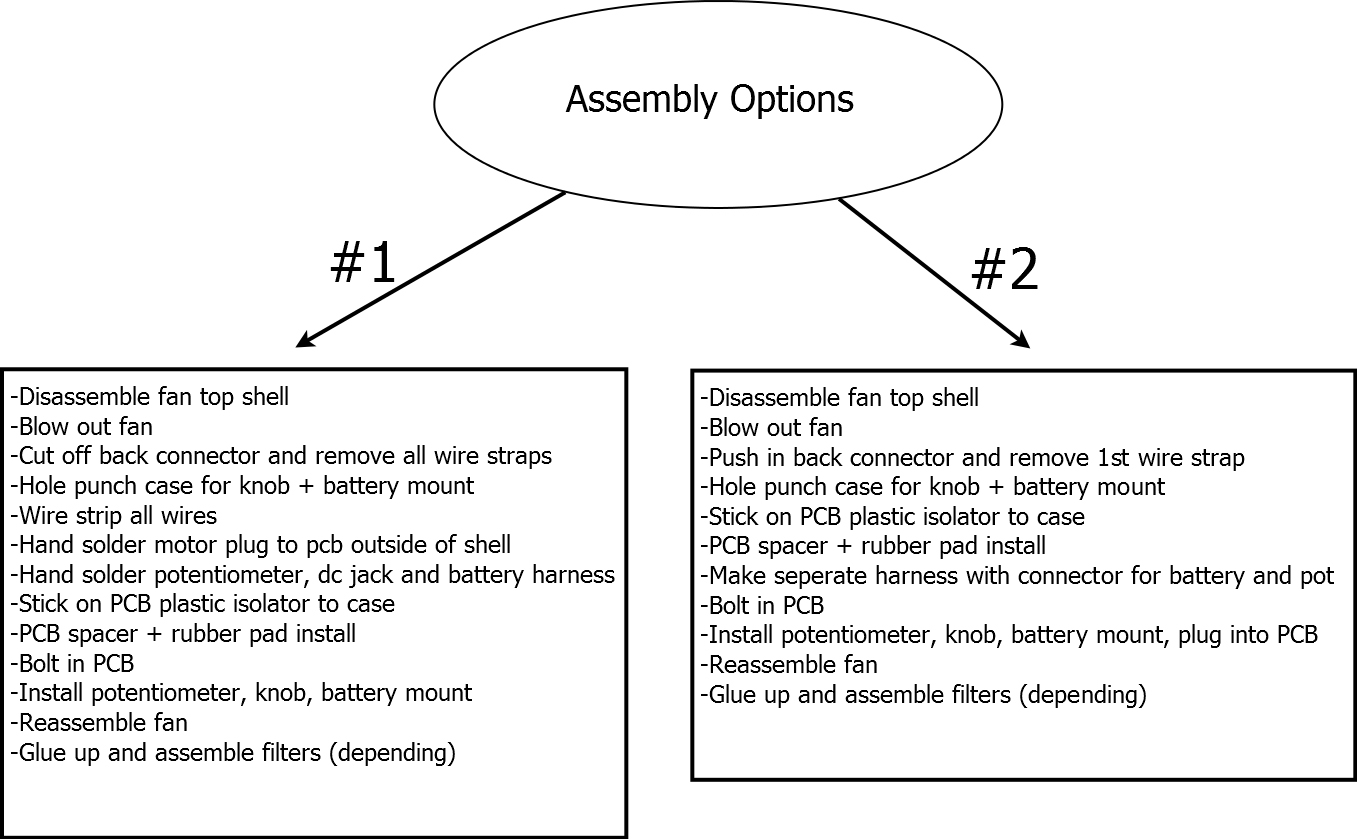
I have decided to select option number two because my aim is to make assembly as fast and efficient as possible. By removing hand soldering from the assembly process, I can optimize the assembly through specialization. This way, I can contract out the wiring harness soldering to multiple contract workers and have multiple sources for the assembly team in order to prevent assembly bottlenecks.
Making a Simple Product Fun:
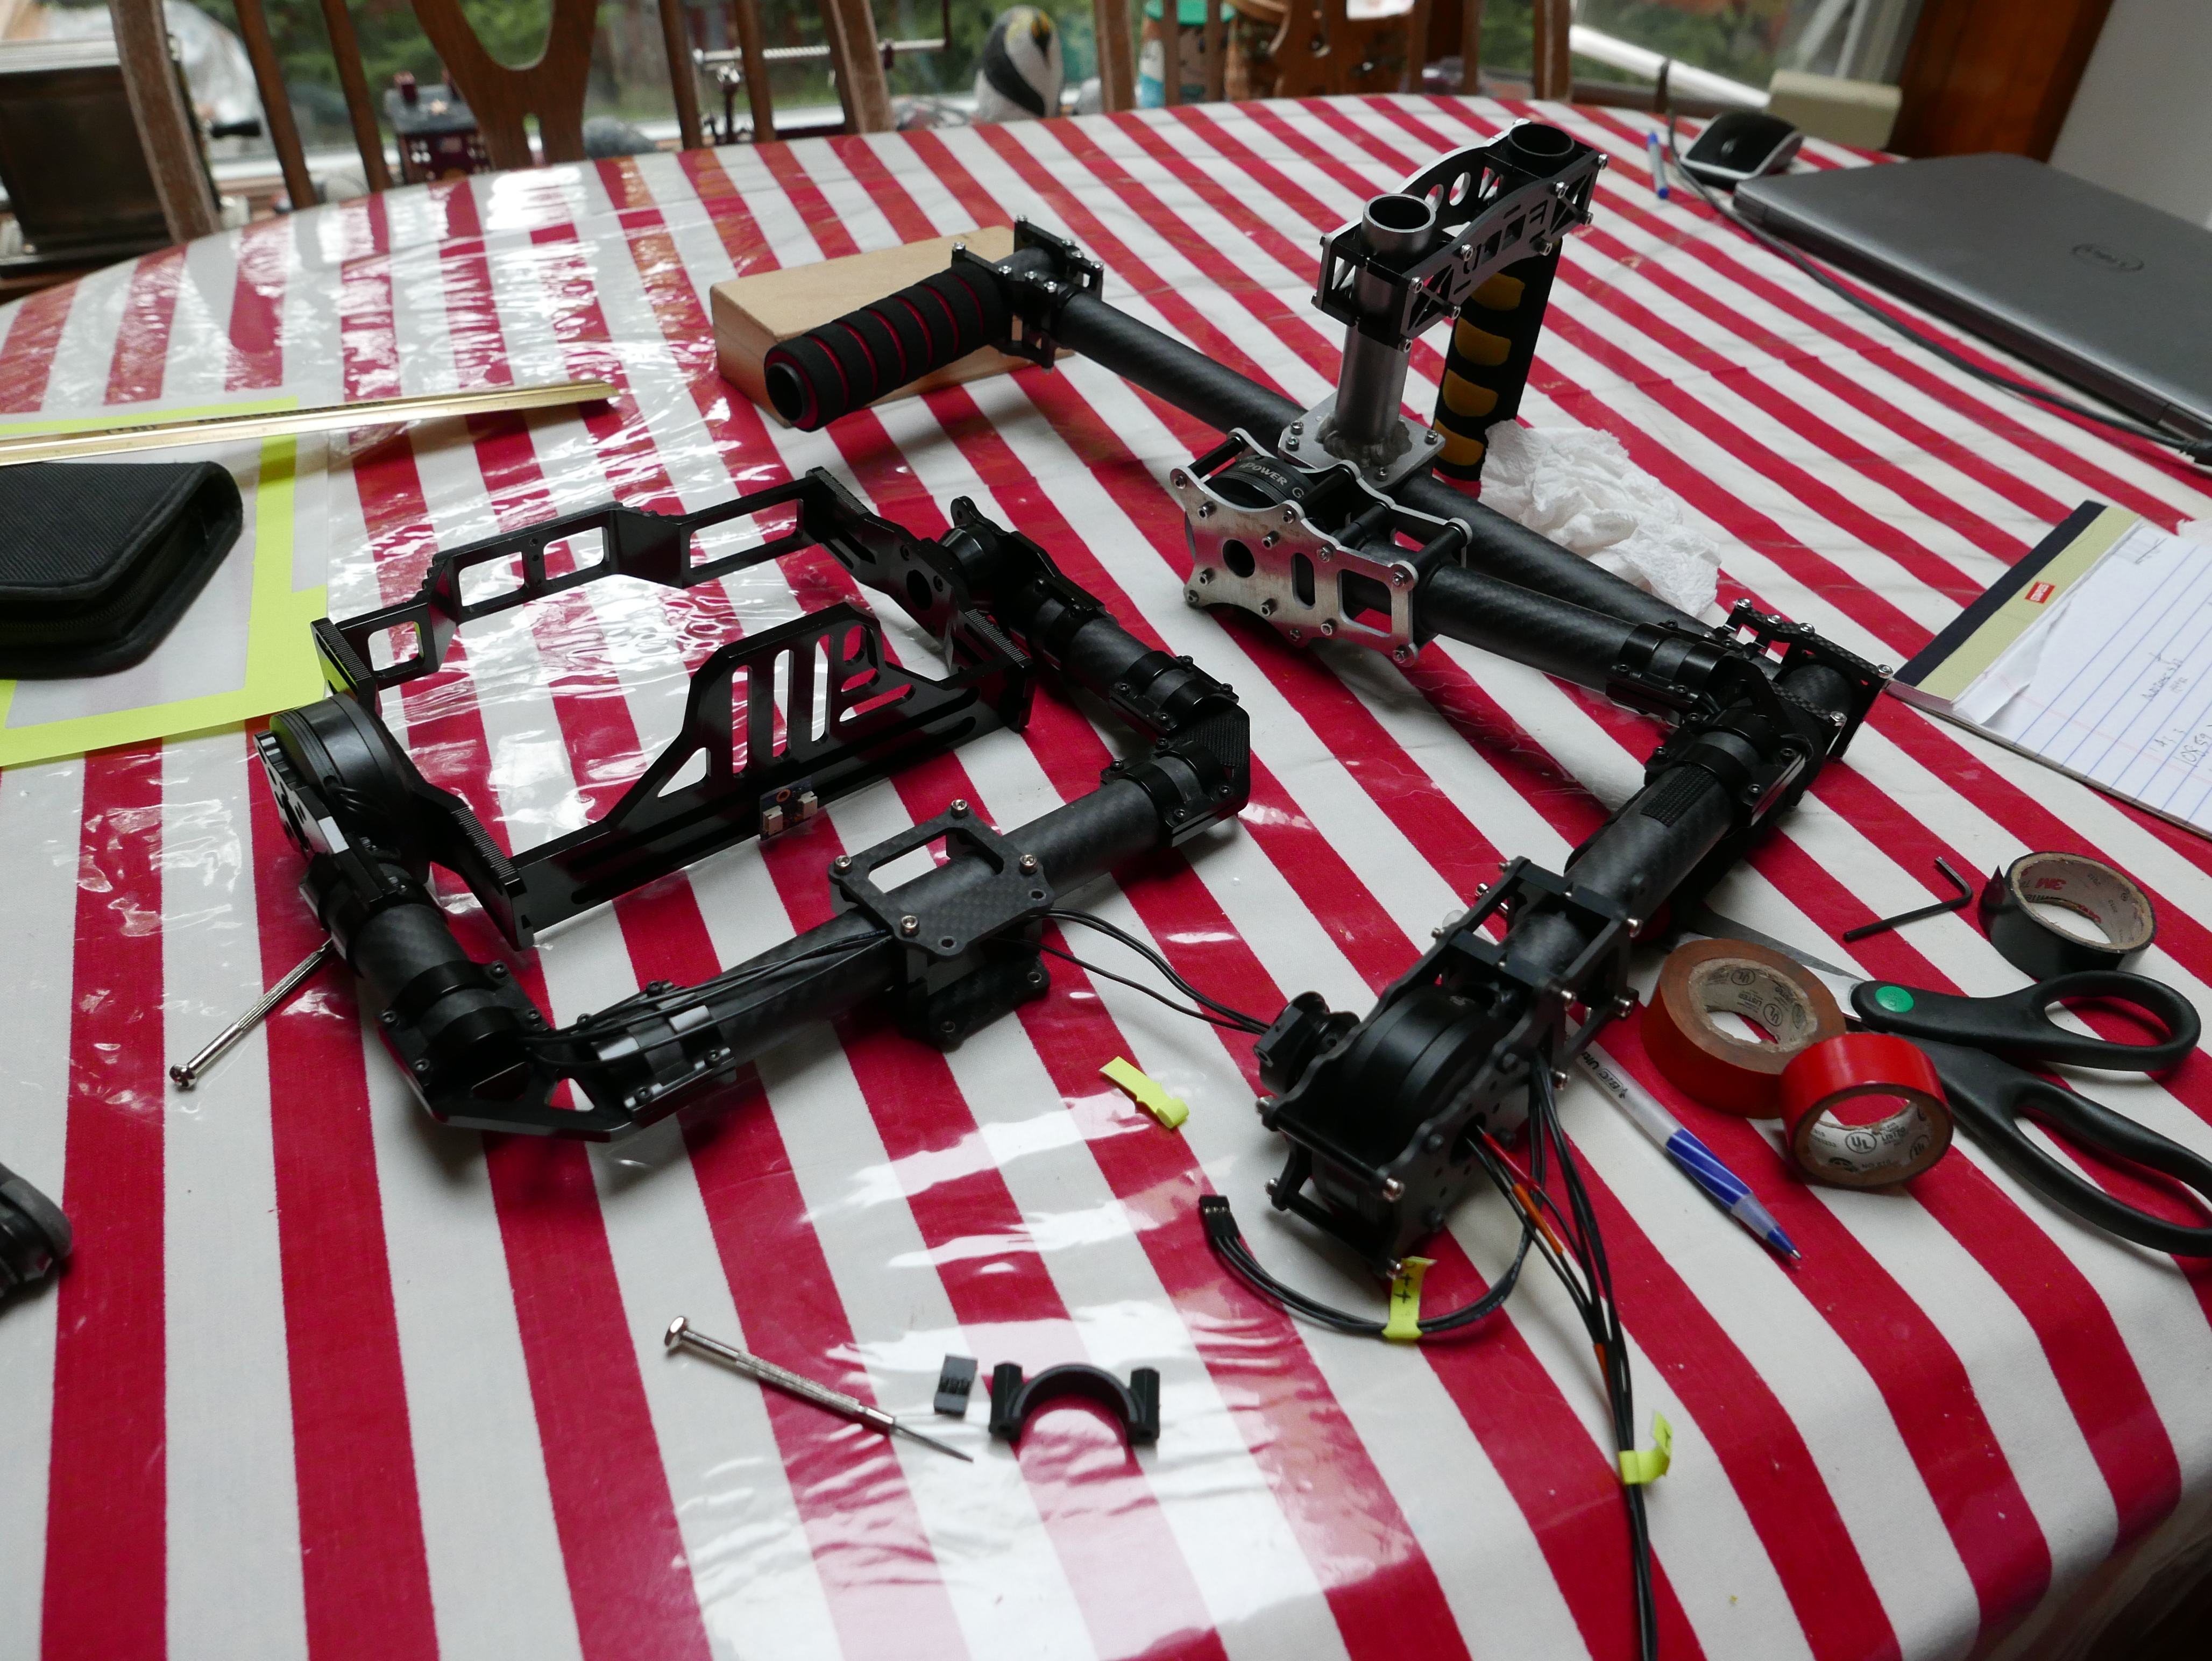
I've ventured into three axis camera gimbal design before along with motor control and PID tuning, but one of the coolest features that gets me every time is the fact that most brushless gimbal motors actually beep when the gyroscope and motor driver are in sync. That simple yet elegant beep is a reminder that yes, a brushless motor is indeed an electro-mechanical system that can act as a sudo-speaker with the right input.
Why not take 8-bit music, a big ol fan and a DC input waveform and make an undercover lab speaker? Tone generation is one of the deciding characteristics for the main microcontroller for this project, as my go-to atmega328 may not be able to generate both the correct PWM for the fan and a high enough bandwidth output waveform to create the appropriate tone generation for music, let alone store a converted mp3-to-waveform equivalent file. I am leaning toward a cortex m0 alternative, but I still need to thoroughly research the process of 8-bit music conversion to a tone waveform. I can imagine a script to automate this process is in order.
Potential Purchasing Options

Here is a quick diagram of the potential options I have for selling this fume extractor. You can see that option #1, requires the buyer to have to do an inordinate number of tasks that, at the end of the day, would put off a large number of buyers from purchasing the unit. A buyer should not have to buy a PCB, the fan and the filter material then disassemble the fan, cut and wire strip the fan, hand solder / crimp some connectors on, make a few holes for mounting then reassemble and glue together a tray. That is FAR too much to ask for a customer to do. It is easiest and most efficient for me, salvagedcircuitry, to go with option #2, where I sell the unit as mostly complete or perfectly complete. Therefore no one feels like they are "inheriting a project" rather than purchasing an awesome product. I am looking into making DIY kits available for purchase, so if a buyer really wants to go all out, they can build one by them self. Such a kit would include everything needed to make the fan and instructions. That option would come later on as I would need time to make detailed, easy to read instructions for anyone to follow.
Note
I will go into details of the specific fan model number in the near future. I am in the process of discovering all the model numbers associated with this fan design (it looks like there are several iterations) and I am working to secure as many sources for these fans as possible. I want to keep costs as low as possible, and secure the appropriate amount of fans to satisfy the estimated demand so this can remain as affordable as possible. As explained earlier, it is easier for the customer to purchase everything from one vendor (salvagedcircuitry) than have to shop around and source components, so I am in the process of acquiring these fans en masse.
Licensing:
Since this project is so heavily dependent on ewaste, and a personal goal of mine is to minimize ewaste and spur reuse, it would be foolish to release this product as anything other than open source hardware. I plan on making the entire bill of materials, CAD, research and PCB design available for download for personal use only. I am leaning toward the CERN Open Hardware License for this project. These are a few caveats. I will be the sole party responsible for mass manufacturing this product at scale and if it comes a time in the future when I decide to step away from this project, I will hold the right to certify another party to assemble or distribute this product. I also hold the right to create a joint venture with another company in the best interest of design, manufacturing and or distributing this product. In addition, the official name of this product may change to give it a broader appeal to a wider pool of customers. The Salvaged Circuitry brand and logo is owned by Anthony Kouttron and may not be reused, duplicated or copied for any financial intents or purposes unless express permission is granted by the rightful owner, Anthony Kouttron.
I am not a lawyer by any means, but basically, this project is my baby right now and I would like anyone to be able to make their own, but I would not like any other company to mass manufacture this good without my consent or permission. This is not a monetary issue, but rather an issue of quality control. I don't want another company to come in and penny pinch this into oblivion and start providing substandard filtering materials, or use alternative PCBs powered by no-name undocumented chips that no one can source when the components fail.
Potential Corporate Cooperation
I invite any tool company with a battery system to reach out and work with me on expanding the support of this fume extractor to their battery system. Frankly, more people need proper fume extraction in their homes and workspace and having a portable fume extractor would bring extra value to any tool system. Think of how convenient it would be to use the same battery system as the household drill for a personal pet fume extractor or a fume extractor in the art studio. I would love to source connectors straight from you. I hate knock off connectors and having one designed from source is significantly preferred. I am a lover of any and all tools and have been using power tools since I was a toddler, so seriously, feel free to reach out.
Ewaste Cooperation:
If you are an ewaste company and you have server fans like this model, feel free to reach out. I am looking for multiple sources of fans and you may be one of them!
Feedback From the Community:
Since this project is open source, I'd love to know what you think! Seriously, give me some feedback folks! I'm interested in finding out what drill battery systems makers use and which ones I should CAD up and research connectors for. As mentioned previously, I'm aiming for the big three tool vendor systems, but there are some underdogs like the Hitachi-Metabo system that look pretty tempting. In terms of ergonomics, where would the end user want the DC jack to be? behind the battery? On the side of the battery mount?
In terms of the power button, should I reuse the mechanical release button on the handle as the on/off button or should I go with the power switch integrated into the potentiometer? If anyone has input on this, I'm all ears.
5/16/24 Update:
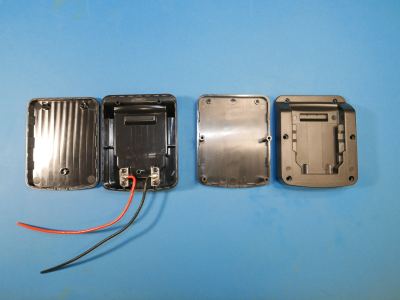
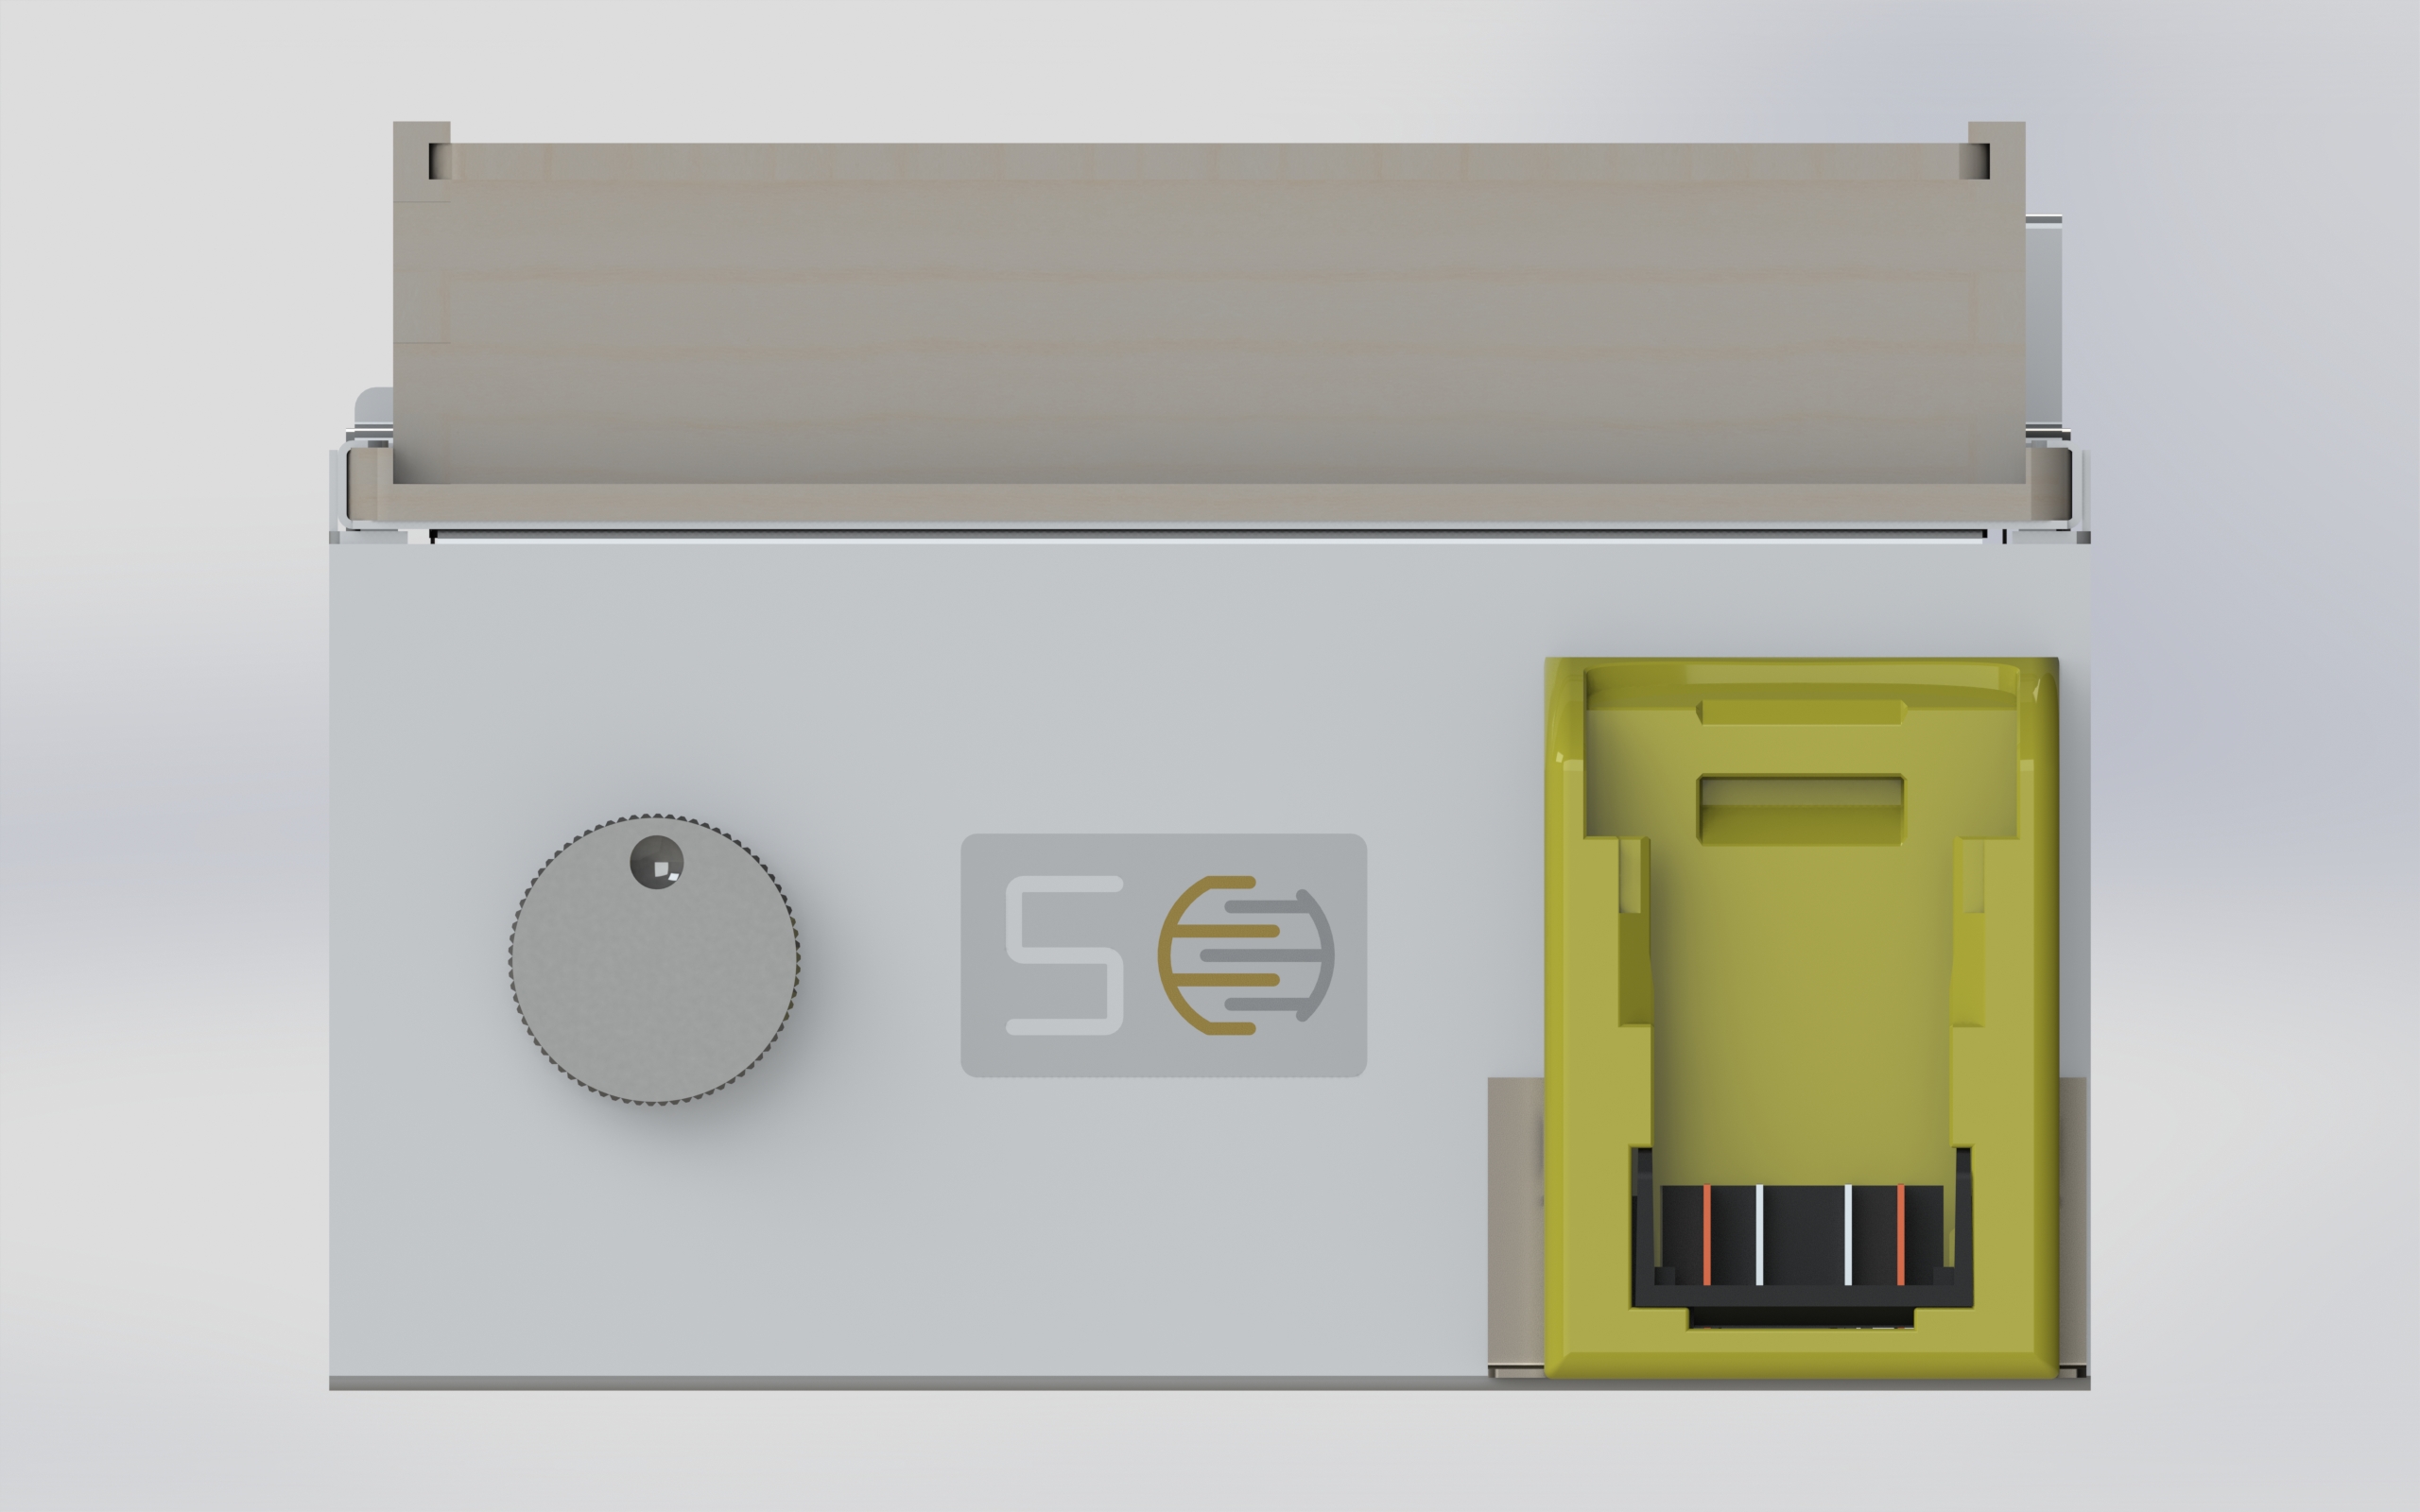
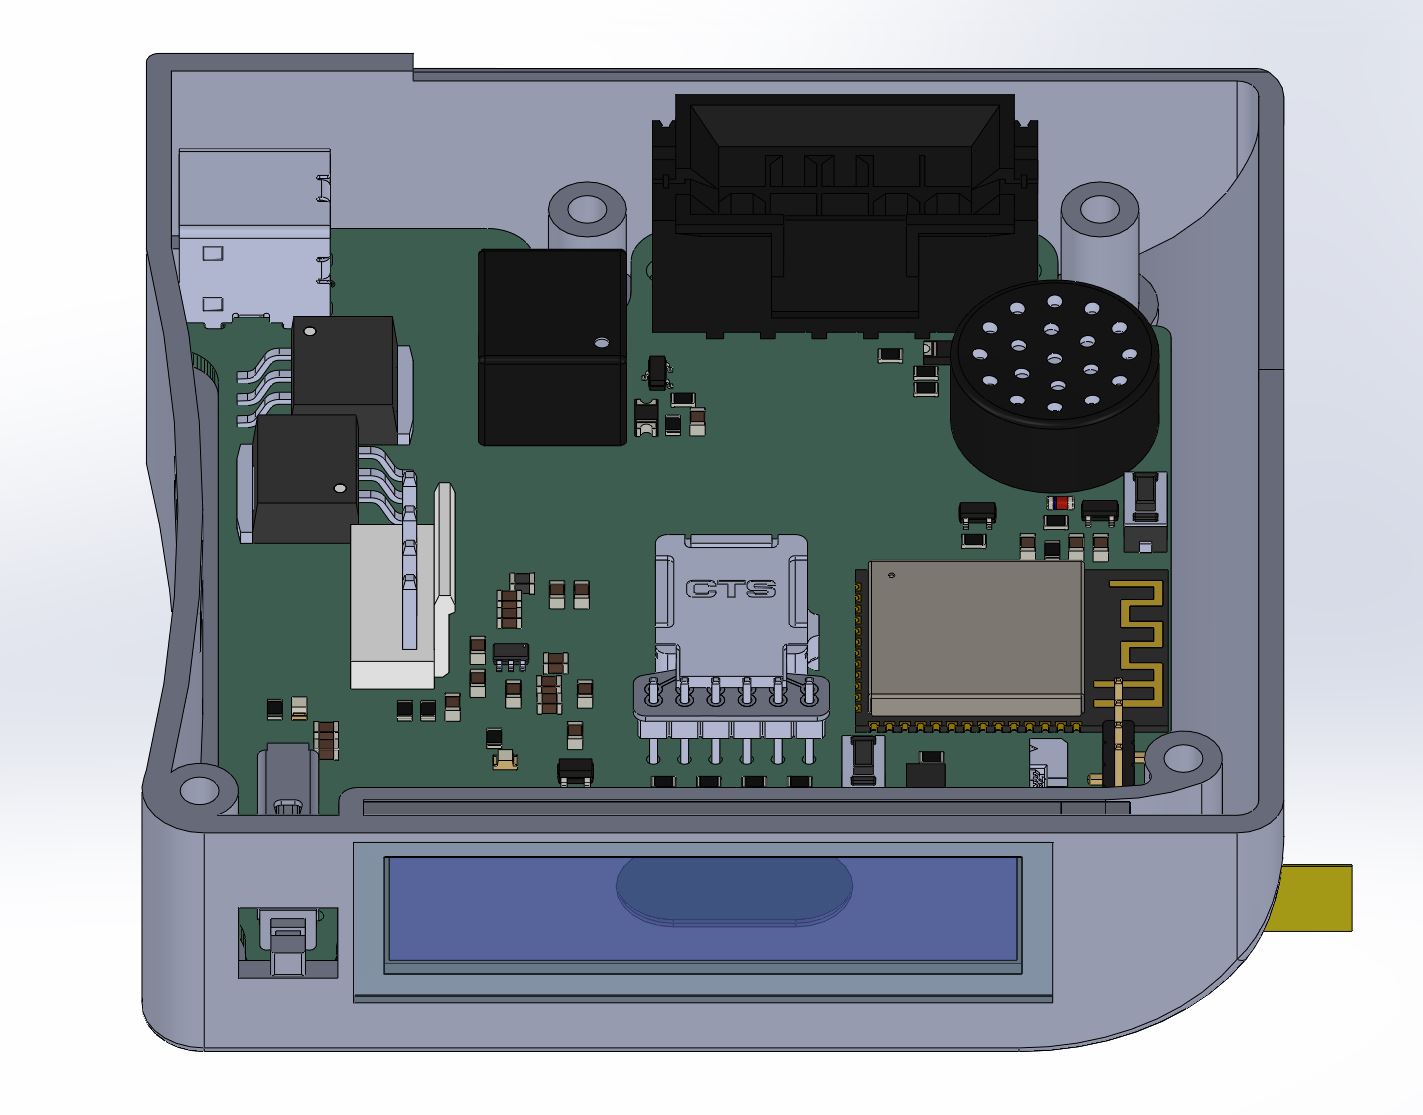
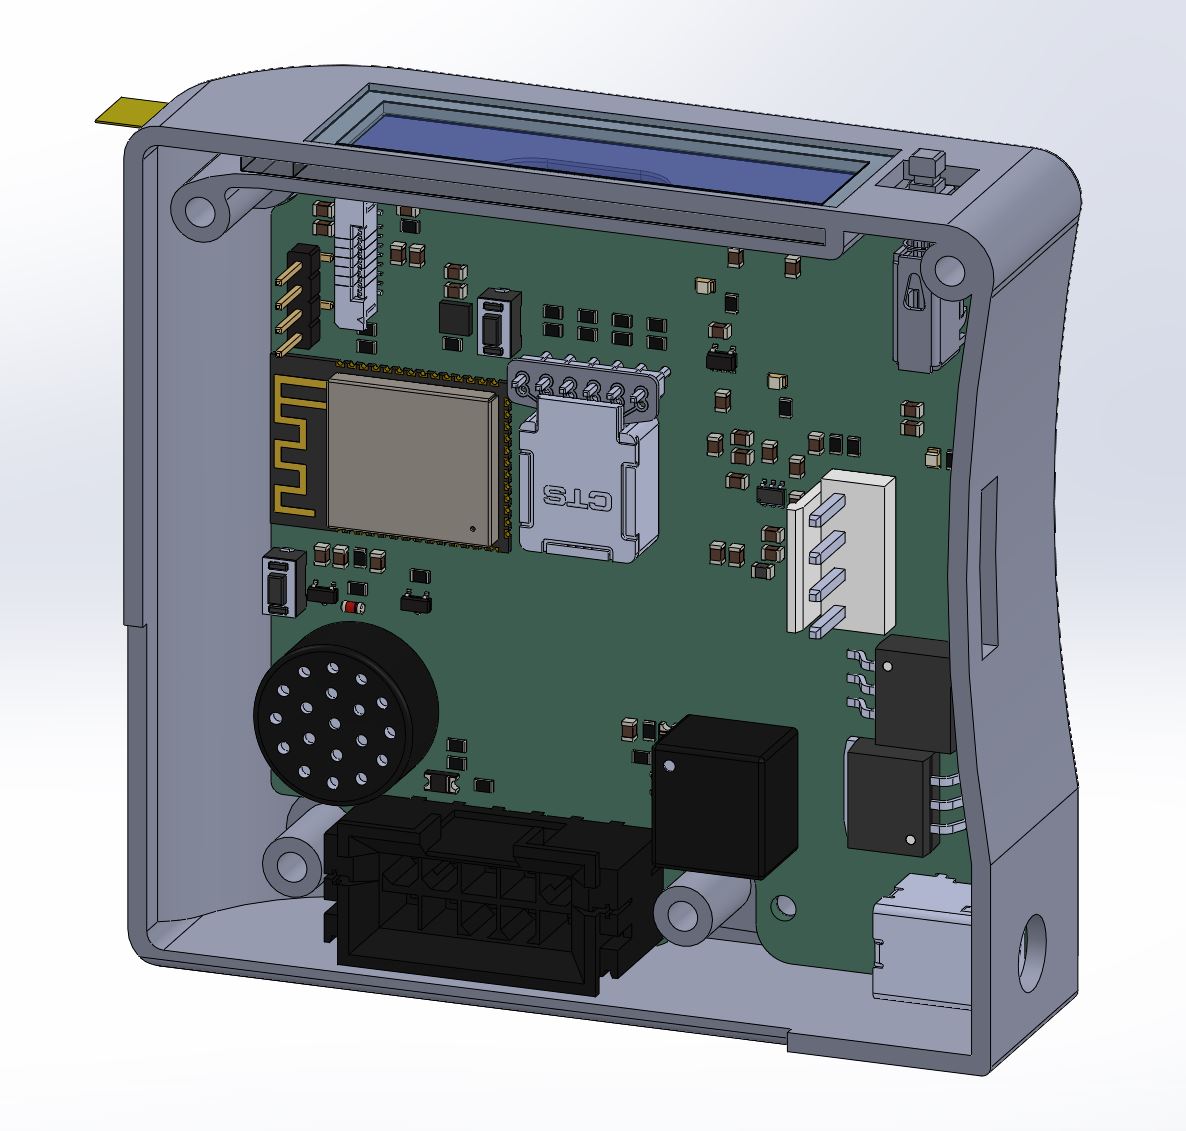
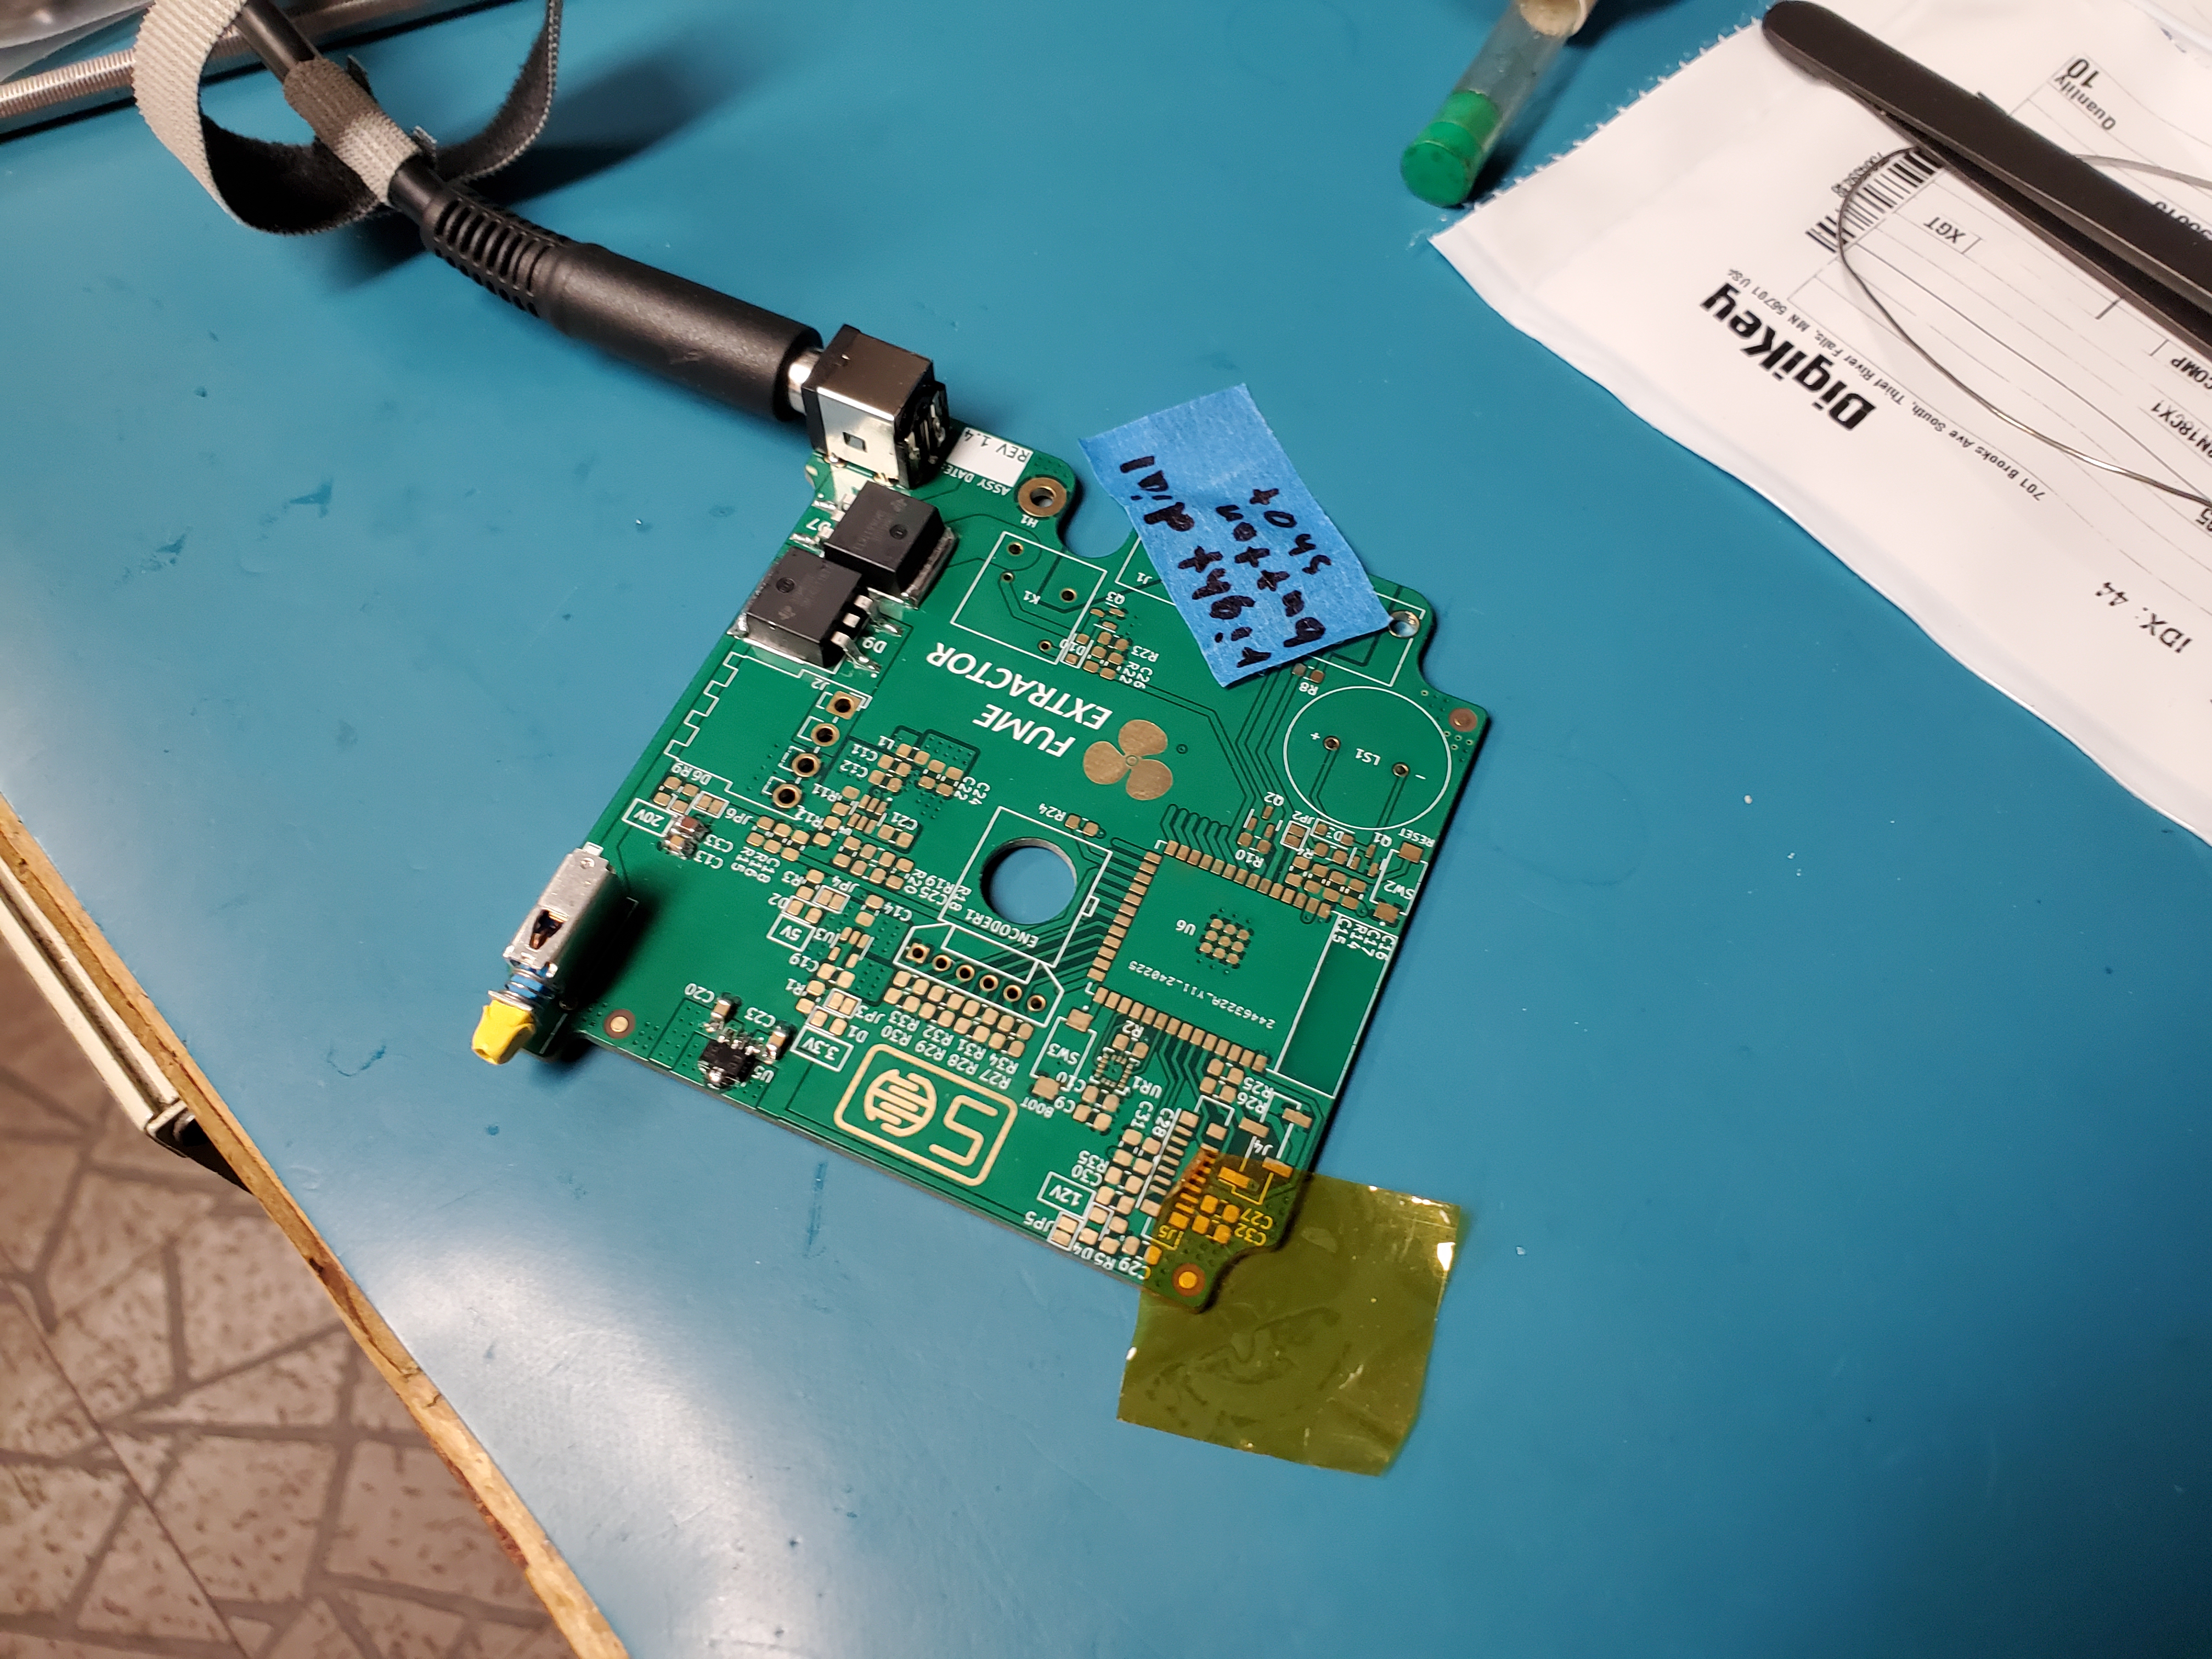
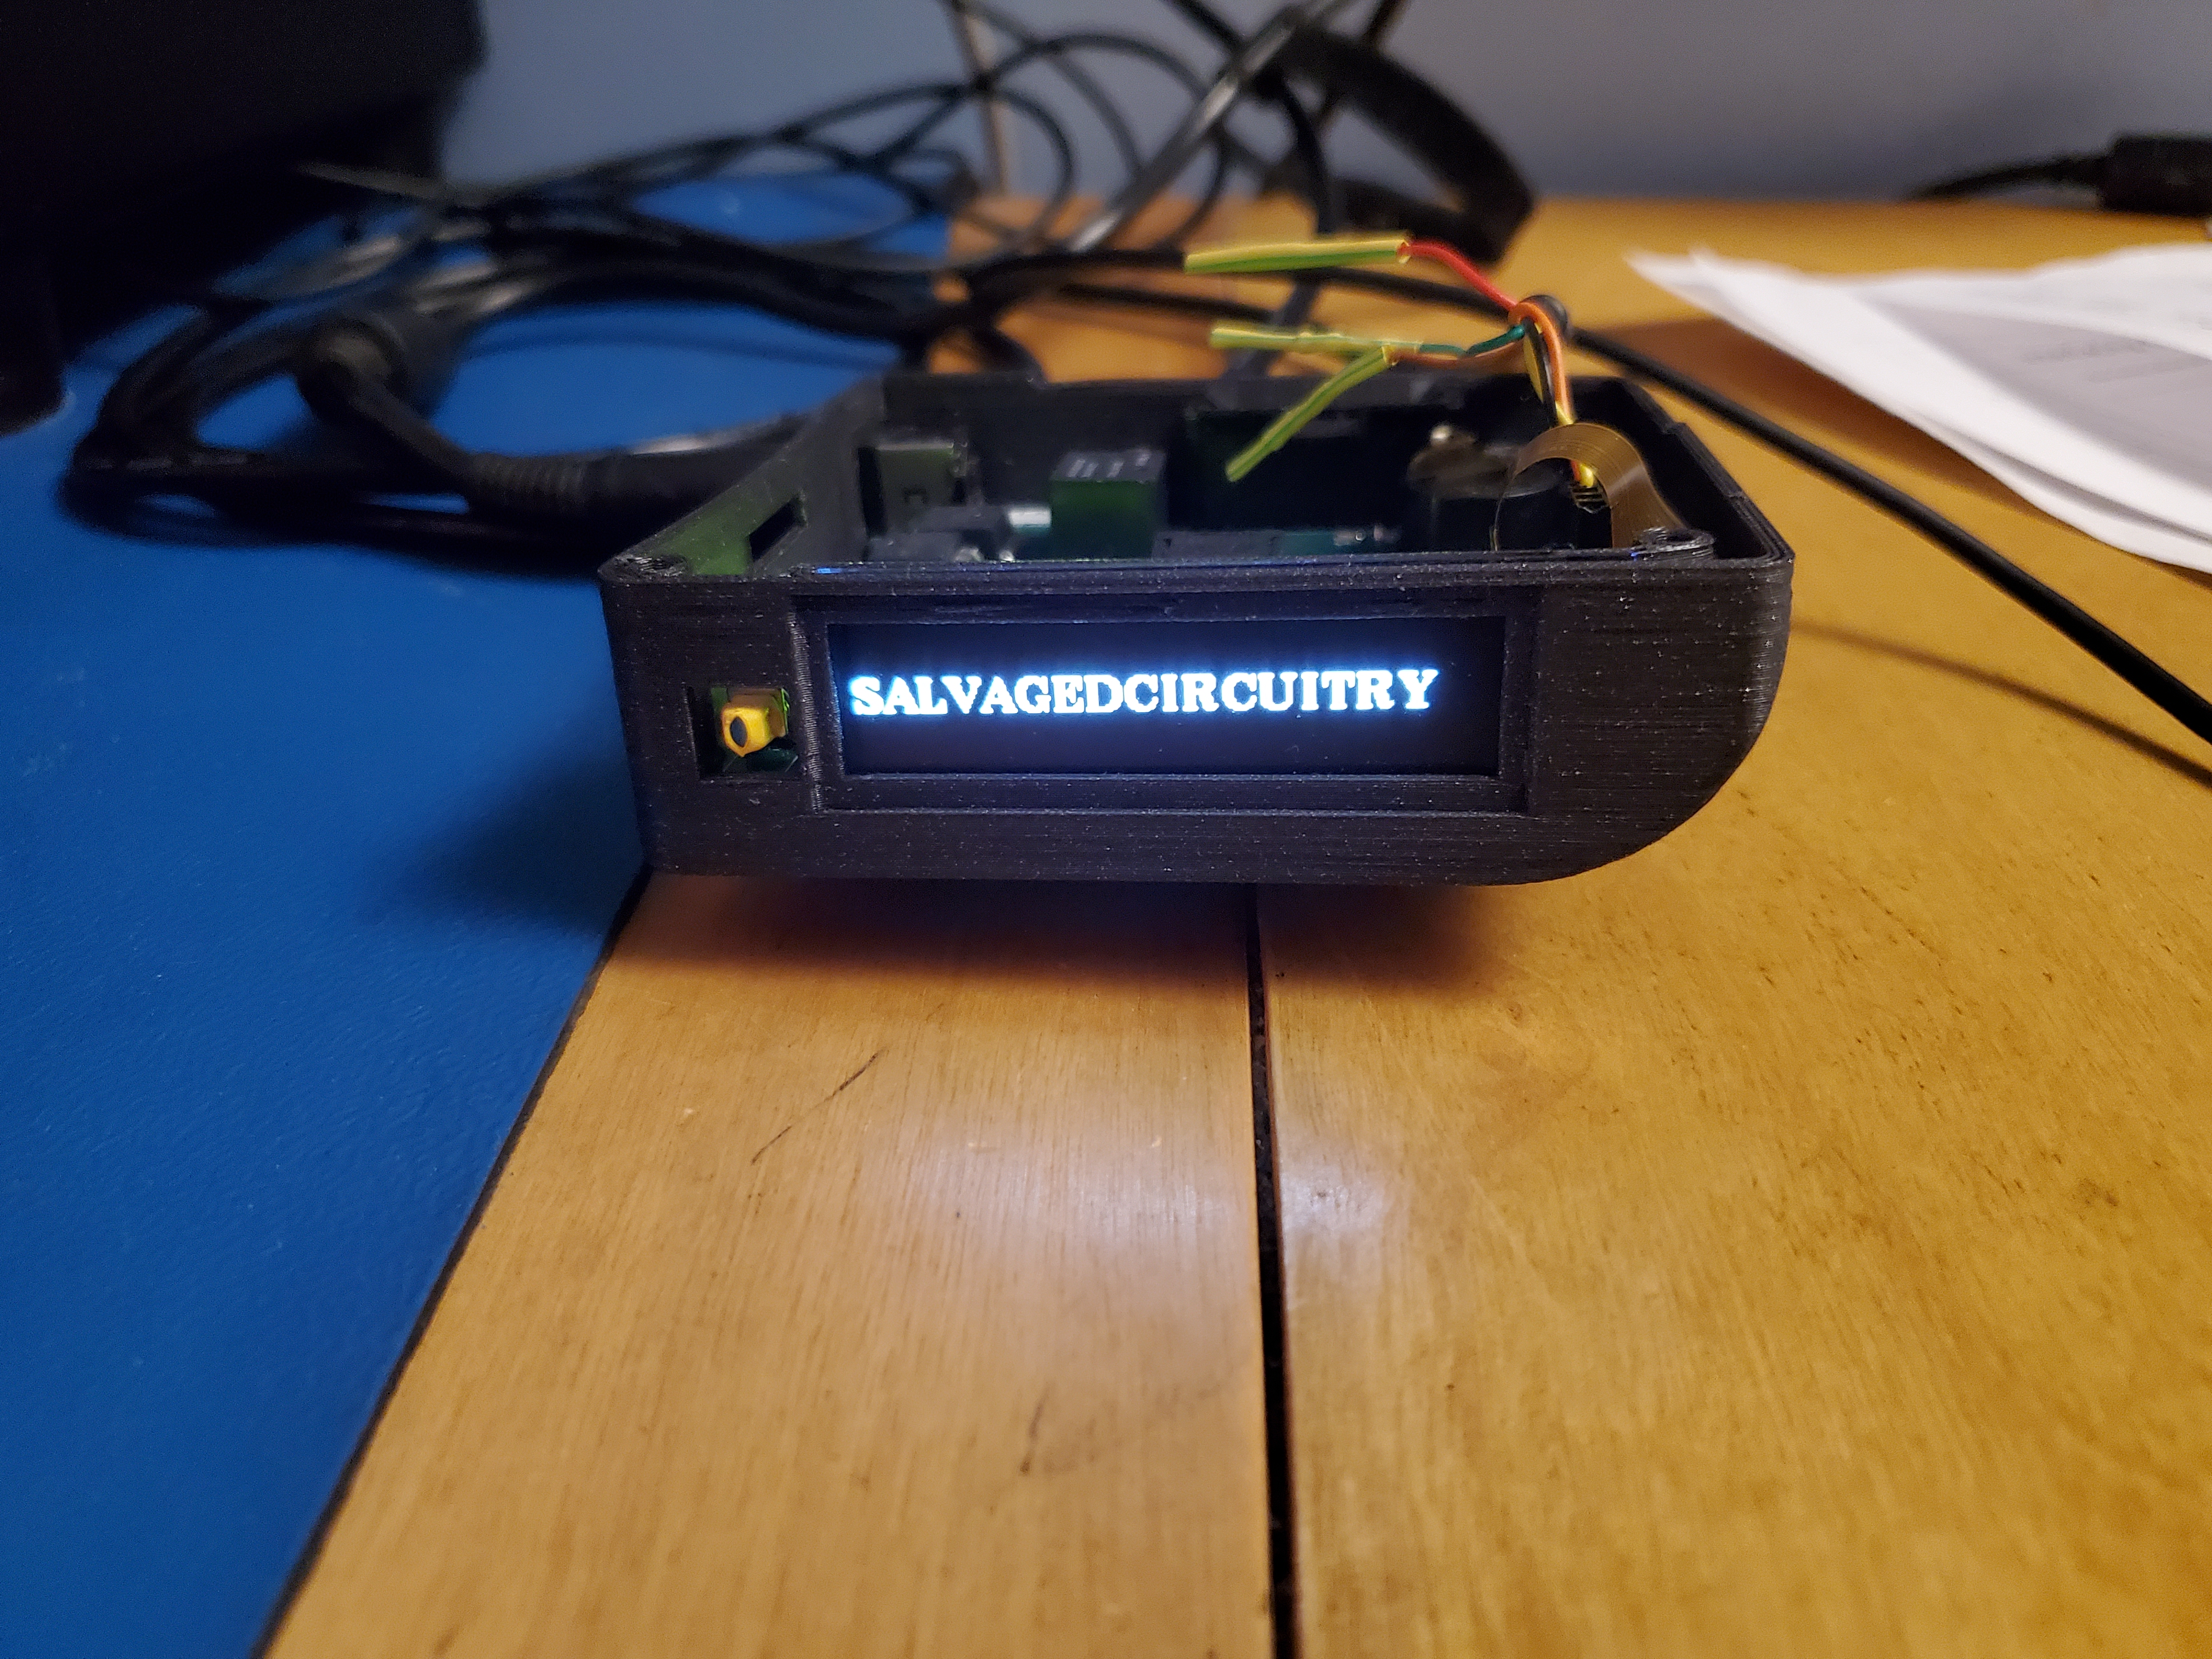
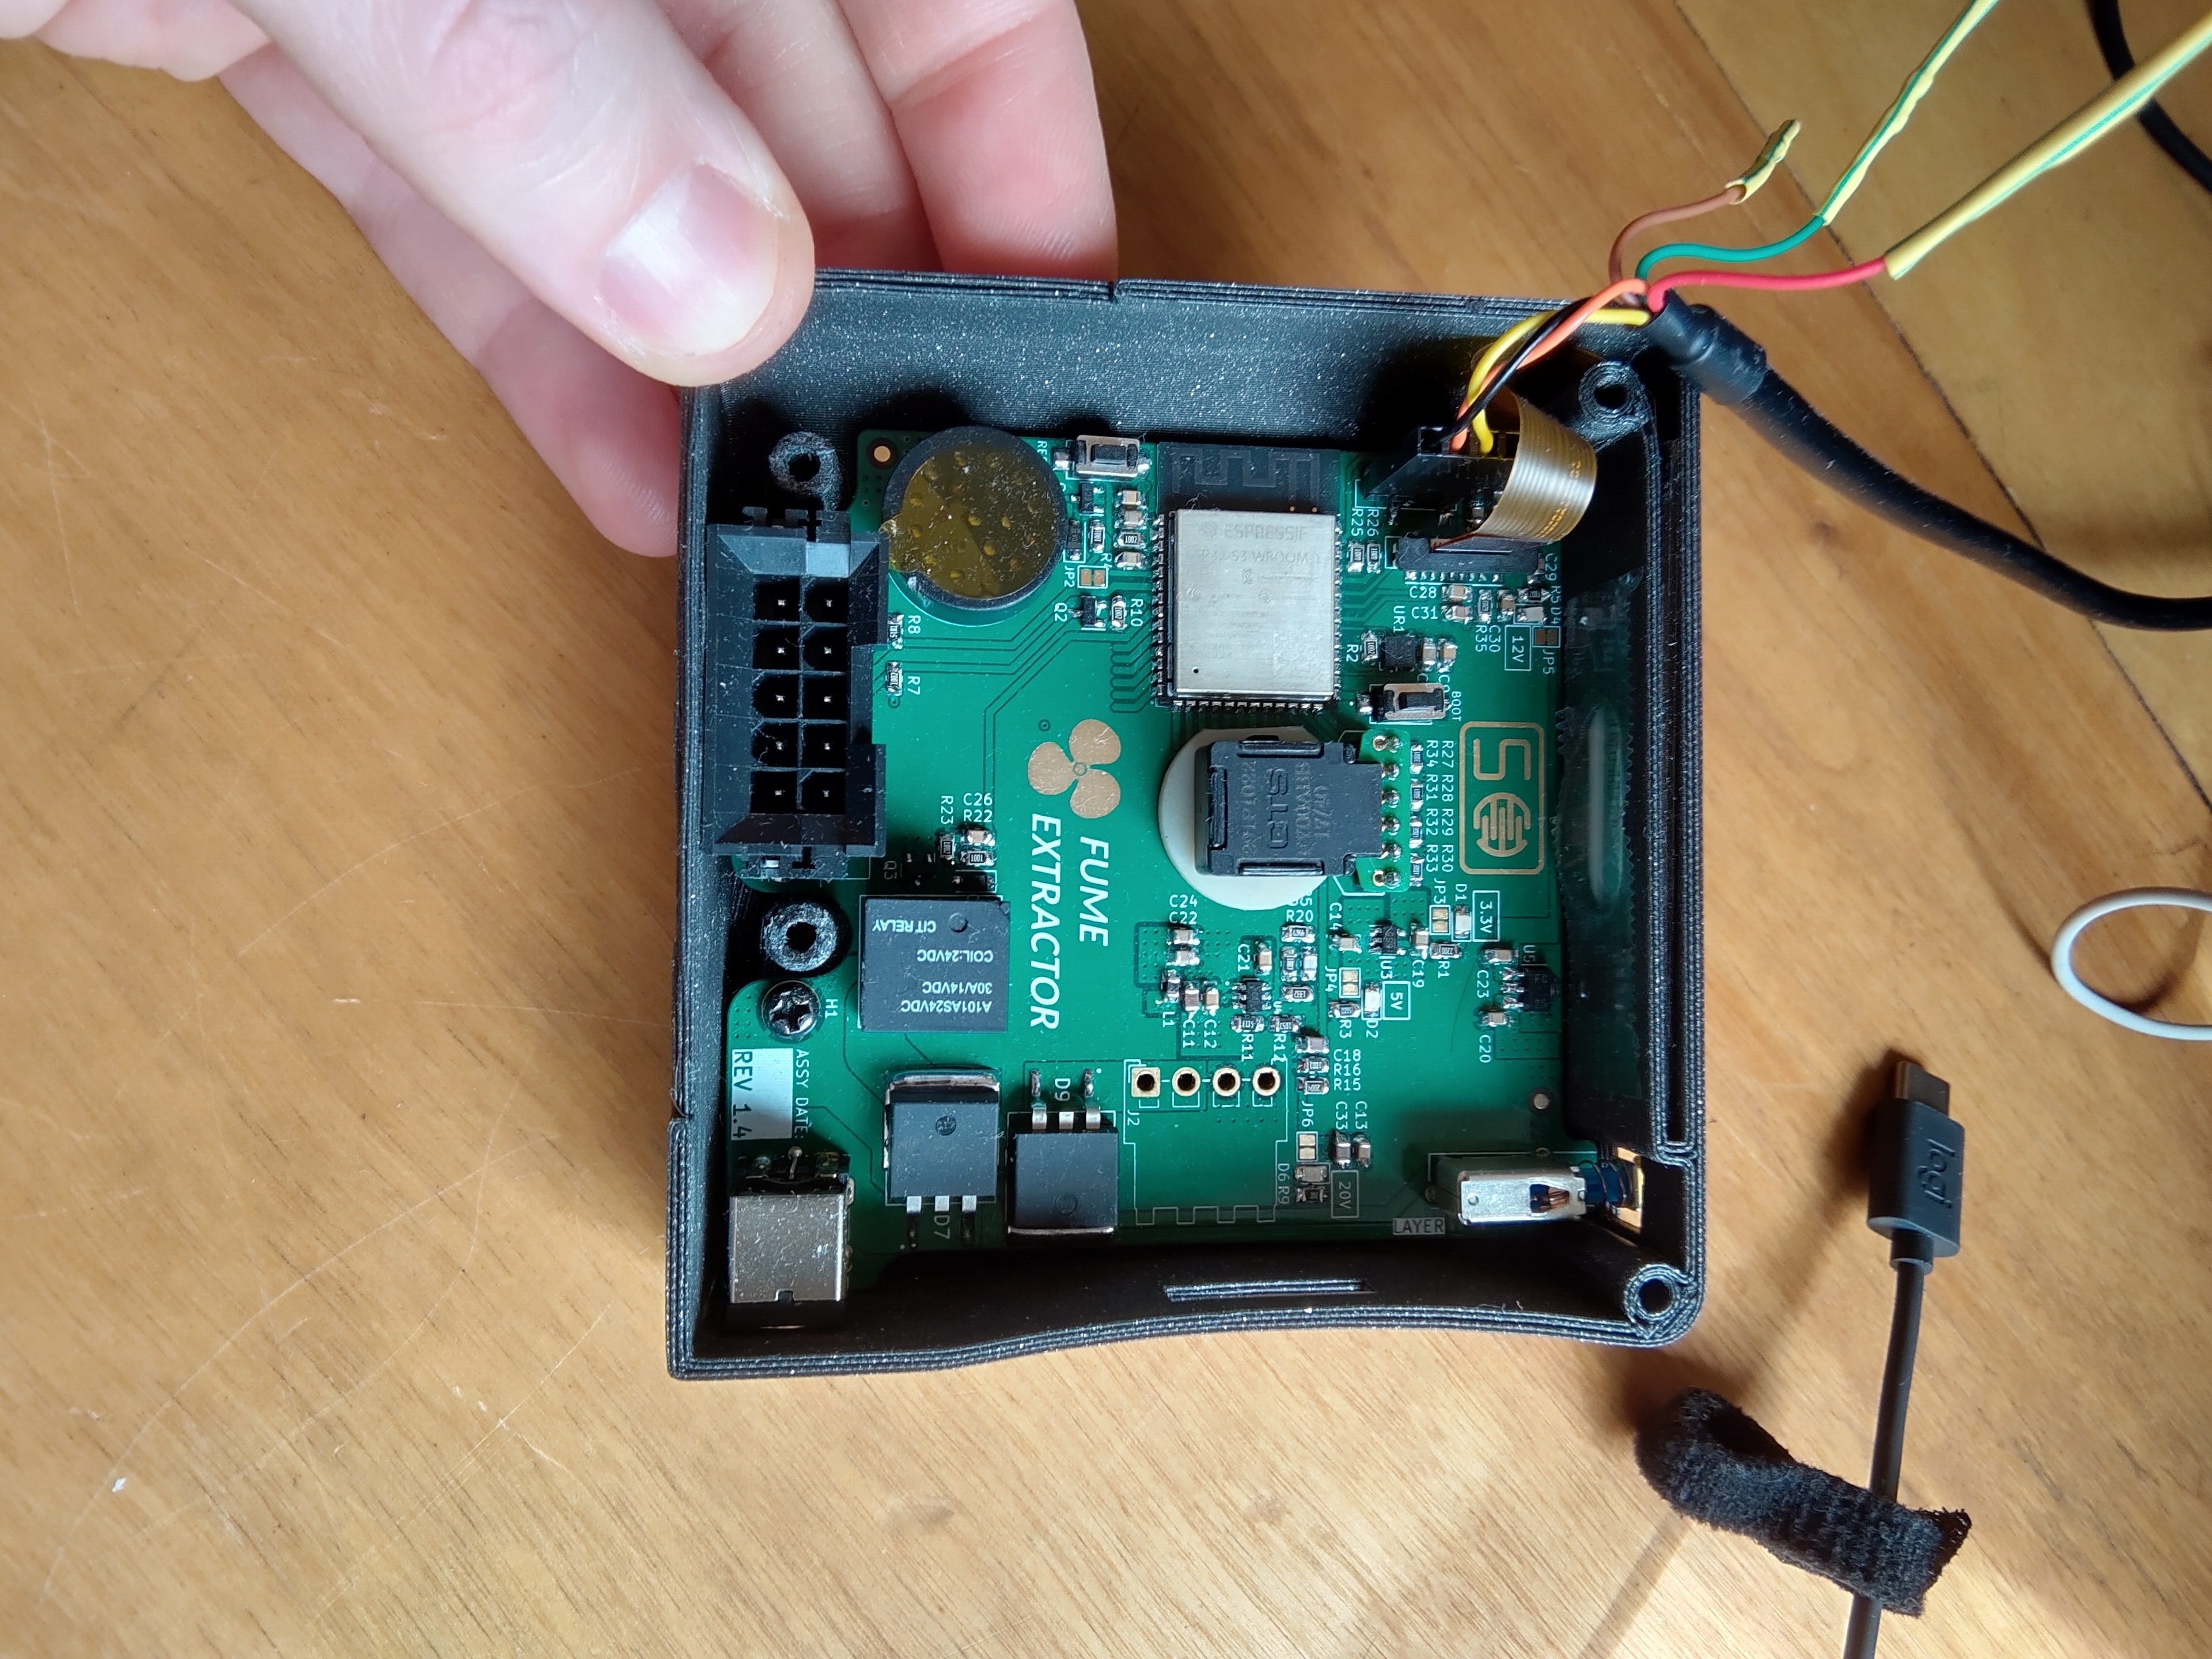
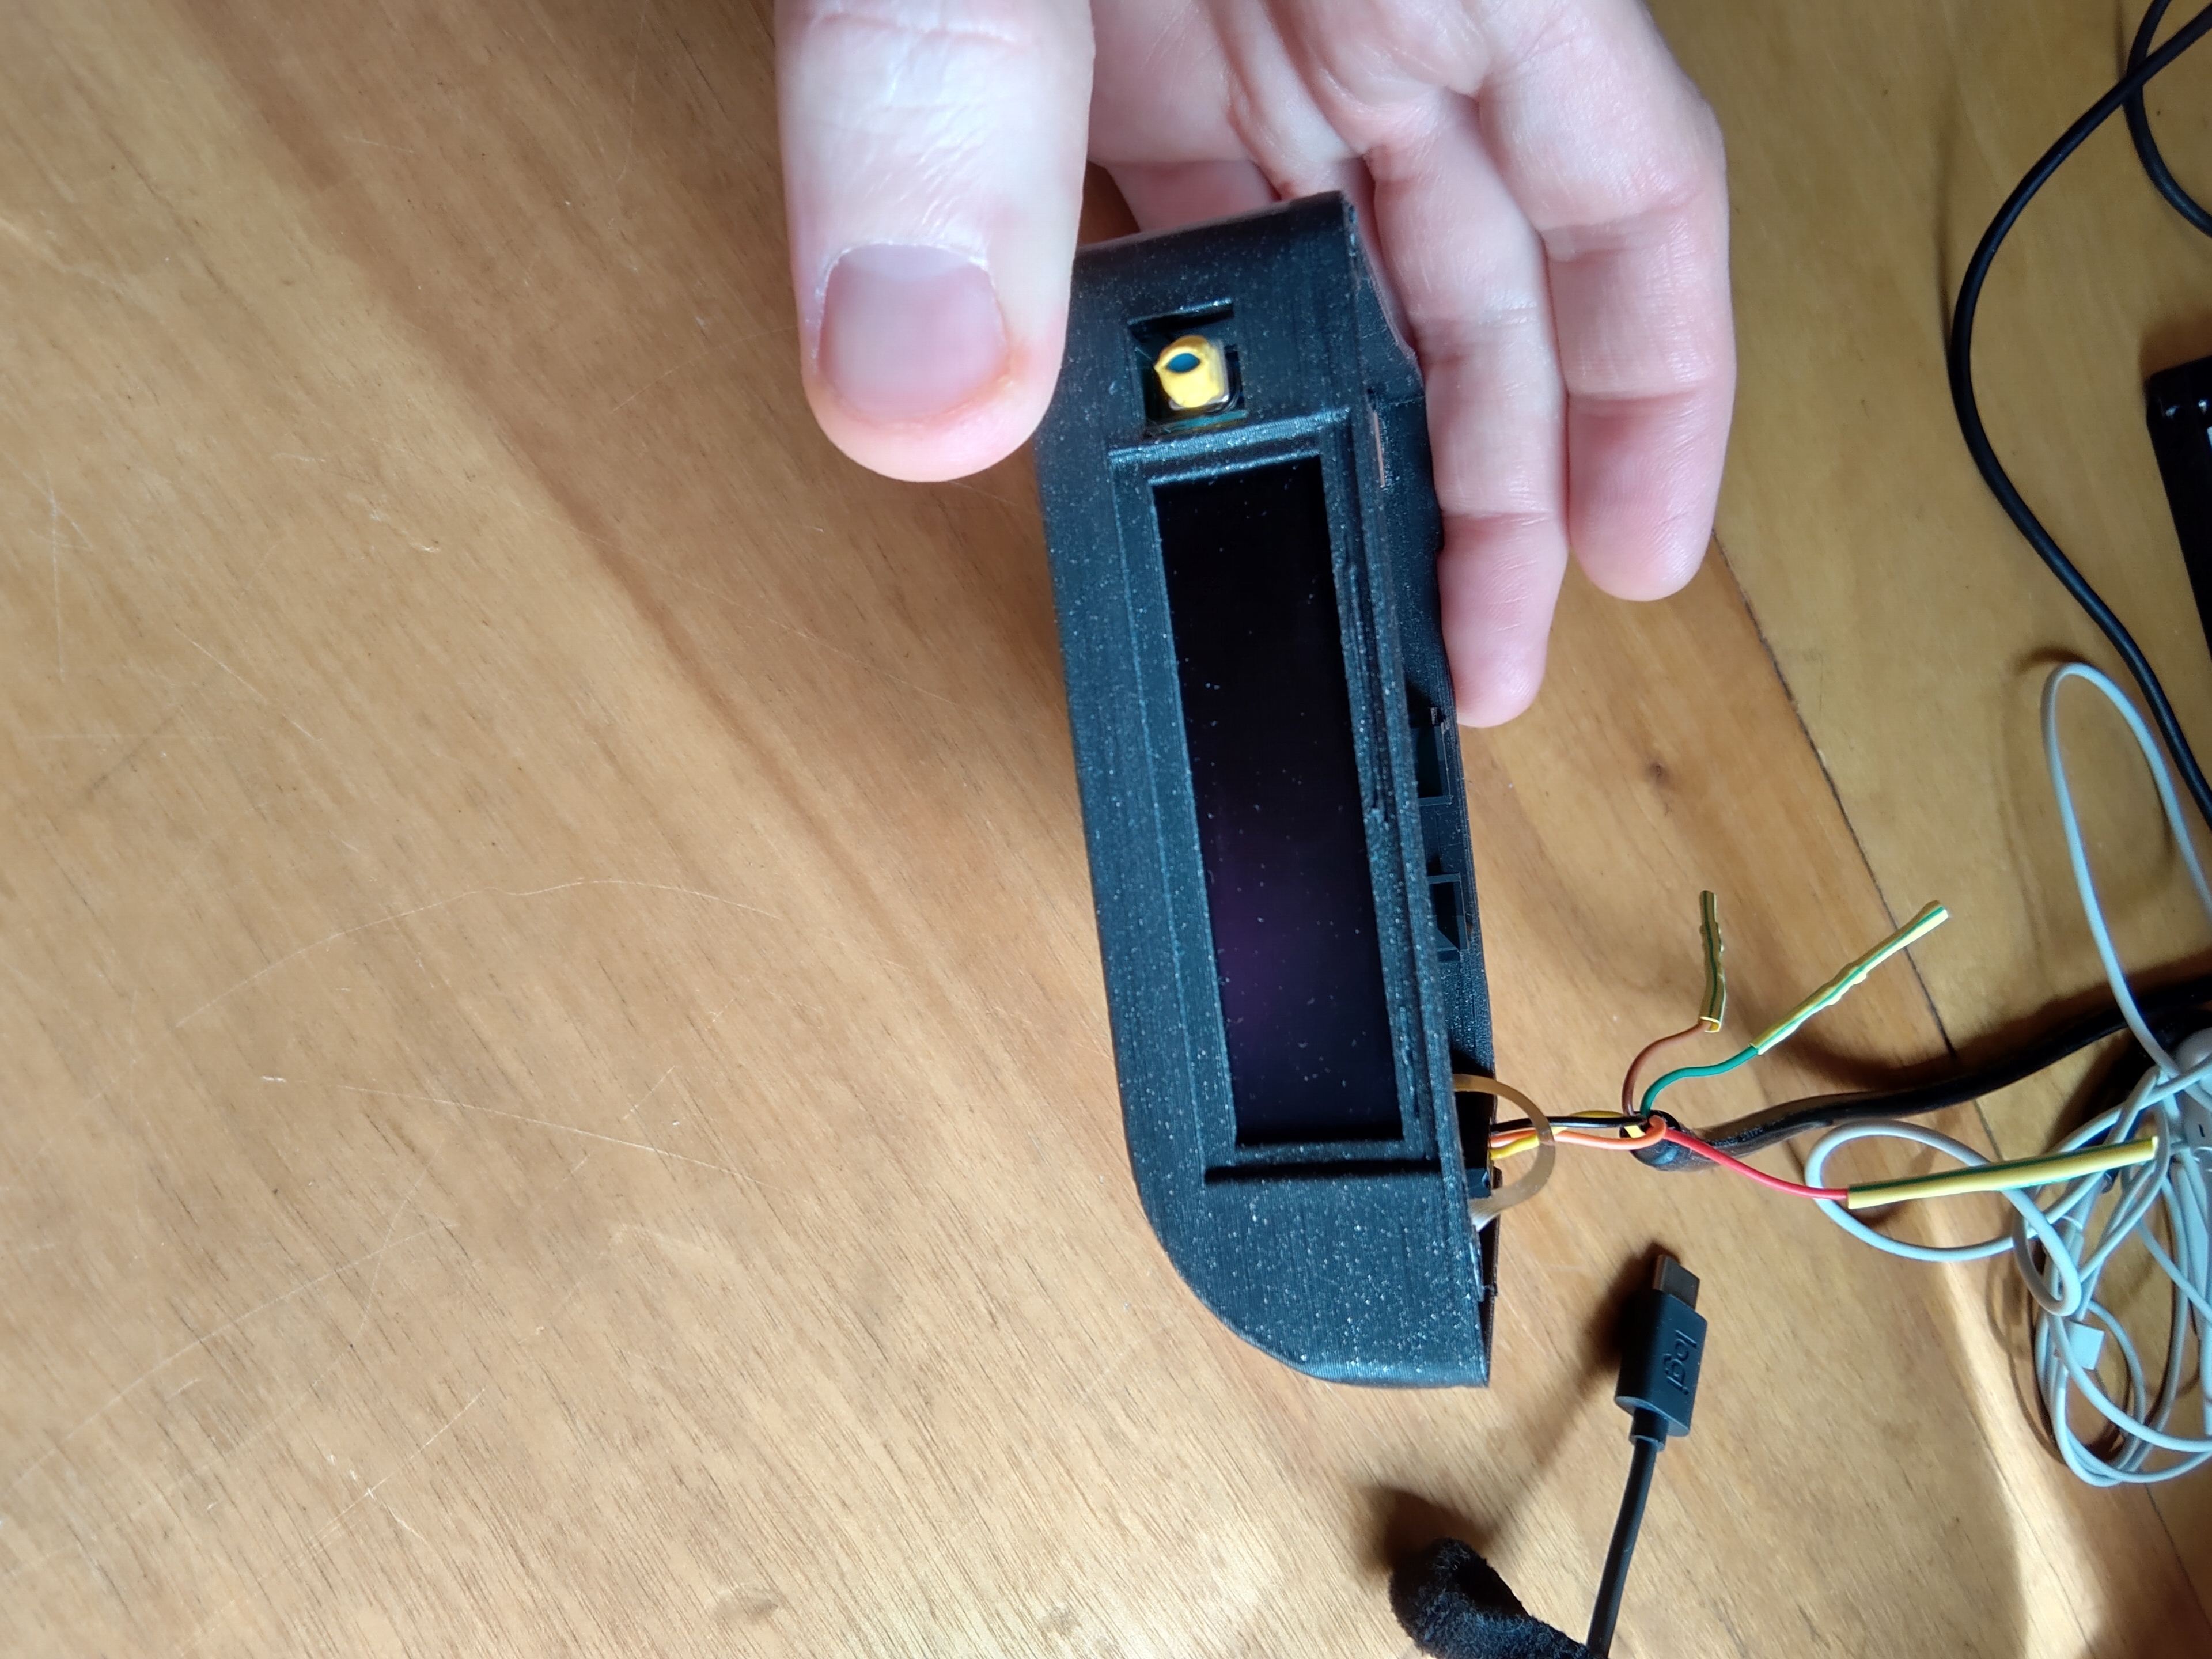
The internal PCB design has been scrapped for an externally connector-ized PCB inside a plastic shell, forming a simple plug-in module. The shell is home to an OLED display, power button, 20v laptop barrel jack and a main control knob + function switch. The OLED provides a simple user interface with fan RPM speed, battery voltage reading and low voltage battery cutout warnings.
Moving toward an externally mounted control module significantly reduces assembly time as you no longer need to disassemble the fan. It becomes a plug-in attachment to the fan and makes it incredibly easy to assemble. Since the stock server fan uses a mini-fit jr connector, the module slides right into the fan shell and with four self-tapping screws, makes the module permanent. This also enables me to make a kit available to transform excess stock of an EOL fan into a useful fume extractor for many DIY oriented folks. I've already been using it around the home while gluing with epoxy, using JB weld and brush painting. It works a treat.
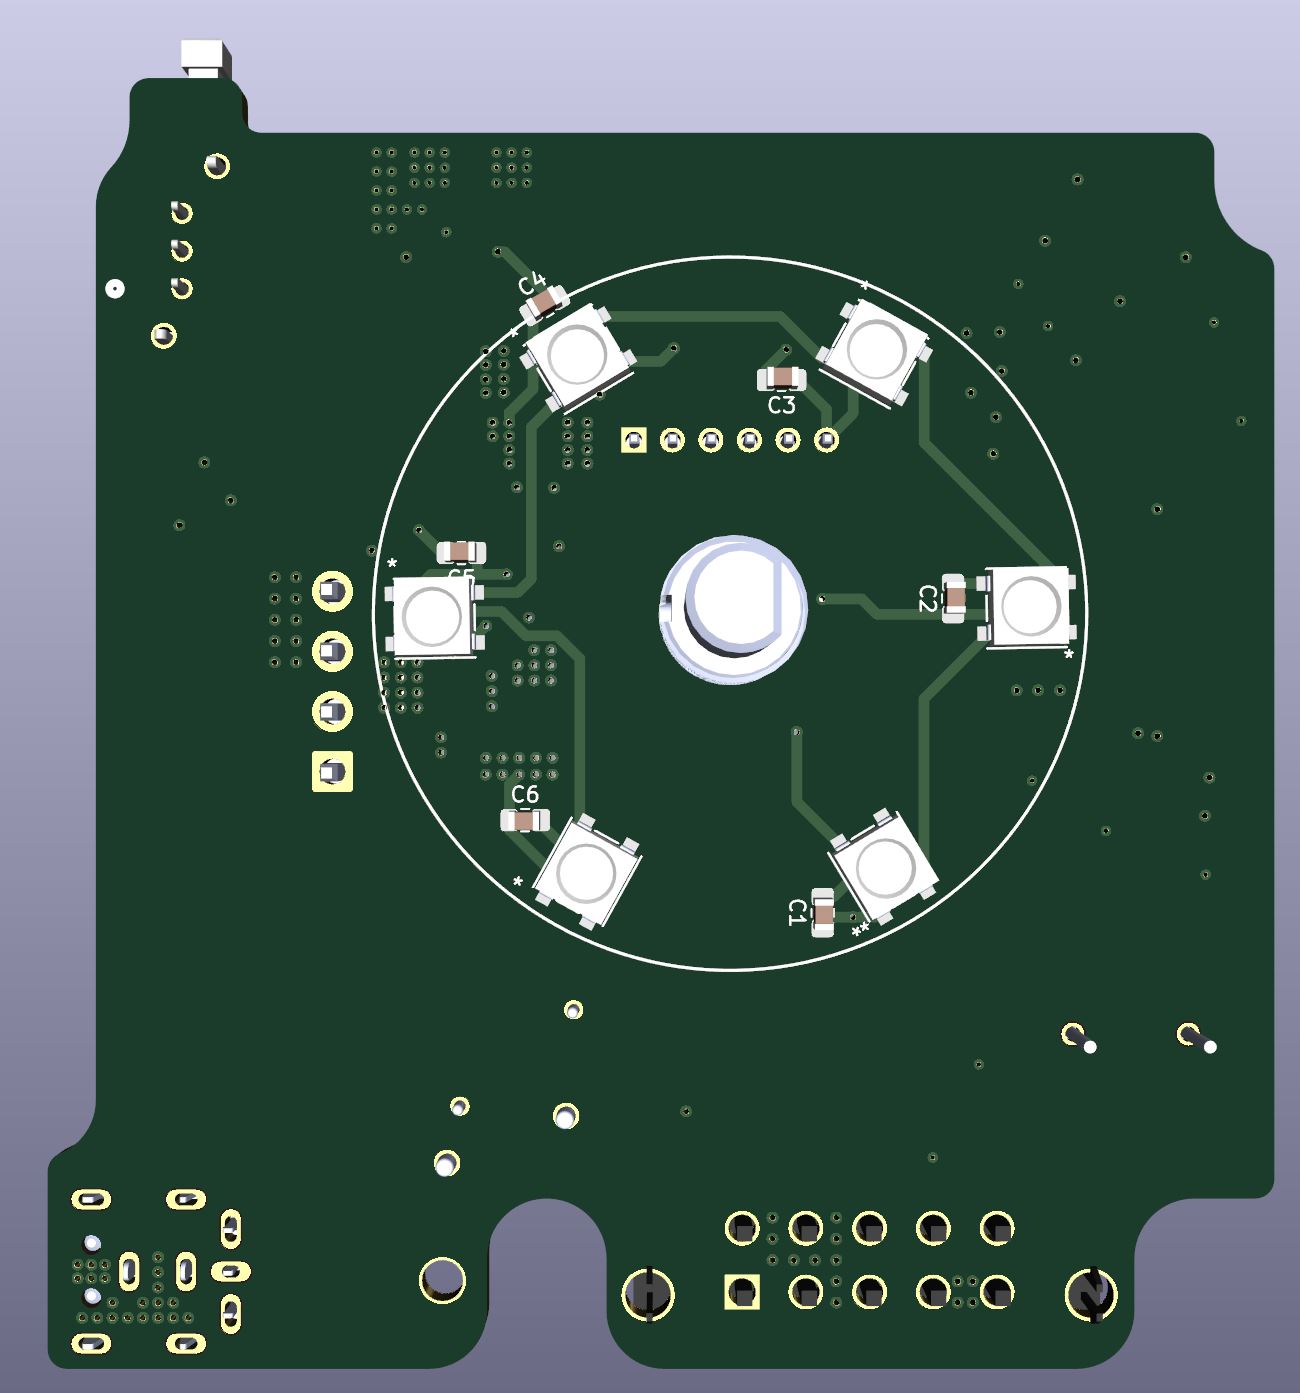
Here's a peak at my rev 1.0 of the fan control PCB. I went with an ESP32 because of the absolute insane price:performance ratio of the module and the simplicity offered to an overall BOM. No external crystal needed! Granted, the esp32 has plenty of problems, but you can easily work around them.
I went a bit overkill with the encoder, but boy do I love a good optical encoder. In a weird moment of time Arrow electronic had heavily discounted CTS optical encoders and I literally bought dozens of them at once. Unfortunately, it's not a financially sensible encoder to include in a piece of consumer electronics. I don't think 1 million mechanical cycle life was a necessary requirement :D. To put that into perspective, Agilent / keysight uses 30k lifetime mechanical potentiometers on their oscilloscopes. WOWZERS. The 1980s one-knob designed test equipment had fancier encoders, but still not 1million lifetime. I guess I went a bit too overboard!
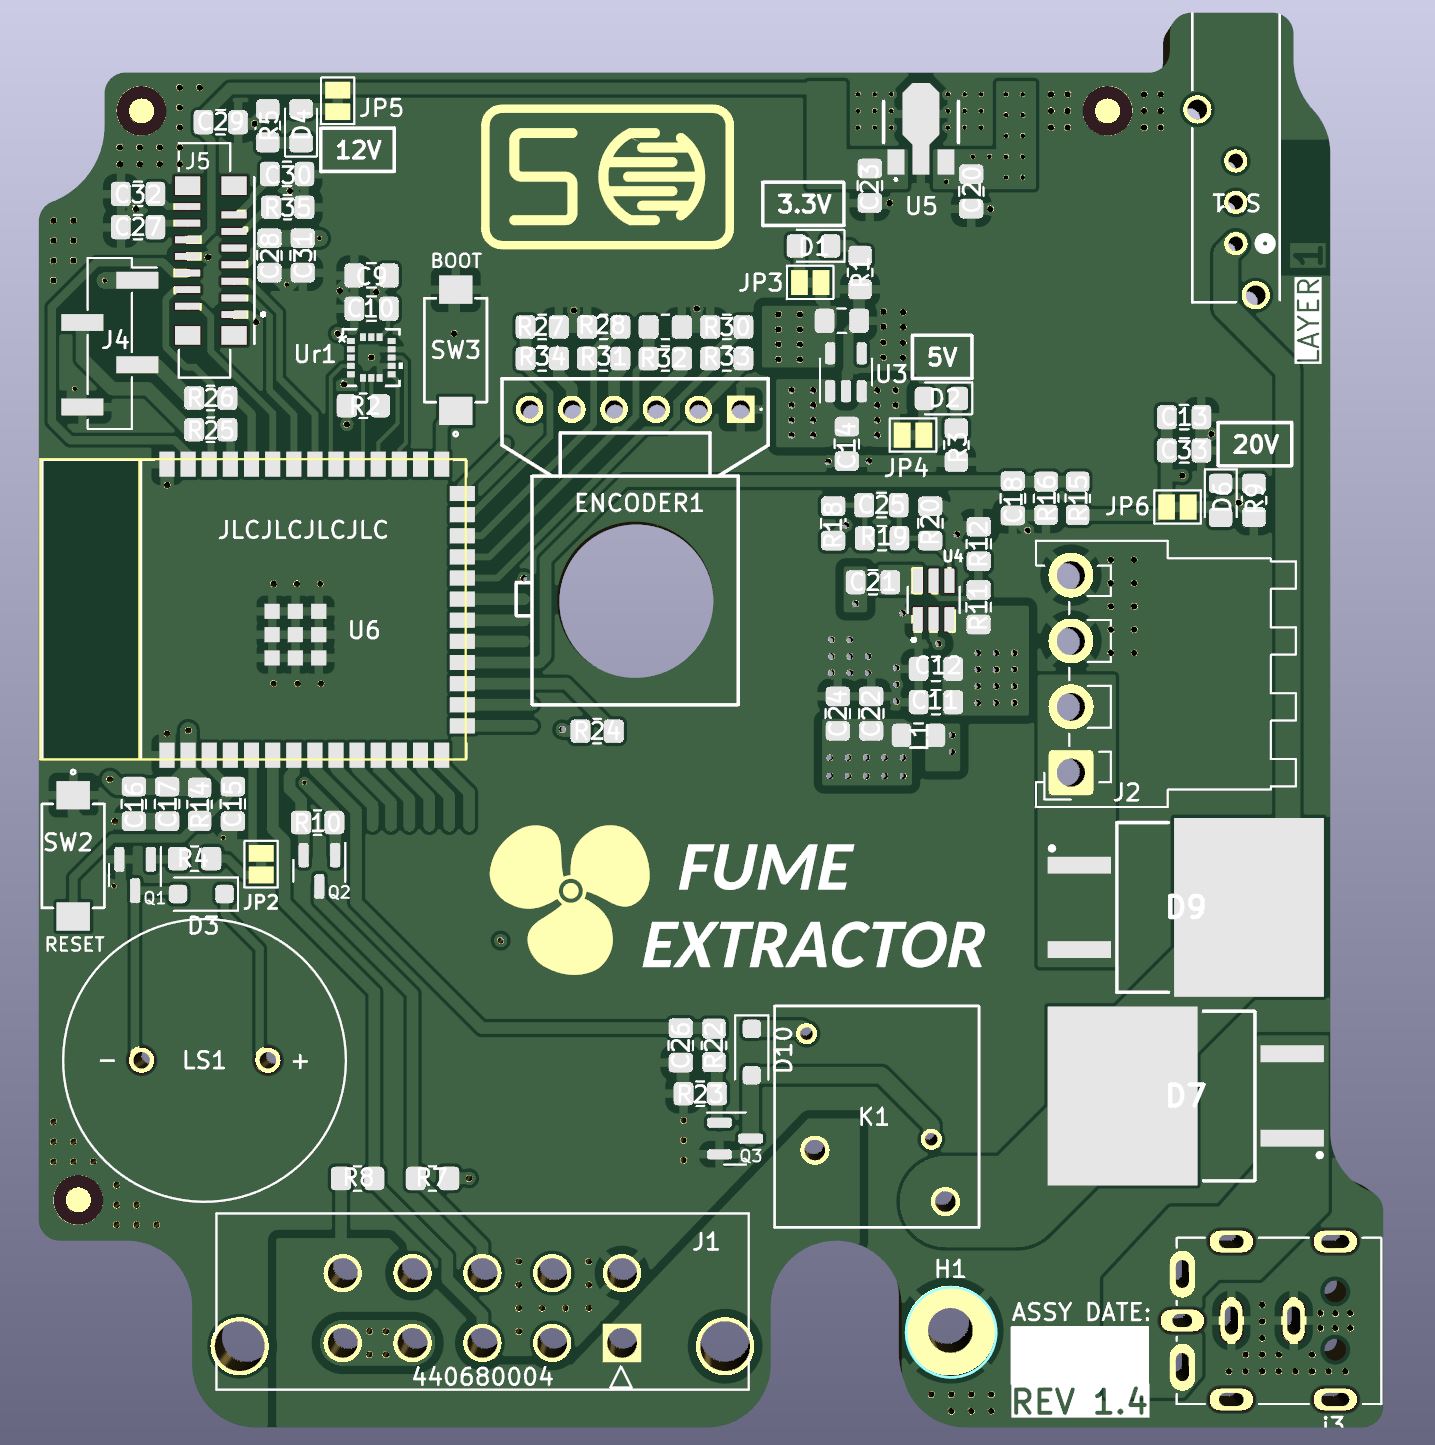
All the other components are very affordable. Molex minifit jr connectors are ubiquitous but in this case, this one needed to be 10a+ rated. Not a big deal, molex knows how to make 10 versions of every part with an absurd number of plating options as well. THe relay is a small but mighty relay from cit and the remainder of the components are pretty nondescript passives. The speaker oddly was a strange part to select. There are not many THT speakers that don't sound horrible and that are easily available. The one I selected was from CUI devices, but on further contact with them, they are a non-stock manufacturer, AKA a re-labeler, so I will have to hunt around for a better source. The 20v connector was a very strange selection process. There are many variants of the standard 7mm laptop dc barrel jack ranging in size, orientation and current handling. Yes, you can get partially exposed 7mm barrel jacks. Nuts. The hard part was finding 13a barrel jacks. It seems foxconn / singatron have monopolized the 13a version of the connector and it's not available from anywhere in the states. I had to settle for a 10a version that was available from digikey/mouser. I just didn't have several days to mess around contacting random suppliers in Asia.

I have been extremely satisfied with the built-in kicad rendering options. These came out extremely professional even though I experienced a weird bug where the 3d footprint files would occasionally vanish from the library directory.
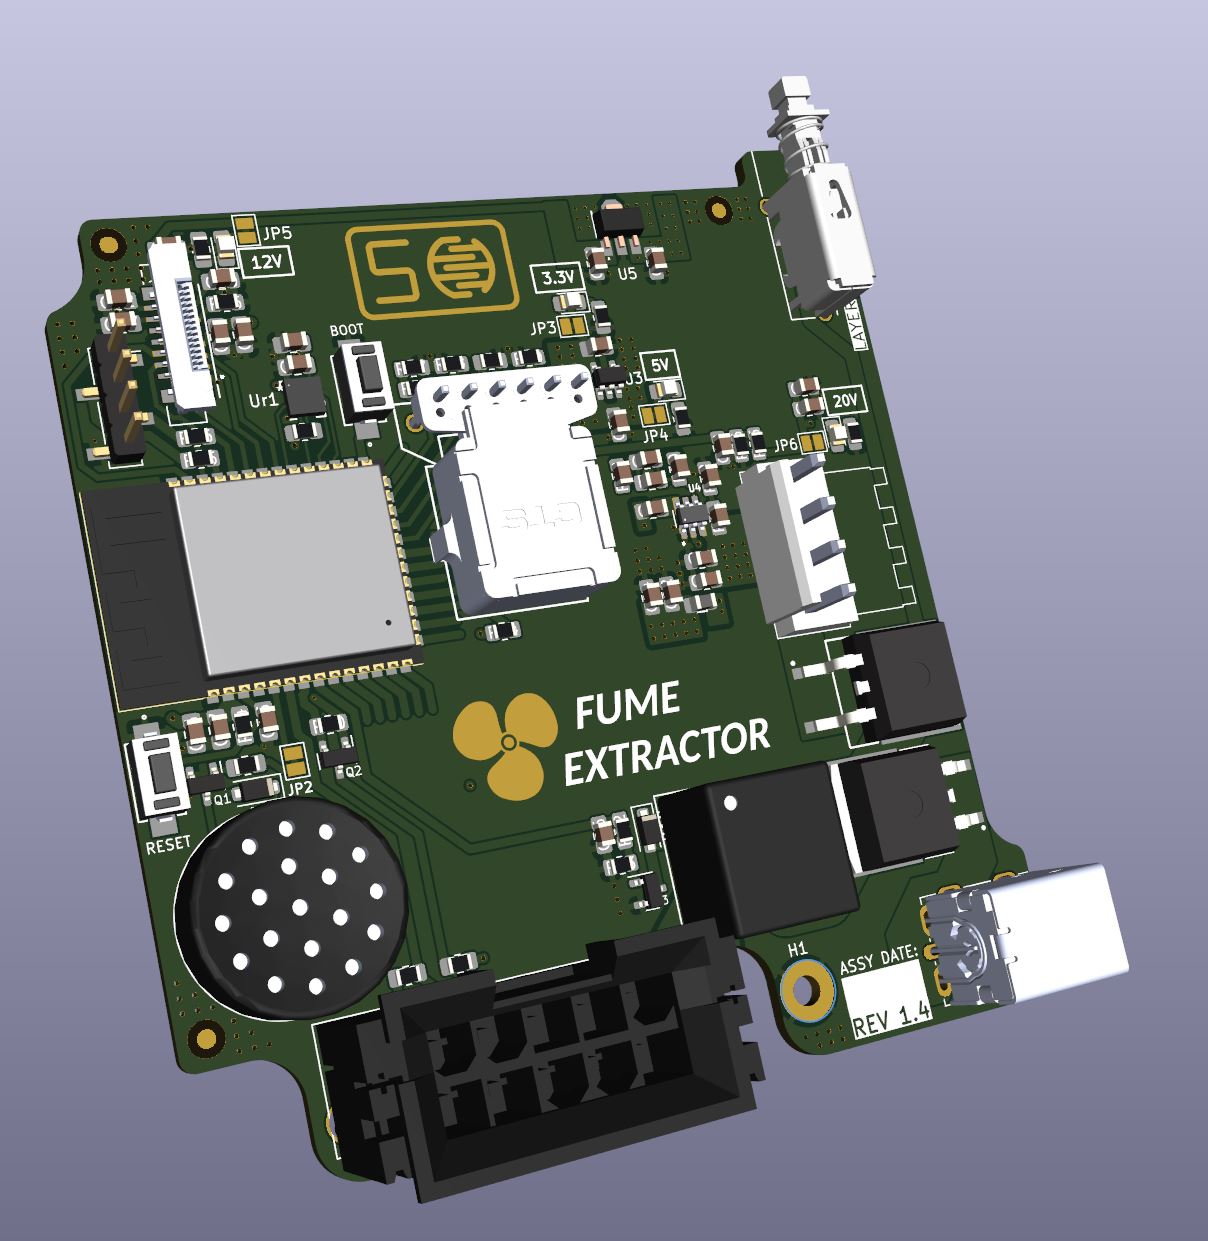
I took the step export from kicad and imported it into an external CAD package to verify the PCB fit. It's like having superpowers to know the fit and finish of a product before it's actually tangible.
The boards arrived from JLC and indeed, it fits like a glove. The flange of the molex mni-fit scrape the side of the shell a bit, but I'll be switching to a non-flanged far less expensive connector for the final product. THe power button and DC jack lines up no sweat. Magic powers I tell you!
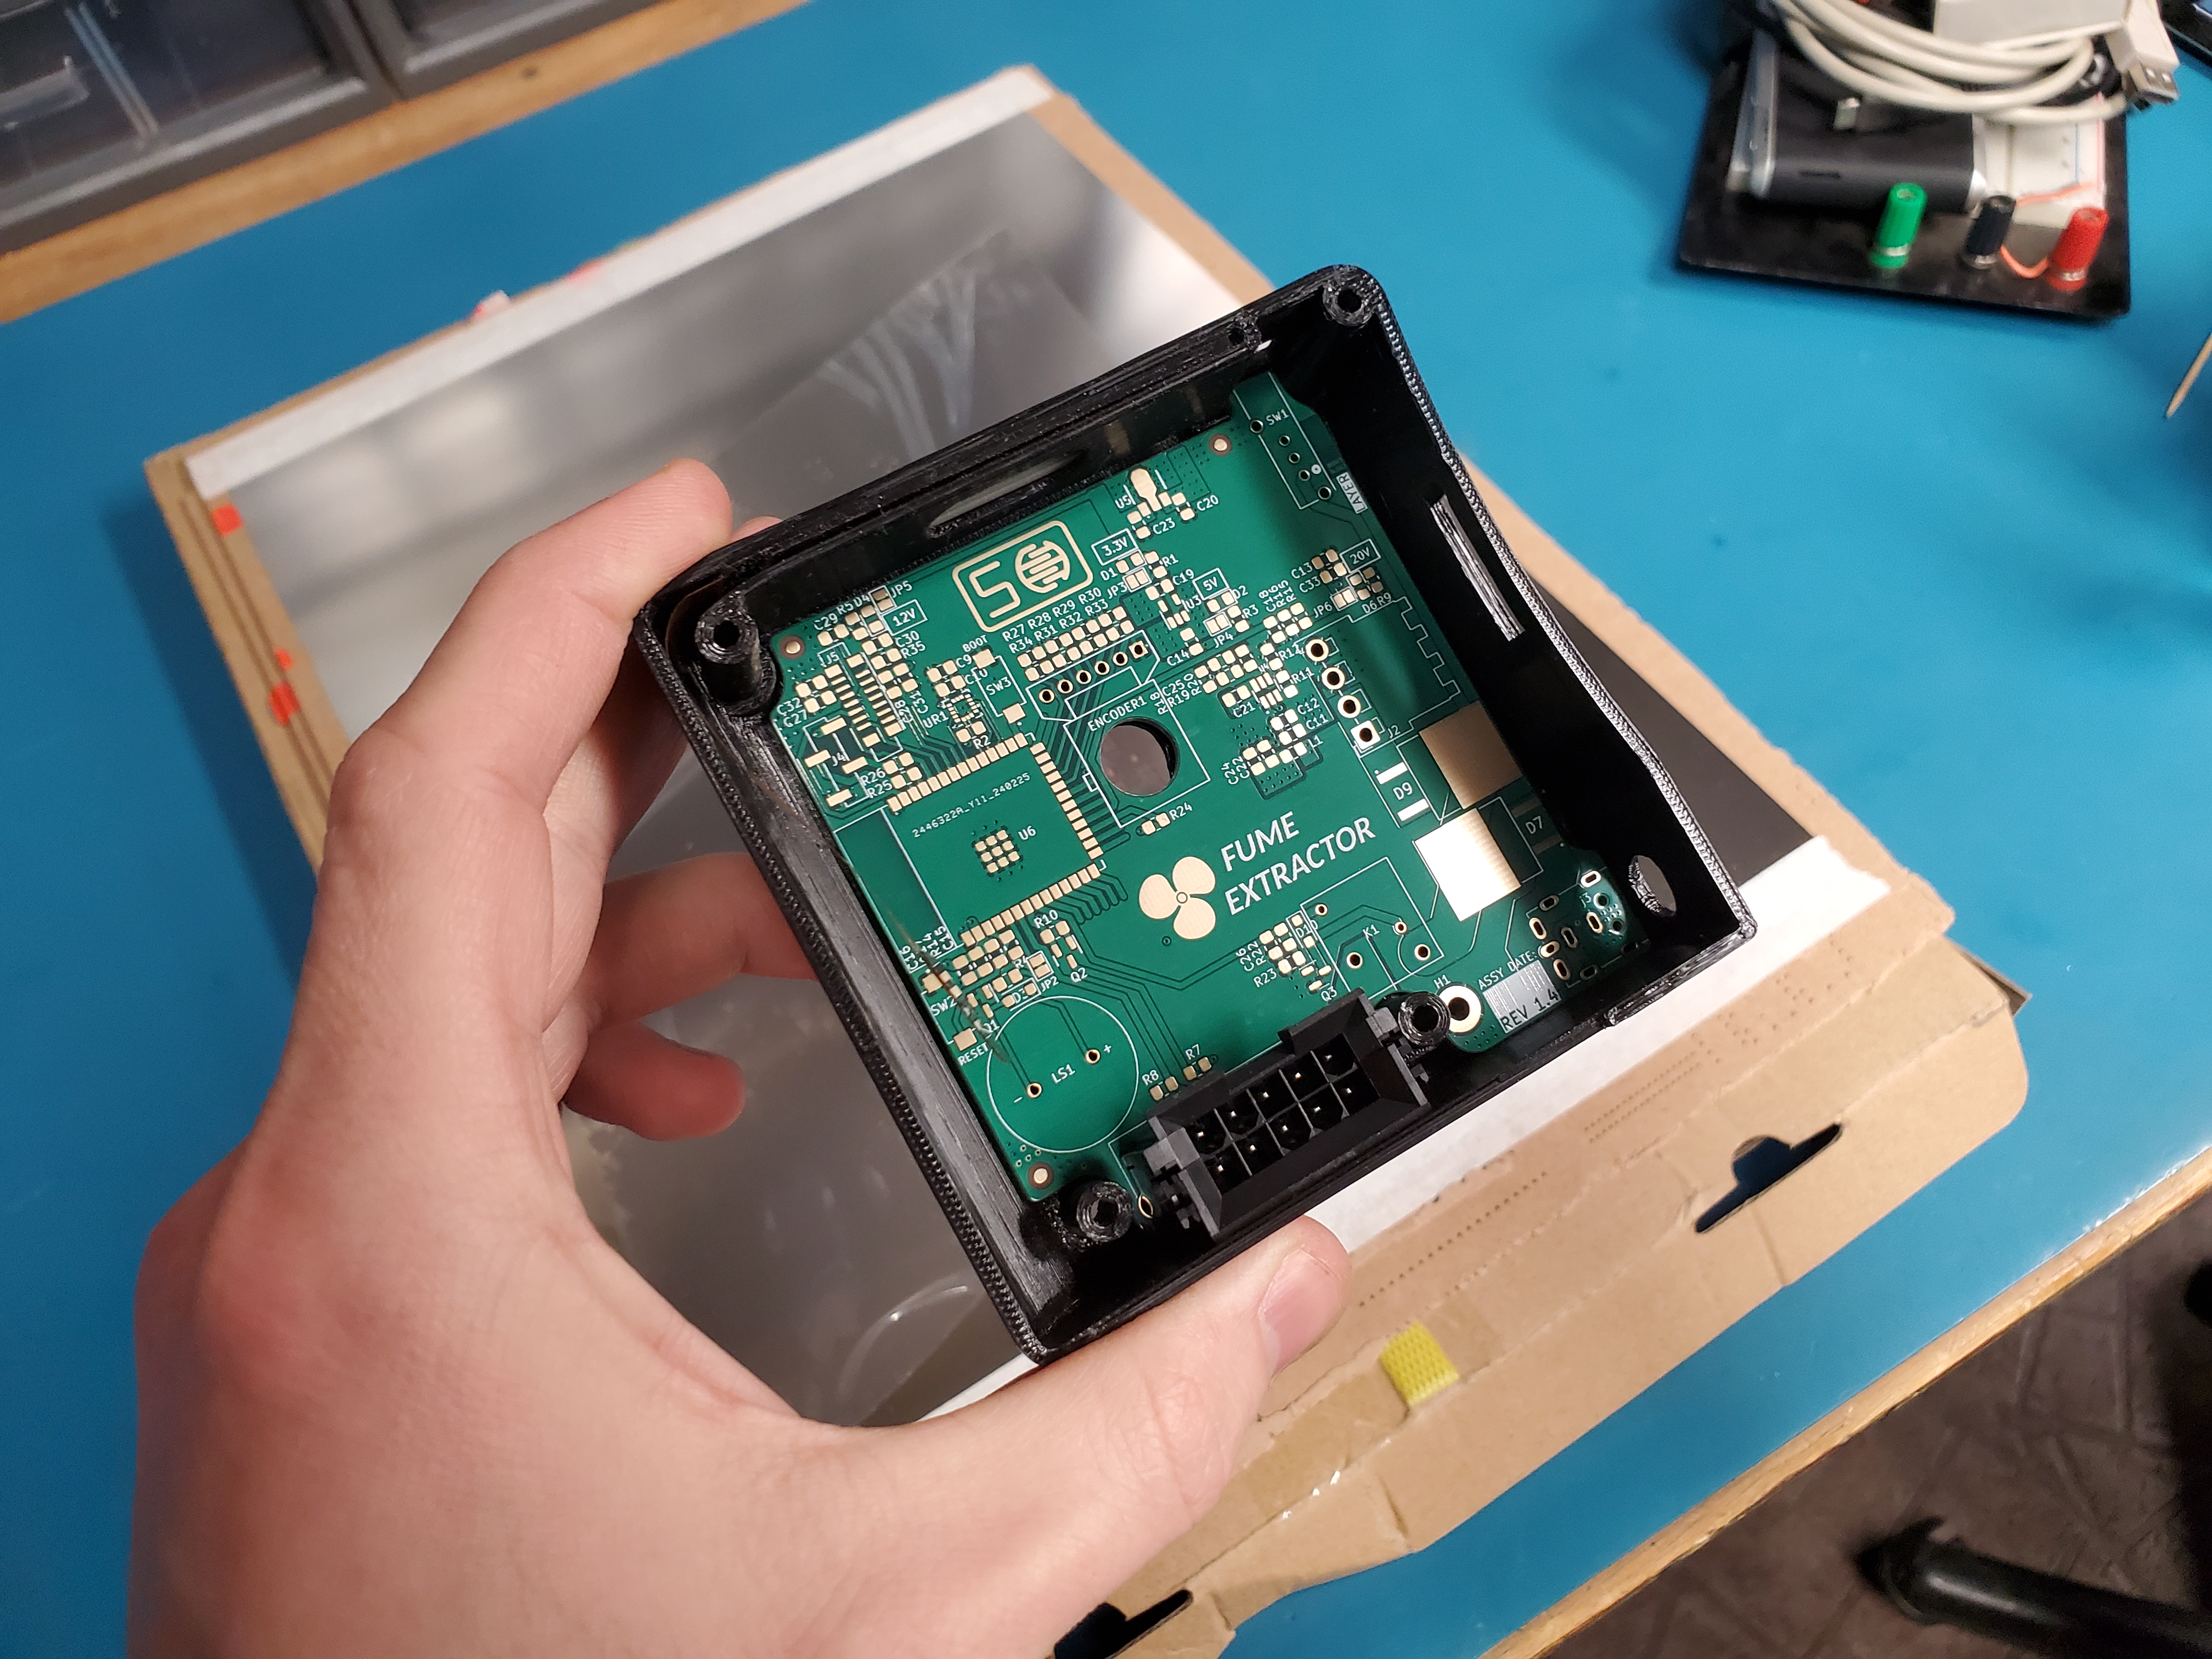
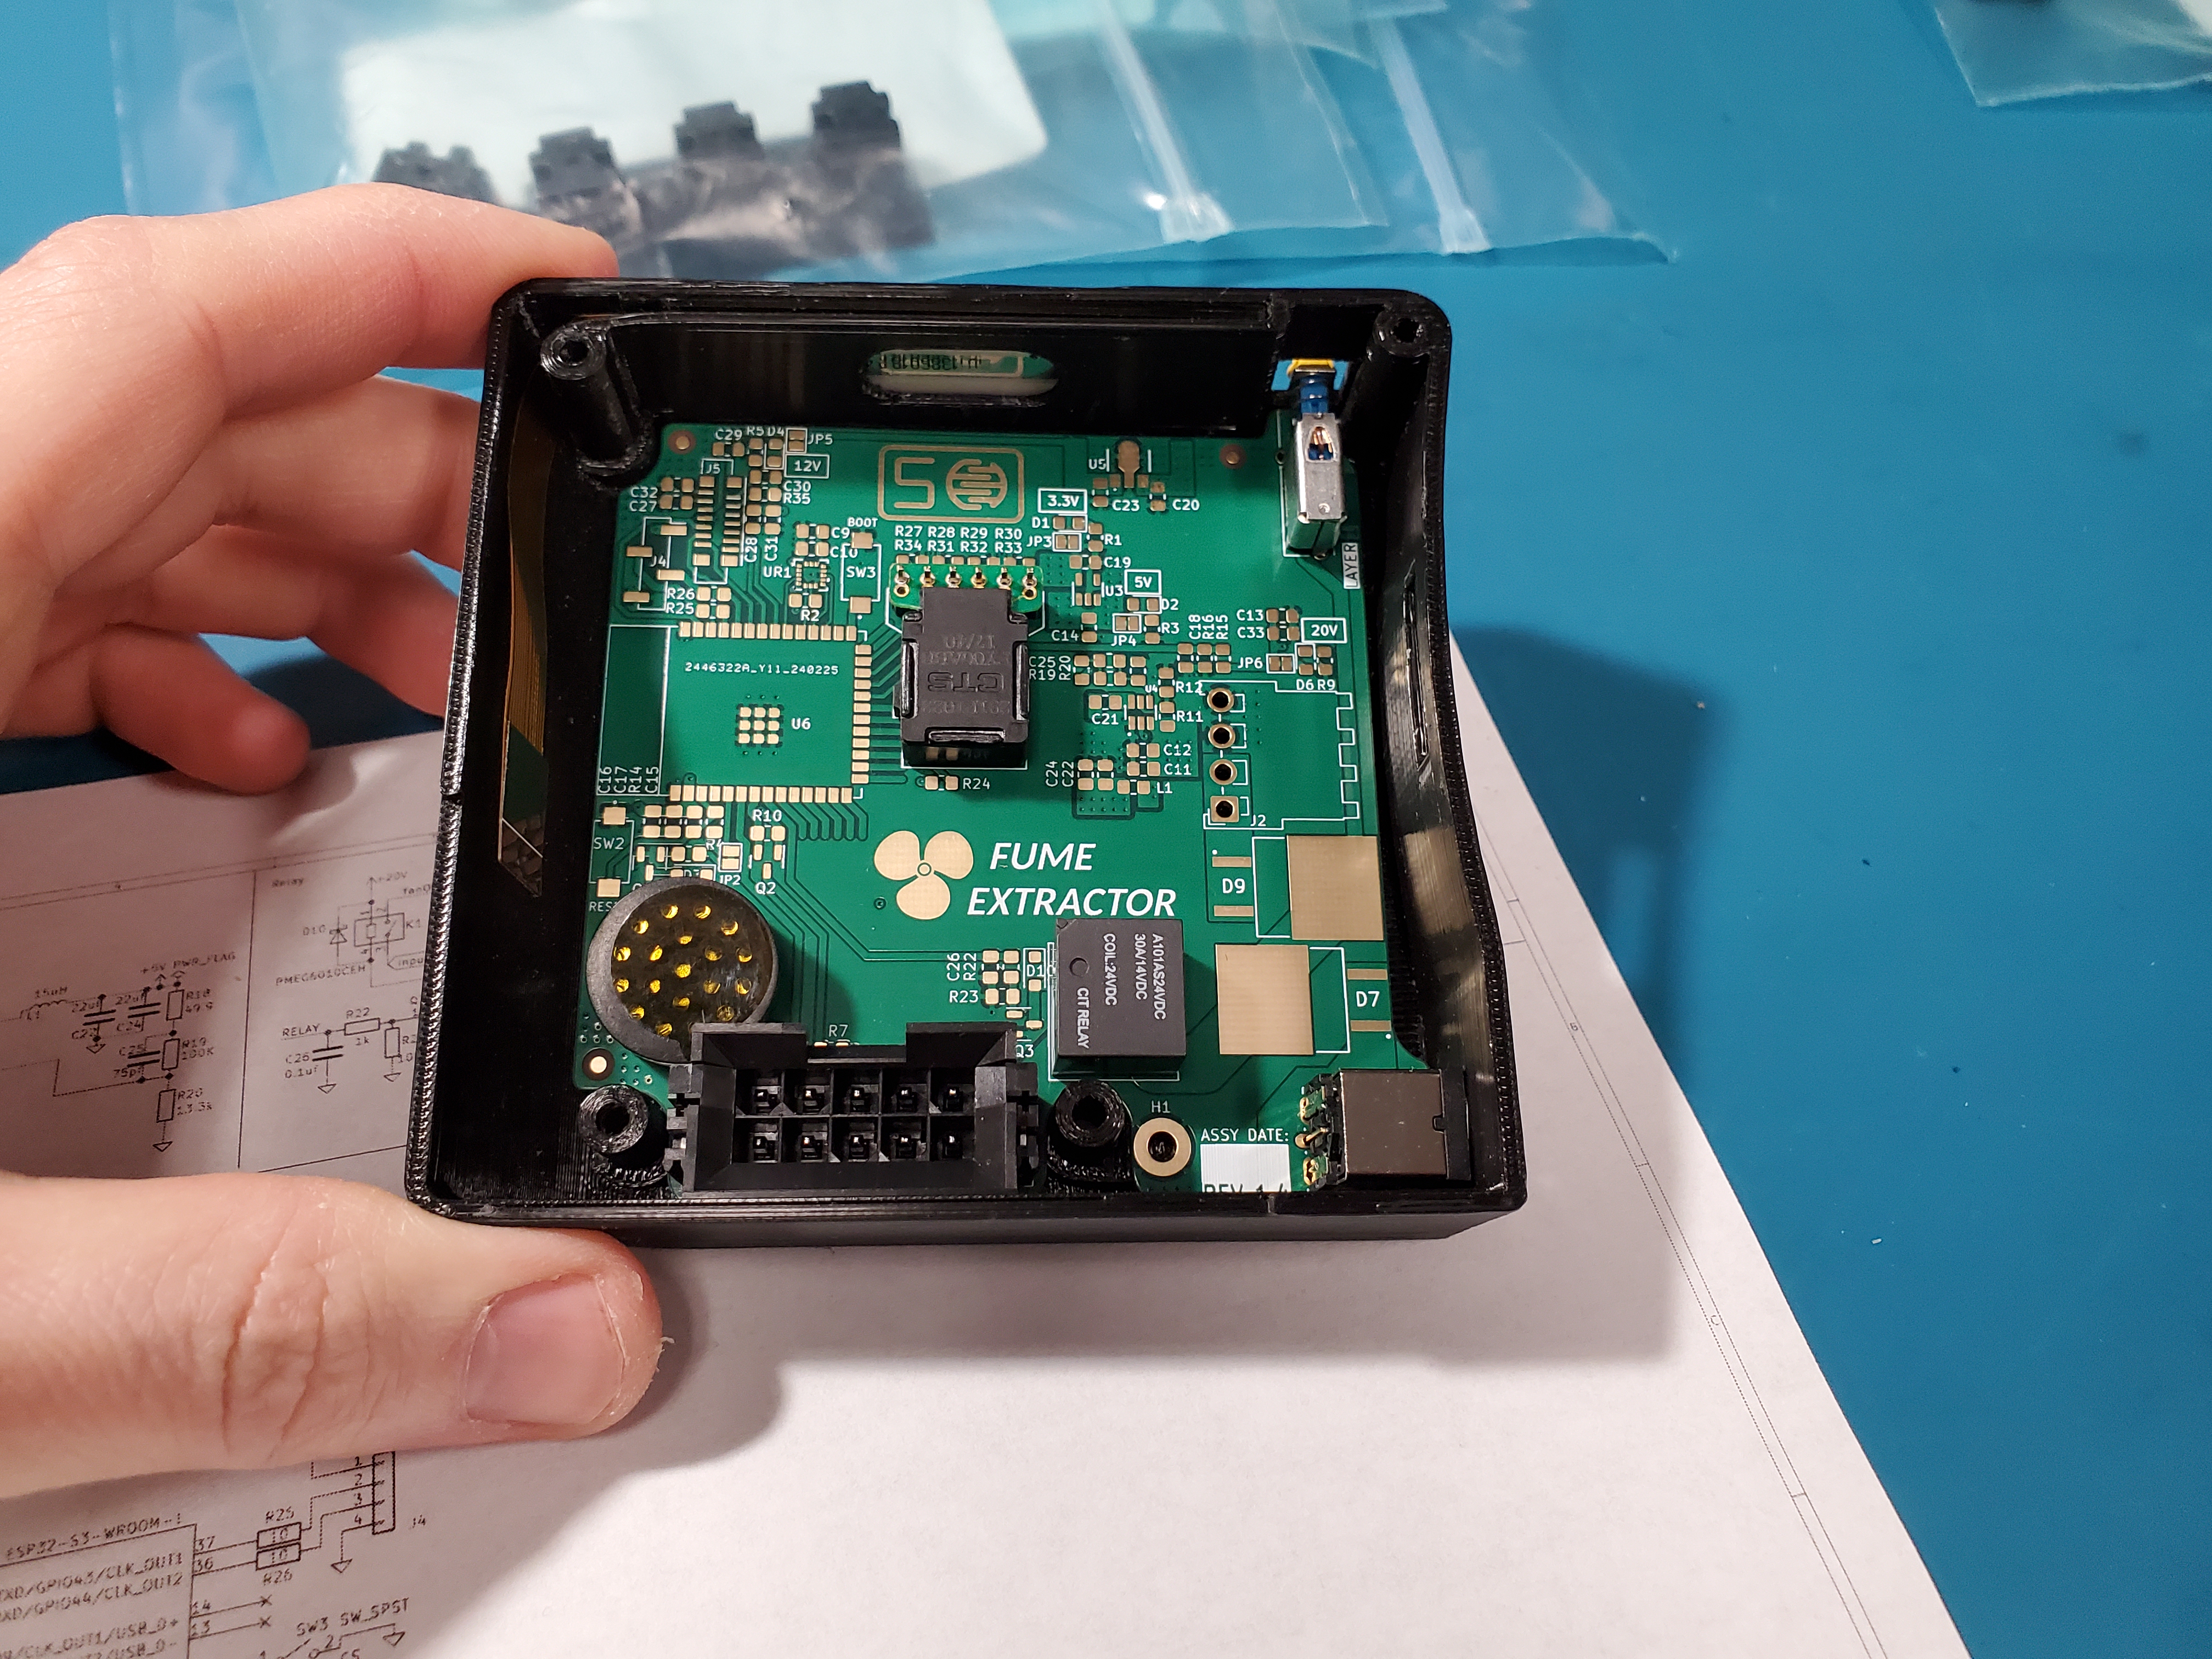
These are photos of the initial bring-up process. It's important to test a newly designed board rail by rail to know if there are any unforeseen problems with the PCB as it's built in stages. In this case, the overall DC power-on sequence is 20v > 12v > 5v and 3.3v.
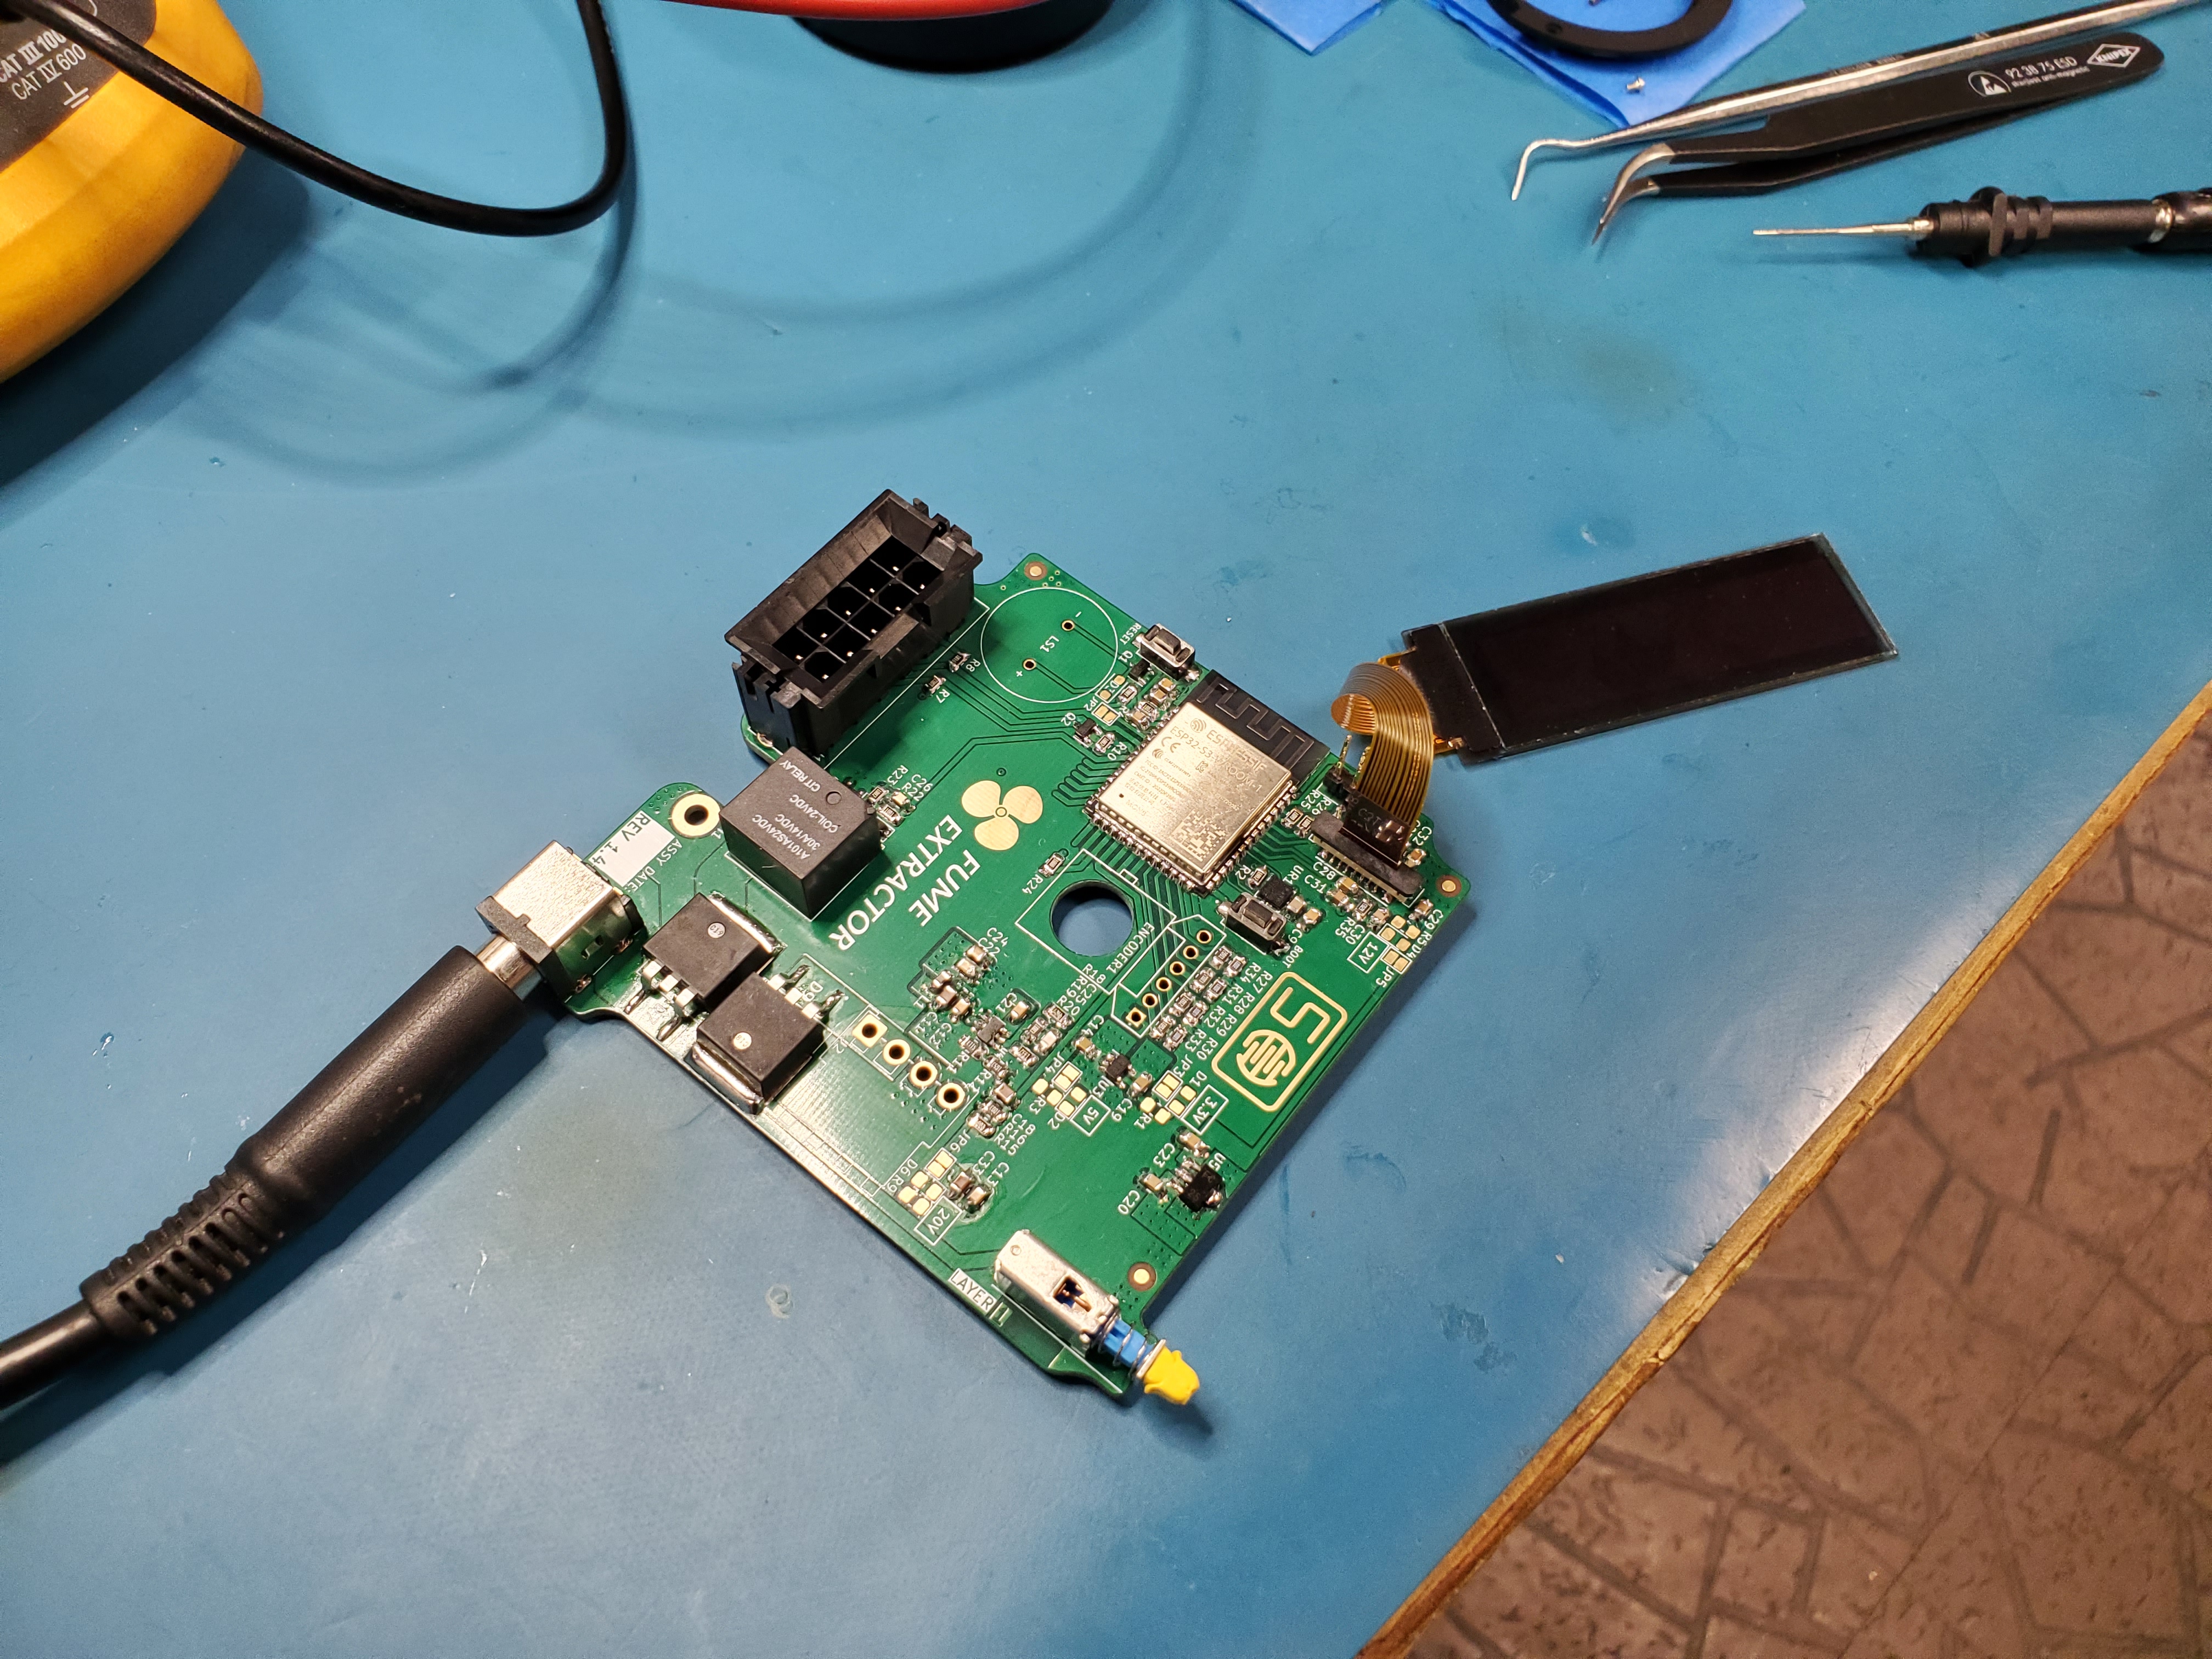
This is a test of the 2.08in OLED in the plastic housing. it fit like a glove and more importantly, had plenty of clearance and bend radius for the flex cable. The recommended manufacturer bend radius is 2mm diameter. This is nearly 10. A loop around a mount extrusion offered a great location for ease in assembly and flex cable protection. Mega thanks to the U8g2 OLED library. It is incredibly convenient and offers support to many obscure OLED panels.

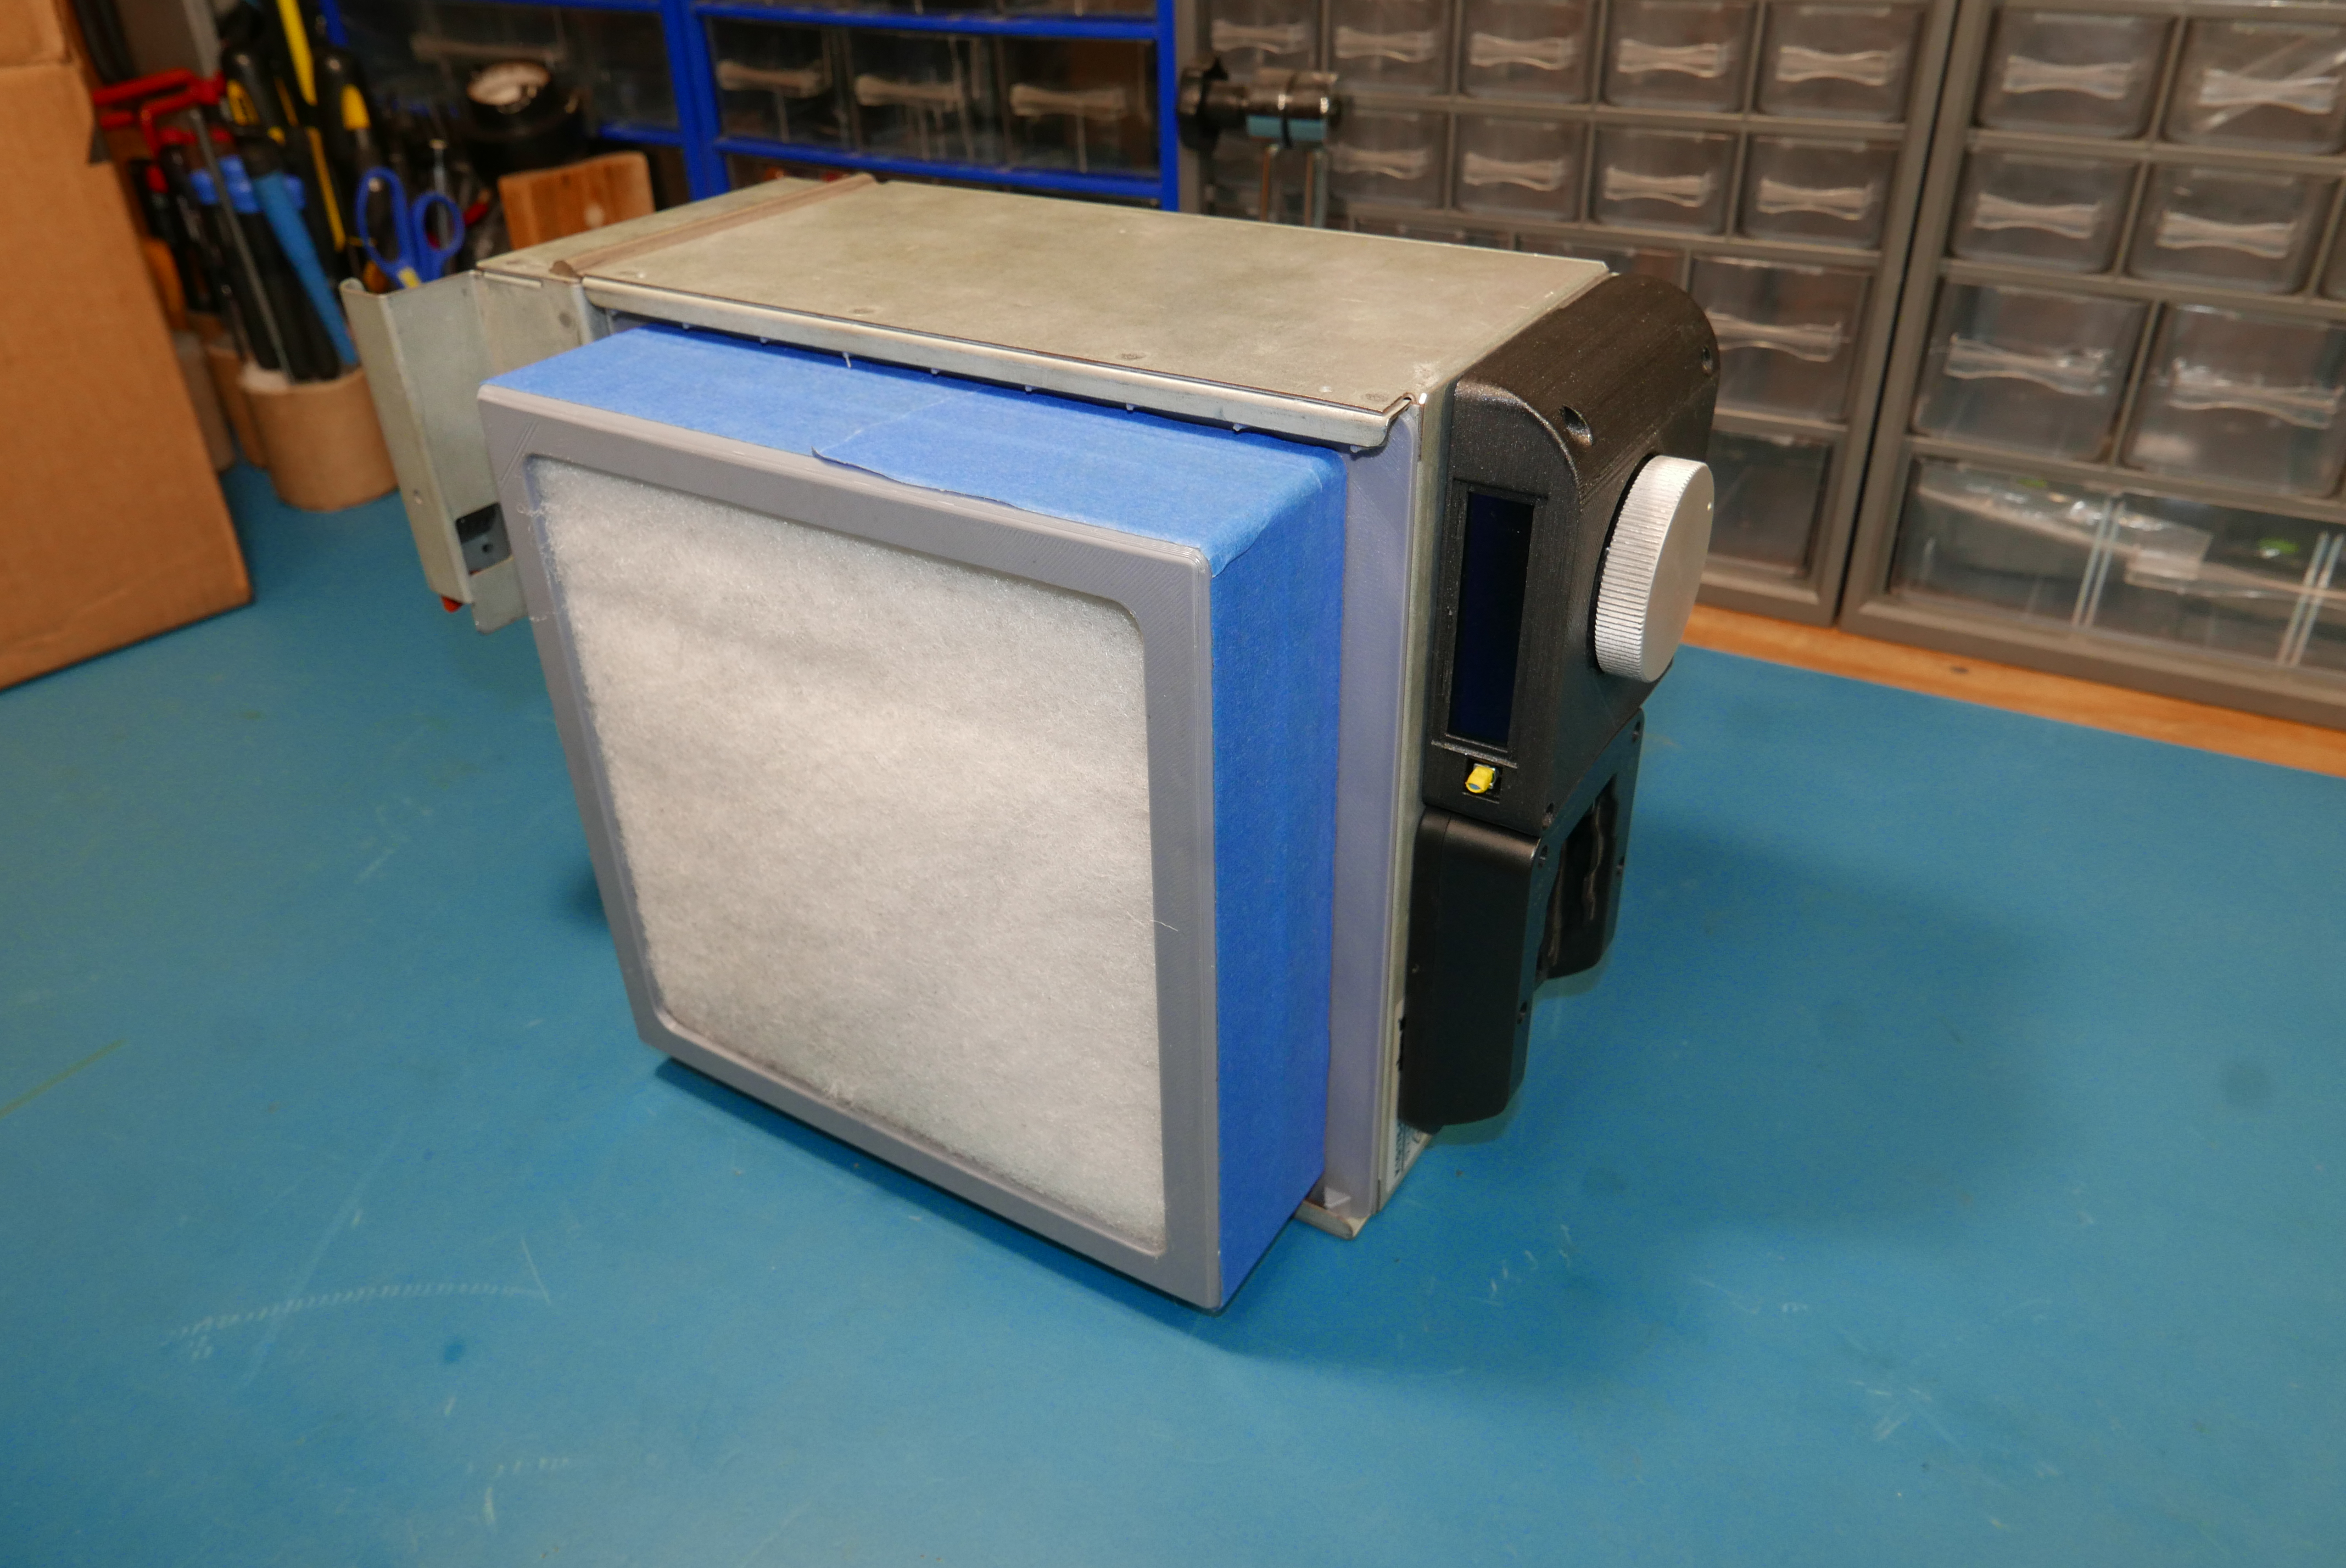
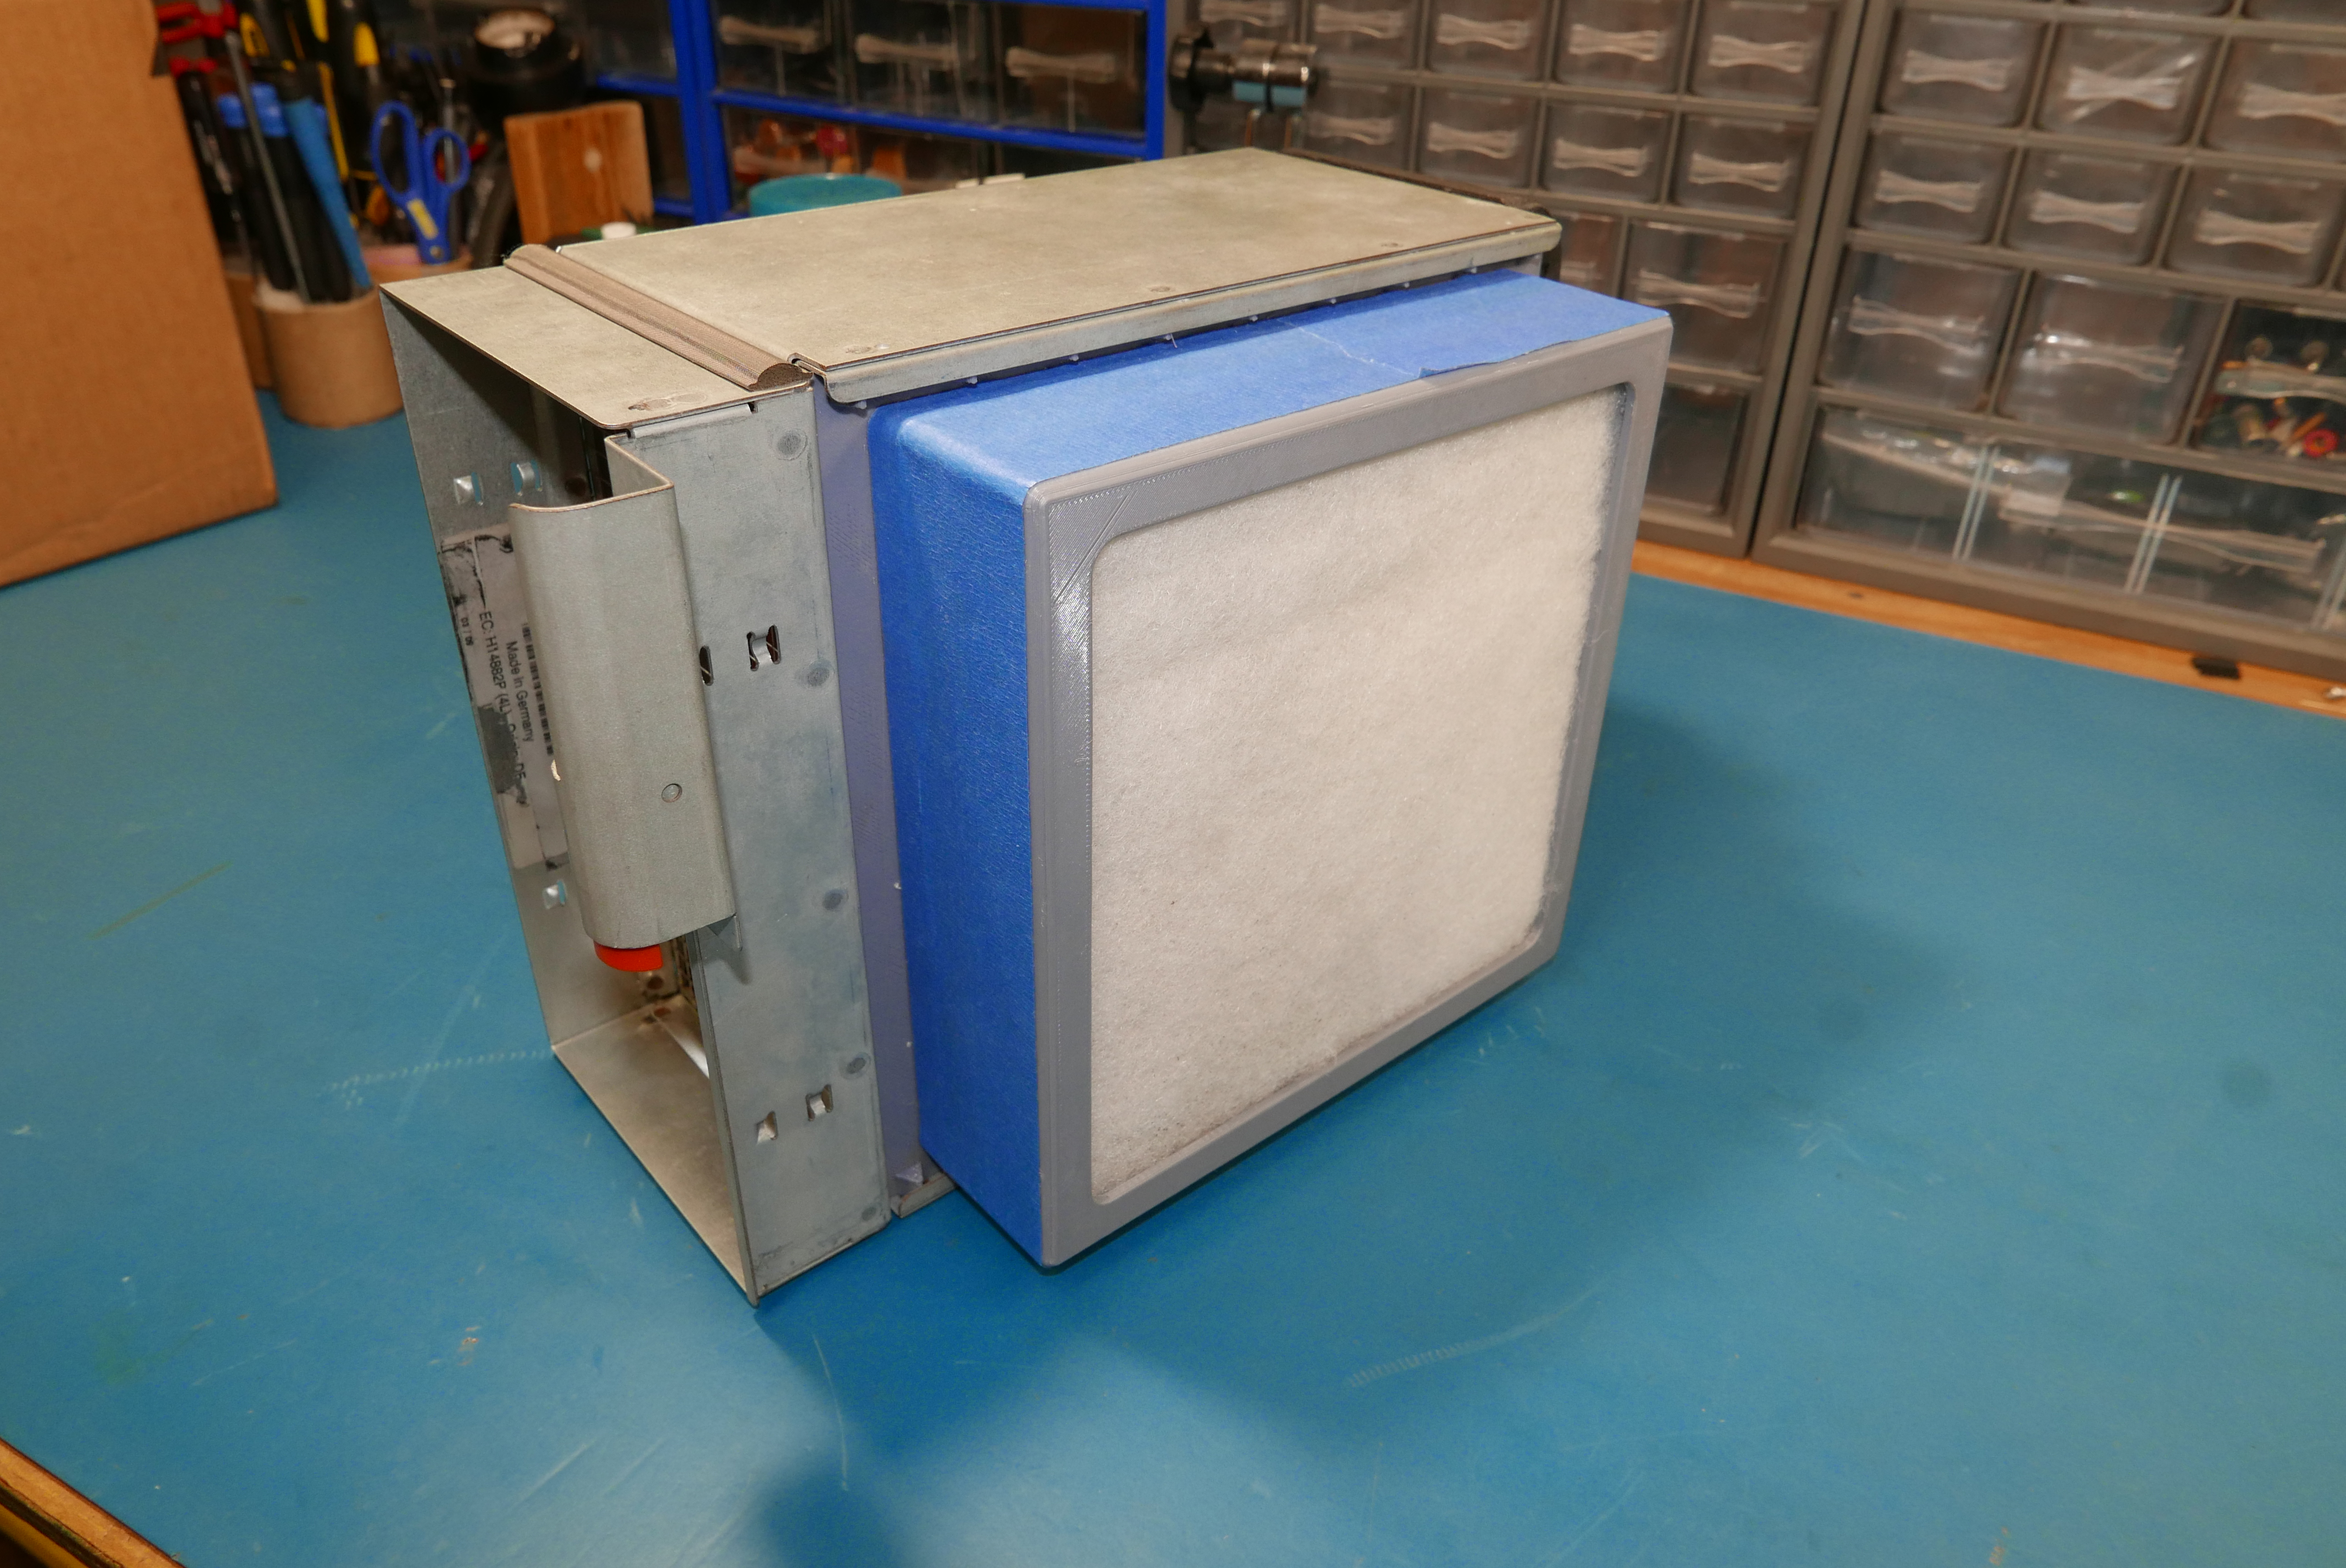
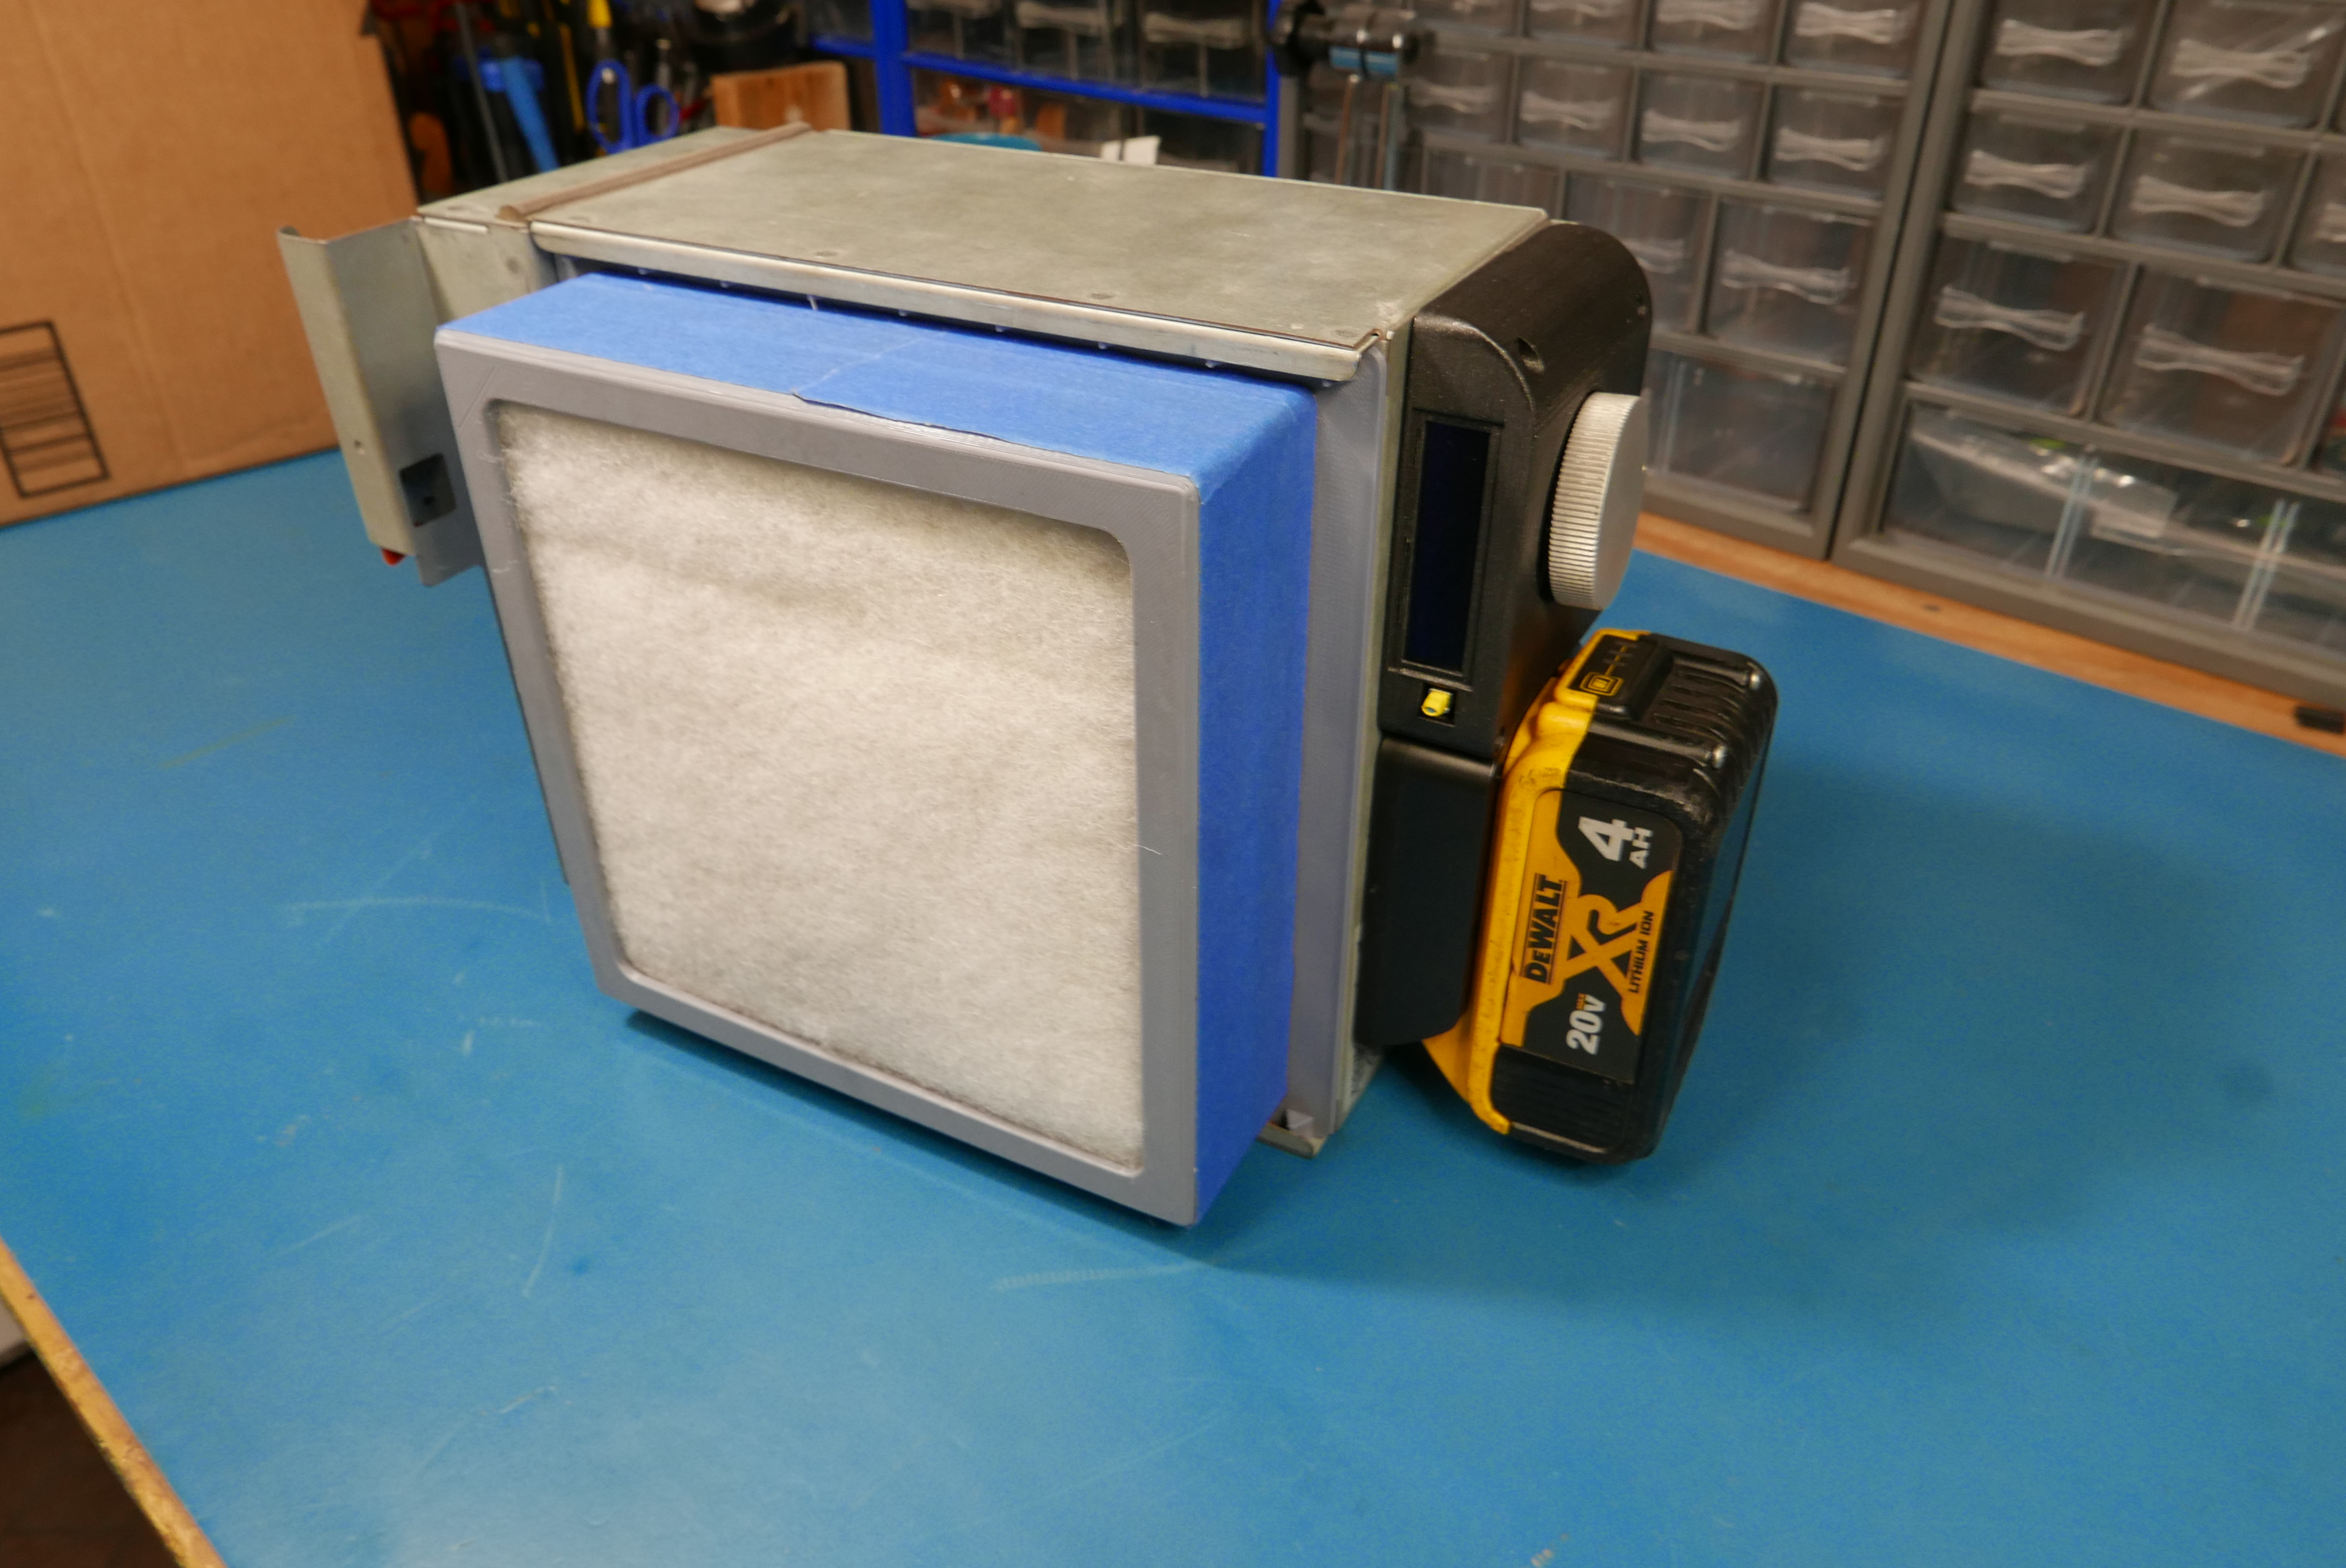
Final Assembly in shell
Non-Beauty Shots
The Business end

Want more? Here's a behind the scenes look at my workspace and some of the images that did not make the cut to be included in the write-up: